1.1 Using Status Details to Track Applicants
Once you start assigning applicants using the Evaluations>Evaluation Setup>Assignments, the Status of your applicants will automatically be set to “Under Committee Review”.
Therefore, if you have multiple stages or steps to your Evaluation Process, it is best practice to create Status Details for each stage of your process, this will help you track your applicants throughout the evaluation stages.
Examples of using Status Details to track applicants in the Evaluation Process:
- Your applicants have “Submitted” their application and you need to check for compliance and confirm that all documentation has been received, or you need to complete additional questions in the Staff section, or you have some other step prior to assigning them for review that you need to track where you are on that step. You can create a Status Details for tracking, and once you complete this check or steps, change the applicant to show that Status Detail. Then when looking at the Review reports you can determine who of your “Submitted” applicants you have completed and who hasn’t been completed by looking for this Status Detail.
- You have multiple stages in you review process and in each stage need to qualify applicants that are “Under Committee Review” to move forward or stop at that stage and not be qualified to move forward. Since this is the case, when you see the Status of “Under Committee Review” you need more detail about where they are in the review process. You can create multiple Status Details, two for each stage, one for the qualifying and on for this disqualifying. Then when assigning for the next stage, you can filter on the Status of “Under Committee Review” and the Status Detail for the qualifying of the previous stage and only get a listing of those applicants that have qualified to move forward.
Important: Once you determine all the Status Detail types you will need, you will need to have you Global Admin create those for you in the Administration>Status Details setup. Once they have been setup and activated they will be available in all Status Detail Dropdown menus for your use.
1.2 Setting up the Evaluation Process:
There are three main steps to setting up your on-line evaluation process.
- Tasks – Create the separate evaluation task steps.
- Committees – Create committee groups and assign committees members to each group.
- Assignments -Assign applications to evaluation Tasks and assign committee members to review those applicants.
The evaluation setup will need to be created on each separate application form according to the application process type you are using:
1 to Many – (one application that is used to apply for multiple funding sources) setup the evaluation process on the application that applicants are using to apply to all your funding sources.
1:1 – (each funding source has its own application process) – setup your evaluation process on each separate application form.
Common Application – (one common application, that then, automatically, pushes data down to separate funding source applications) – setup your evaluation process for each separate funding source on that funding source’s child application, not on the common application form.
Two-stage, two application process – (you have applicant’s apply to one application form, then after internal qualification by staff on the first level, they are directed via an application link in the first application to an additional application to finalize the application for a specific funding source) – depending on how you review the first level application, you may need to setup your evaluation process on the first level application as well as the additional application. If both application levels need to have a review process setup to review those applicant’s involved, then you will need to set up each application with its own evaluation setup process to effectively review in each level.
The setup of the evaluation process is all completed under the Evaluation Setup dashboard.
1.3 Accessing the Evaluation Setup – Dashboard
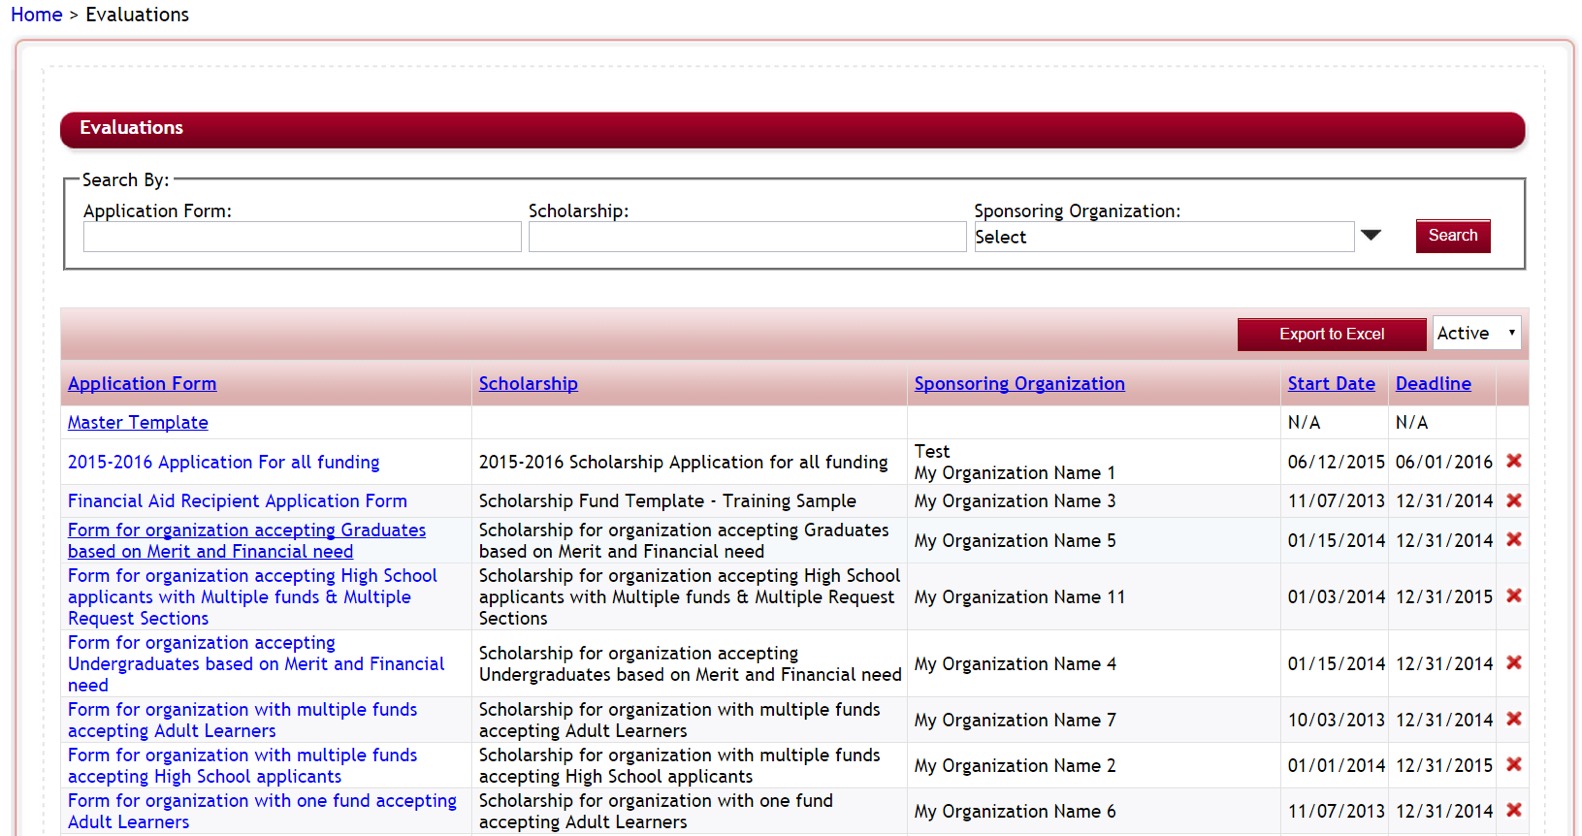
Step 1: From the Home dashboard select the Evaluations icon or you can access it by clicking on Evaluations in the Navigation link at the bottom of the page.

Step 2: This will direct you to the Evaluation application’s listing. Select the application you want to setup your evaluation process on, by clicking on the application name under the Application Form Column.
Step 3: You will be directed to that application’s Evaluations dashboard.
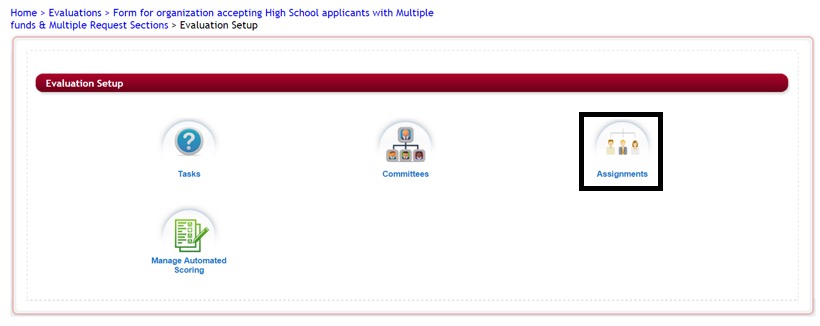
Step 4: Select the Evaluation Setup icon

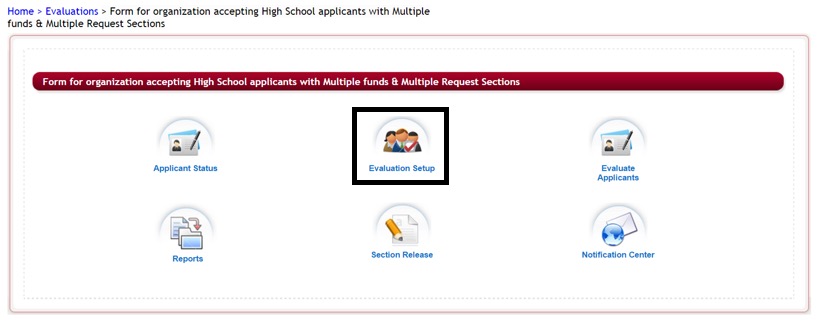
Step 5: This will open the Evaluation Setup dashboard:
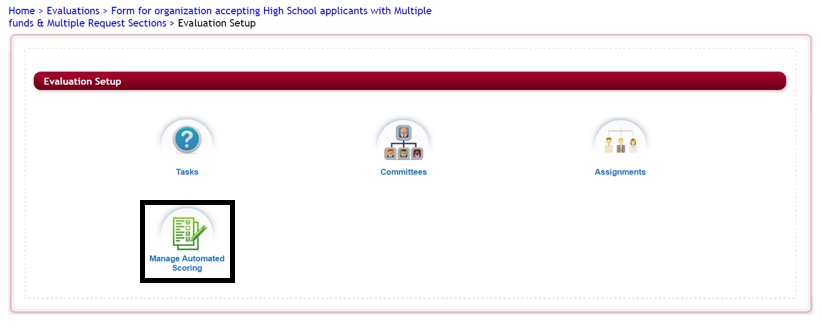
1.4 Overview of the Evaluation Setup Dashboard
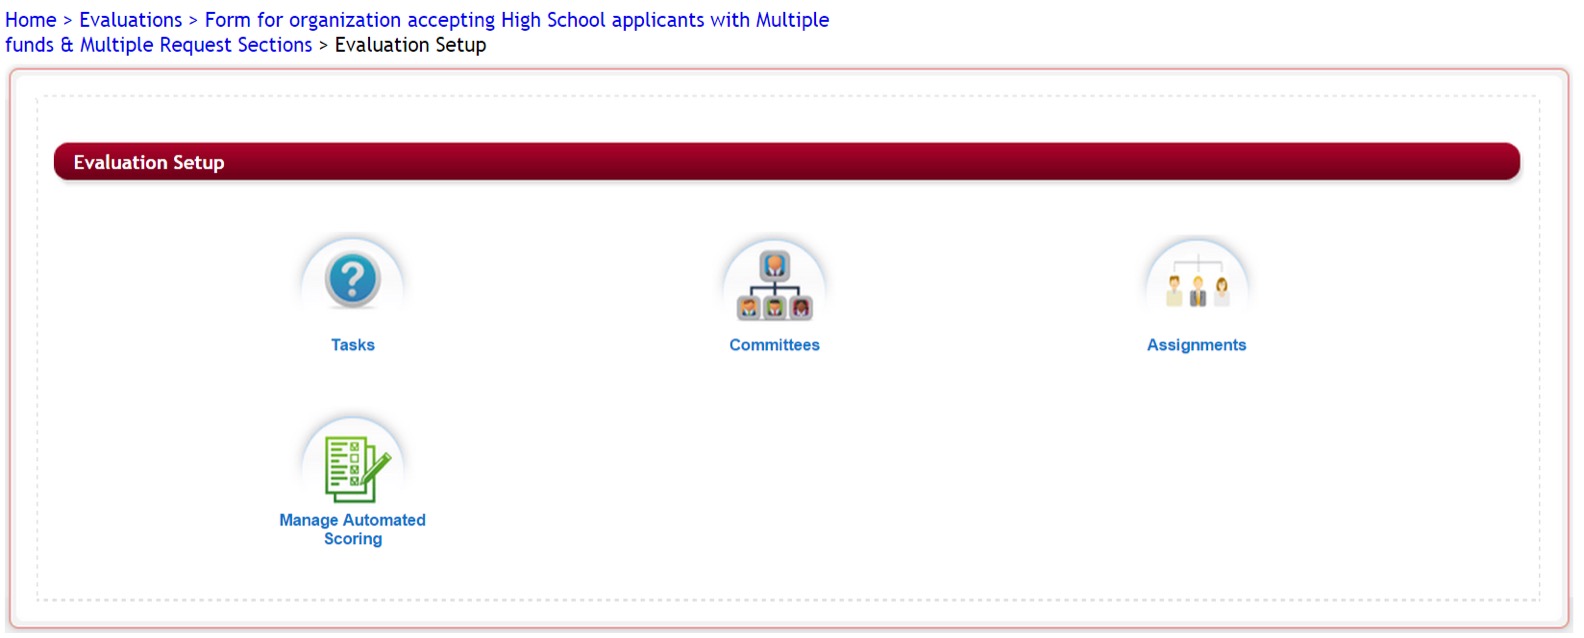
The Evaluation Setup dashboard consists of four icons:
Tasks: The tasks used to complete your evaluation process. Tasks are where you would create the actual score cards that are used when scoring your applicants, as well as any task that you want to assign to specific staff and reviewers to complete and be able monitor the completion of the tasks.
Committees: the review committees and staff committees that will be performing the various tasks in your evaluation process.
Assignments: where you would assign applicants to the tasks and the committees to those tasks and applicants.
Manage Automated Scoring: allows you to set up automatic scores that would automatically assign a score to a question if the applicant answered a specific value.
1.5 Creating an Evaluation Task
- When would I need to set up a task?
- Any time you have a stage in your process that requires you to assign applicants to be reviewed by staff or a review committee, where they need to answer a question, series of questions, or enter a comment about that applicant, and you need to know how each separate reviewer or staff member answered that specific question, or comment for each applicant.
- You need to setup a scoring rubric and assign your review committee to score applicants based on that scoring rubric.
- When would I not need to set up a task?
You have multiple staff members reviewing for compliance but don’t need to track if they have completed their assignments or not, you could get by with just having that staff member change the applicants Status Detail to show the stage has been completed.
1.5.1 How many tasks should I set up for my evaluation process?
There are times when you can set up one task for all your reviewers to reviewer, but there may be instances when you may need to add multiple tasks to an evaluation process. The following are some scenarios are clients have had:
There are times when you can set up one task for all your reviewers to reviewer, but there may be instances when you may need to add multiple tasks to an evaluation process. The following are some scenarios are clients have had:
- One to One application form (or a common application process reviewing the separate funding source application form)
- One committee reviews one time and the review is completed – only one task for that process is required.
- I have multiple stages in my review process that I need to view scoring on to move the applicants to the next stage – create a task for each stage in the process, making sure to turn that task off once it has been completed by unchecking the “Display of Review Reports”.
- One to Many application form
- One committee reviews all the applicants that have applied using the same scoring task to review them. Then the applicants are matched to their funding sources that they qualify to. Those applicants that scored the highest are then awarded the fund. – create one task for the scoring review.
- One Committee reviews all the applicants that have applied but there are multiple stages in the review process but each process has the same scoring task to review them. - Create a task for each separate stage. Check the “Display on Review Reports” on only the active stage. Then Make sure to uncheck the “Display on Review reports” once that stage is completed before moving to the next task, and then “Check the Display on Review reports for the next task in sequence.
- One committee reviews all the funding sources, but each funding source has its own scoring system and applicants could be reviewed multiple times if they are matched in more than one funding source. Each review could have a different score due to each funding source having different requirements. – create a task for each separate funding source. Make sure when viewing the applicant’s scores you have only that task active and marked “Display on Review Reports”, and all the others turned off with the “Display on Review Reports” unchecked, to be able to see only that applicant’s score for that specific task. If you also had different stages for each funding source, you would need to create each stage as a separate task for each funding source.
- There are different Committees that review different funding sources each committee uses the same scoring task, but there could be crossover of applicants matching to multiple funding sources that are reviewed by different committees. Some of those committees may review multiple funds by the exact same committee, exact same members reviewing, (i.e. a foundation committee reviews all the funding sources that are foundation funds) but then other committees review separate funding sources that they are directly involved with.
- Each separate committee would have to have its own task to be able to track how the applicant scored on the separate funding source(s).
- If the same committeeis reviewing multiple funding sources, using the same scoring task and that score will not change on the same applicant if they are matched to more than one funding source that the same committee is reviewing, then you can create a task for that specific committee. When assigning the task, select all the funding sources at one time to assign all the applicants that match to all the funding sources at once to the committee reviewing that task. When reviewing the final scores for that committee, you will need to make sure that only that task is checked to Display on Review Reports, or the task is selected when awarding the individual funding to the applicants.
- There are different Committees that review different funding sources each committee has its own scoring task that is different from the others, or they have the same scoring task and reviewing multiple funding sources, but each applicant matched in that separate funding source score could be different in another funding source they matched to that the same committee is reviewing. For each individual funding source that the committee reviews, there would need to be a separate scoring task created. (I.e. if they reviewed one fund, then one task can be created for just that one committee, but if they review multiple funds, since each fund can have a different score, each separate fund has to have its own scoring task and assigned separately to the committee.) As you review the scores it is very important to make sure you have the correct task checked and activated using the “Display on Review Report”
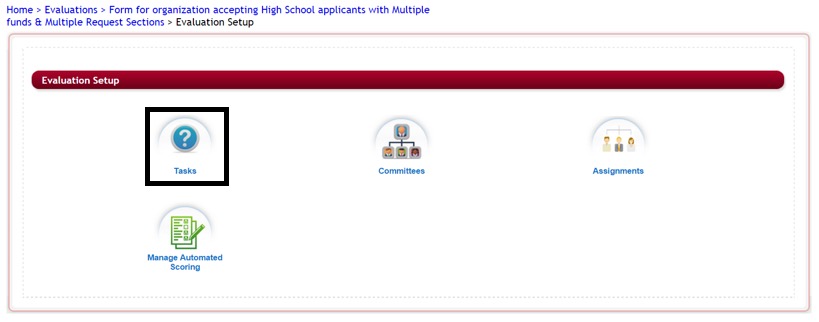
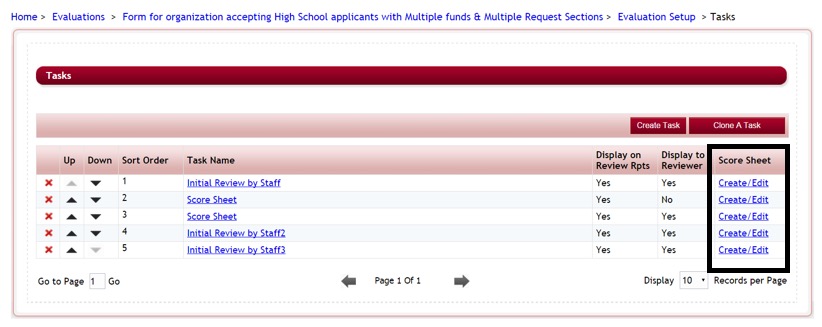
1.5.2 Create a Task
Step 1: While in the Evaluations Setup dashboard for your application, select the Tasks Icon.

Step 2: The Tasks listing will appear listing any tasks that have already been added to your application. If you have not created any tasks this listing will be empty.
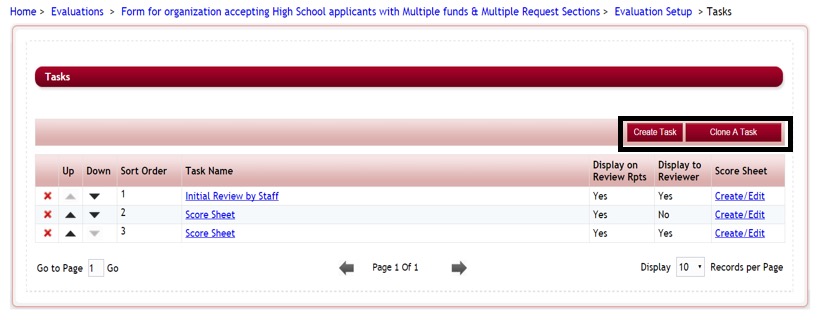
Step 3: You can clone an existing task or create a new task.

Step 3a Create Task – Click on the Create Task to create a New Task
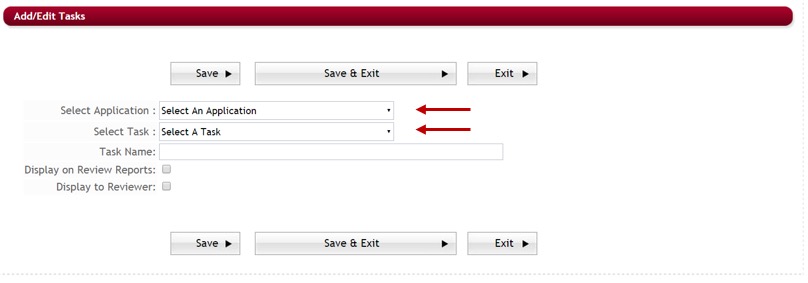
Step 3b Clone a Task – Click on the Clone Task to clone an existing task that you have created in another application form, or within this same application form. Cloning a task will clone all the questions from the prior task and allow you to keep the XML name for the questions in each task the same. This is useful when you have multiple applications or funding sources that use the same scoring rubric but need separate review tasks for each funding source or application. This is also helpful for when the reviewers are reviewing in the same application form, for different funding sources, that have the same scoring rubric. When the reviewer reviews an applicant they may have in another task, they can then have the option to have the same applicant’s scores pushed down from task to task without having to rescore that applicant again on the exact same questions.
Select the Application that contains the task you want to clone, and then select the task from that application.
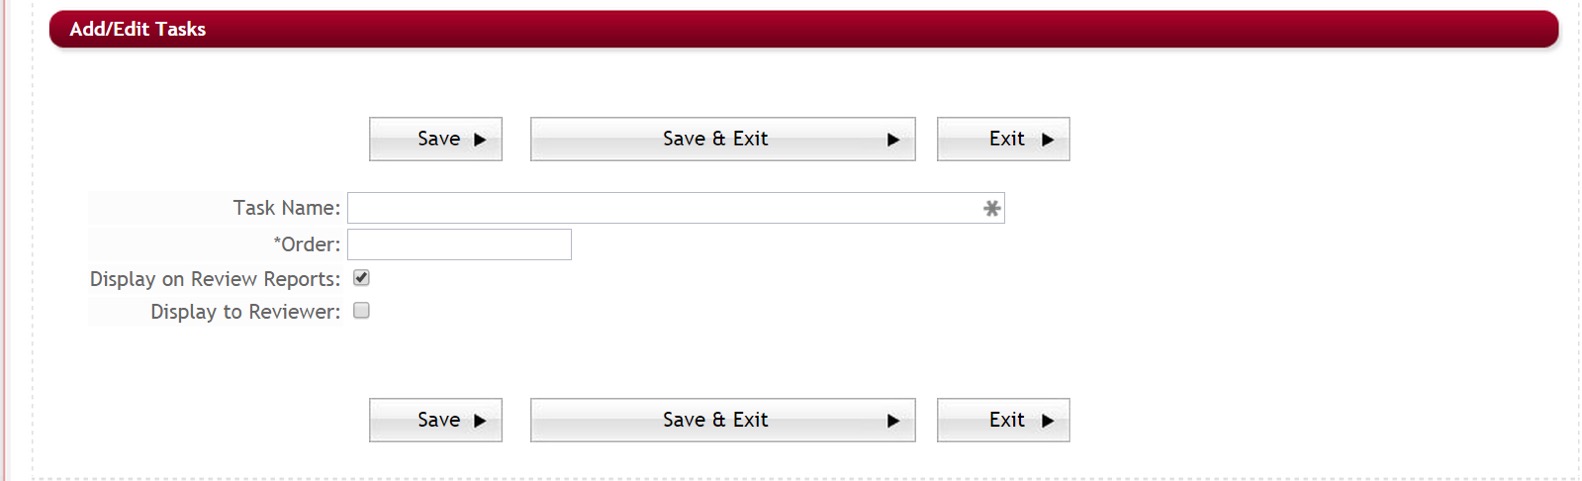
Step 4: Task Name – Assign a name to the task.
Best Practice Tip: When assigning a name to a task, think about how your reviewers will see this name. Make sure it is something that they will understand.
For Example:
When creating separate tasks that are needed for reviewing each separate funding source, it may be best to name the task the same name as that funding source, so that you reviewers better understand the task they are reviewing and its purpose. i.e. – Jones Scholarship Scoresheet
If you have multiple committees reviewing multiple funding sources using a task specific to their review process only that may be used by the same committee to review multiple funding sources at one time, you may decide to name the task after that committee. i.e. – Foundation Committee Scoresheet – reviews all the foundation funding sources using the same scoresheet.
If you have a review process that is done in separate steps/stages name the review task with that specific step/stage: i.e. – Qualification Review, Scoring Round 1, Scoring Round 2, etc.

Step 5: Order – Select the Task order – this is the stage order that the task is performed during your evaluation process.
Step 6: Display on Review Reports: When viewing the average scoring on tasks in the Evaluate Applicants>Review Results, the Avg. Score column, in that report, will show the total combined average score for that applicant of all tasks that have the “Display on Review Reports” selected at the time you view it. Therefore, if you only want to see the average score for one task at a time, you will need to unselect all the score cards you do not want to view and select only the score card you do want to review.
- Note: that in order to assign the committees and applicants to a task, that task must have the Display on Review Reports selected. Then when you are ready to view the scoring results for each task in the Review Results, you will need to unselect all the tasks, except the task you want to review. When you are ready to move to the next task, unselect the prior and select the new.
Step 7: Display to Reviewer: Select this for the task to appear on the Reviewers dashboard. Once your review process is complete you can unselect this so that your reviewers can not go in and change their scores at a later time.
Step 8: Click on Save or Save and Exit, to return to the Task listing.
Note: you will need to create a separate task for each stage in your evaluation process. If you have different review processes, or different committtes on each funding source you will need to create a different task for each funding source. However, if you have funding sources that have the exact same scoring rubric on every funding source, and the committee members are the exact same on every funding source review, and the scores would not be different from one funding source to another, you can create one task to use for all those funding sources.
1.5.3 Editing a Task/Evaluation Step
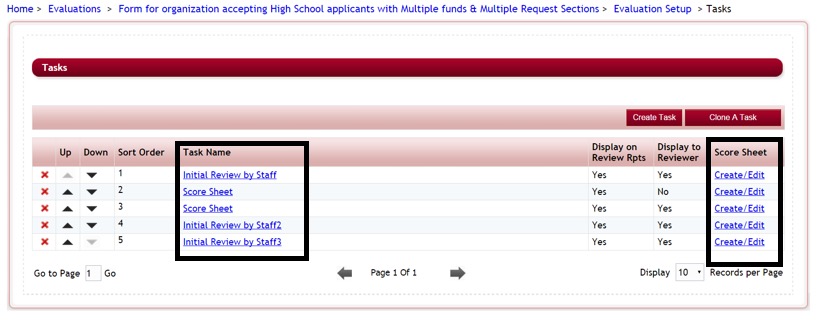
Once you have created a new task it will show in the listing of Tasks.
- To Edit a Task Name, click on the Task Name to open the Add/Edit Tasks. Be sure to Click on Save or Save and Exit to save any changes you have made.
- To Edit a Task score sheet or questions, click on the Create/Edit under the Score Sheet column
1.5.4 Deleting a Task/Evaluation Step
To Delete a Task, click on the red “X” next to the Task Name in the task listing.
Caution: deleting a task will delete any data entered on that task by your reviewers.
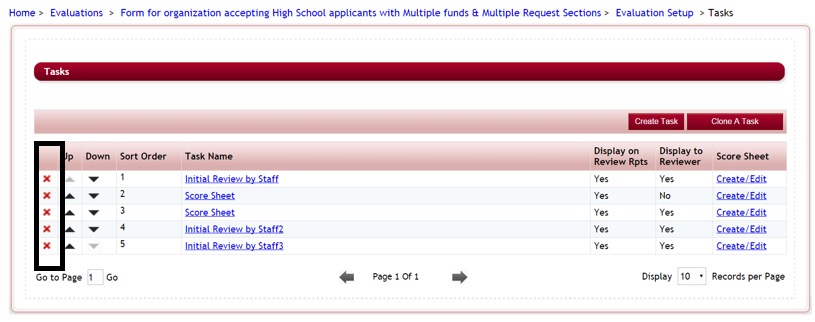
You will receive the System Message confirming the deletion

Select yes and you will receive a Status update that the task/step has been deleted.

Select OK and you will return to the Task listing.
1.5.5 Adding a Score Sheet or Questions to a task
In order to track completion of a task, depending on the type of task(s) you have, you will need to add either basic questions for your reviewers to answer, or create your scoring question(s) for your online scoring task(s).
Step 1: While in the Evaluations Setup>Tasks listing, click on the Create/Edit located to the right of the task under the Score Sheet column.
Step 2a: If this was not a cloned task, then when you first open this section it will appear blank with no questions listed.

Step 2b: If you cloned this task from another task, then the cloned questions should appear in the question’s listing.
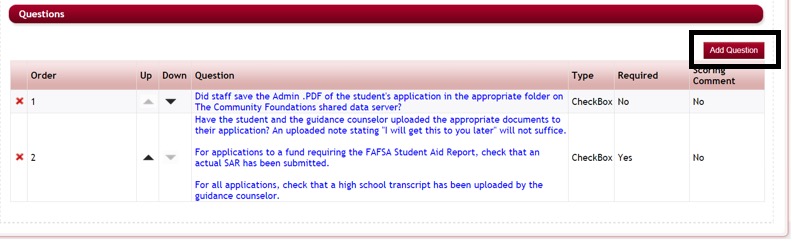
Step 3: Click on the Add Question button, to add a new question, or click on the actual question name to update an existing question. See the sub-sections following, for more details on creating specific question types.
Questions are added and formatted in the same manner they are added to an Application.
You can create questions that the reviewers have to answer, i.e. essays, text, yes/no, etc. or create questions where the reviewer has to type a numeric score or chose from a dropdown listing of pre-defined scores that will calculate the total score for the review, i.e. numeric or dropdown.
Important: A score card task can contain any combination of question types available.However,only the questions in that score card task that are formattedas either a Numeric or a Dropdown question type will be calculated on and included in the scoring total. Questions formatted as any other question type will not be added to the scoring total.
1.5.5.1 Using the Question Editor Box When Creating Task Questions
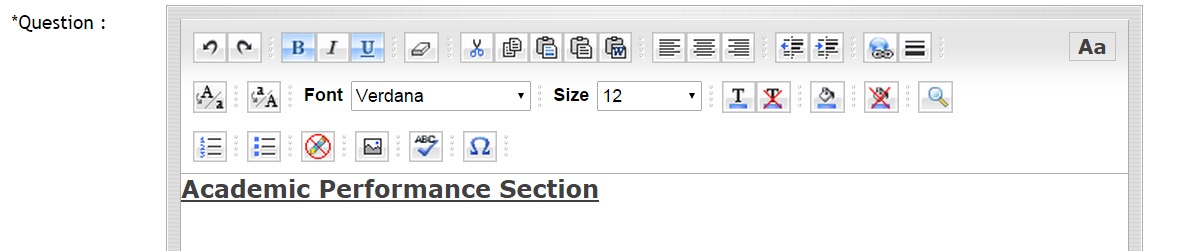
Question: Enter the task question that is to be answered by the reviewer for a specific task in the Question editor box. If you desire to enter this text using HTML coding, you can do so by clicking on the HTML text tab at the bottom of the editor box.
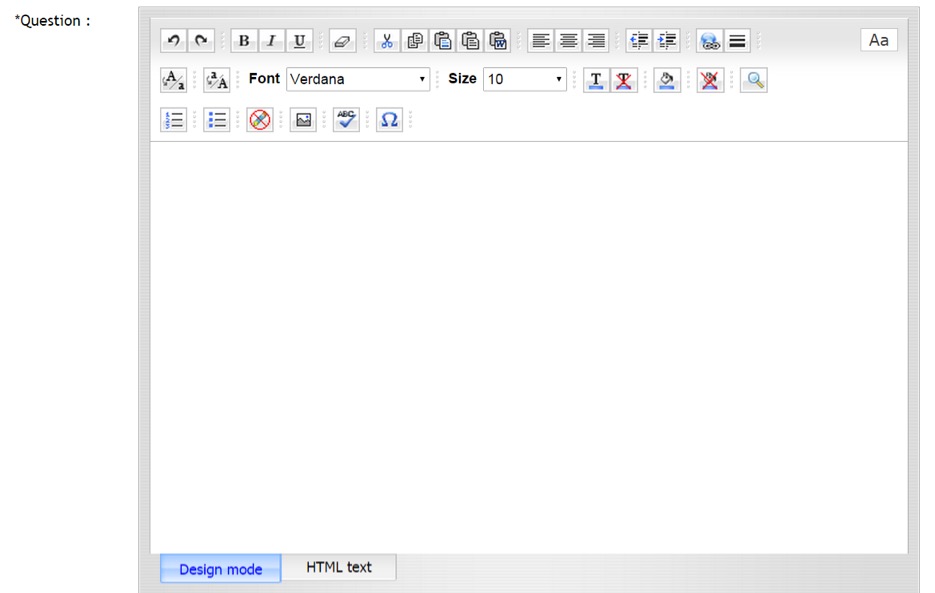
Note: The way you format the question in the editor box, is how the actual question will appear in the reviewer’s dashboard.
Design Mode - This editor will allow you to format text similar to how you would do so in Microsoft Word. Using this feature you can change the font-size, color, style, etc., as well as add additional formatting features to your question as needed.
HTML text - If you desire to enter this text using HTML you can do so by clicking on the HTML text tab at the bottom of the editor box.
1.5.5.2 Adding a Bubble instructions
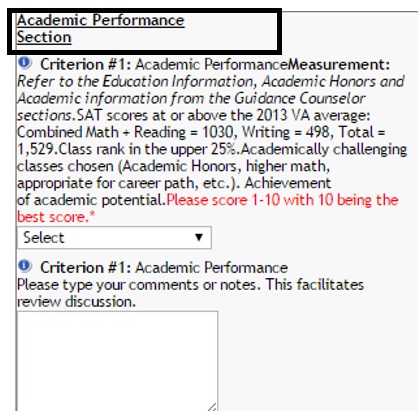
These instructions are brief helpful hints displayed to the reviewer regarding the information requested on this question. A blue icon will appear next to the question. When the reviewer places their cursor on this icon the information will be displayed to them. Enter any instruction for the question that will be helpful to the reviewer. If you have important detailed instructions regarding how to answer a question, it may be better to include that explanation as part of the Question itself or to add an additional “message type” question prior to this question. This will insure that the instructions are not missed by the reviewer.
![]()
Example of Bubble Instructions:
Question: Please enter your Date of Birth:
Bubble Instruction: use date format xx/xx/xxxx
1.5.5.4 Question XML Name
This is the abbreviated name that the database uses to refer to the question.
- The XML Name is very important when importing applicant data from one application to another or when integrating data from CommunityForce to another database.
- In order for this data extraction (mapping) to be successful, the source application’s task question and the destination application’s task question must have the same XML names.
- Once an application has been created, and data is being exported/imported, it is very important to never change this name in your application. When creating additional tasks that the reviewer can export/import scores from one task to the other task, so as not to have to reenter data, the Fields within the one task must have the same XML names as the fields of the new task they are importing data to be populated with.
The XML Name and the Report Excel Column Name should usually be the same except the XML Name eliminates spaces between words.
![]()
Example:
Question – Please enter your Last Name only:
Report/Excel Column Name – Last Name
Question XML Name – LastName
1.5.5.5 Review of Each Question Type
- Checkbox - The Reviewer is presented with predetermined values to select from via a checkbox. All values are displayed on the application. Reviewer can check multiple values.
- Currency - A numeric field formatted with a dollar sign.
- Date – Allows for a date format of: mm/dd/yyyy
- DropDown - The Reviewer is presented with predetermined values to select from a dropdown listing. Reviewer can only select one value from the list. (if a listing of numeric values are provided the numbers will be added and included in the scoring total)
- Electronic Signature – Allows you to capture the signature of the reviewer, the reviewer would enter their login in name exactly as it appears in their login profile.
- Email – Allows for an email format: xxxxxx@ccc.com
- EssayBox - A large data entry area that allows text entry. May have a minimum and maximum number of words.
- Extended Checkbox - The reviewer is presented with predetermined values to select from via a checkbox. The values are only displayed when the Reviewer clicks on the checkbox dropdown. Multiple values can be selected.
- File – Allows the reviewer to upload a document to the question.
- Float – Numeric with special characters. Approximate numeric numbers. This question type will not calculate in the scoring total.
- Numeric – Exact numeric numbers. Best for using arithmetic calculations for exact results. (when a numeric value is entered by the reviewer, the numbers will be added and included in the scoring total)
- Phone Number - Allows for a phone number format of: xxx-xxx-xxxx
- RadioButton- The reviewer is presented with predetermined values to select via a radio button. Only one value can be selected. All values are visible on the application.
- Reviewer Approval – Allows you to create an automatic radio button selection for the reviewer to select one of the following: Approved, Not Approved, or Need More Information.

- Text – A short data entry text field.
- Message - Allows you to enter a read only message statement, instead of a value related question
Best Practice Tip: Many times you have a scoring question that requires a detailed explanation.
Since the question types of Numeric and Dropdown will wrap in the display view, it is sometimes beneficial to first create the explanation detail in a Message question type. Then create a second question directly following that is the numeric or dropdown question for them to reply to.
1.5.5.6 How to use a Date Question Type and Set Parameters
The Date Question Type allows you to set the question type as a date field in which the reviewer enters a date as the value. A calendar will appear that the reviewer can select the date from.
(Note: when cloning tasks with date type questions, you will need to make sure that the new task date ranges have been moved forward appropriately, the system will not do this for you.)
When you select the Date question type you will be required to enter a minimum date and maximum date range so that the selection calendar can be created.

Min Date - Enter the minimum date that the reviewer can enter.
Max Date – Enter the maximum date the reviewer can enter.
1.5.5.7 Setting up Questions that require labels and values
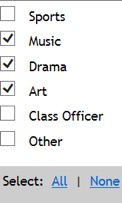
Checkbox, Extended Checkbox, Dropdown, and Radio Button question types all require that you add a listing of values for the reviewer to choose from.
Examples:
Checkbox -

Extended Checkbox -
Dropdown – basic
![]()
Radio Button –

Once you select one of these question types an Add Value(s) button will appear to the right.
Values are used to set the listing of possible replies assigned to question types that are check boxes, radio buttons and drop down question types. If using a rubric scoring system you will enter the listing of possible score selections in the Add Value(s) setup.
![]()
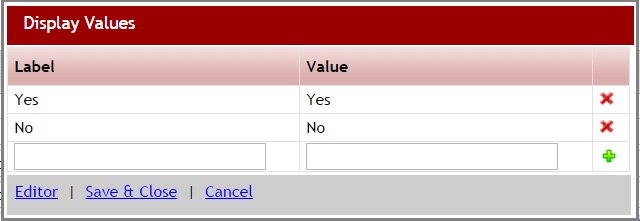
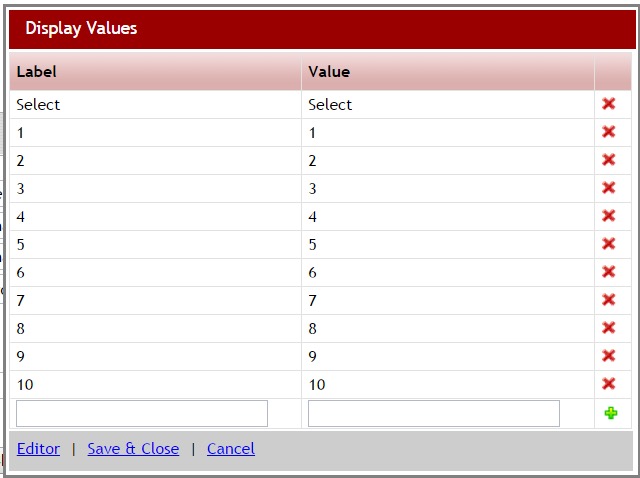
When entering the values you will need to enter them in pairs, once as the label and once as the value.
Label – The Label entry is the value displayed to the reviewer.
Value - Value entry is the report value. If the question type is a dropdown, any number that is used as the value will be the actual number value that will be used in adding totals for your on-line score sheet numeric scoring. (Rubric scoring).
Example of a dropdown question’s values created specifically for the score sheet:
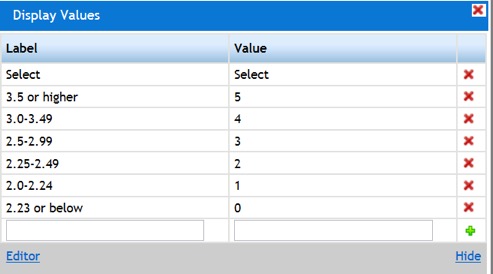
There may also be times when you want the reviewer to see something different than the actual value. You would create the label with the data you want the reviewer to see, but then create the value with the actual value it should be when you are viewing reports internally.
Example of Dropdown values entered to pull scoring, showing a different value than the actual label.
Question: Select the range that the applicants GPA fall within.
(In this example the reviewer would only see the Label column, not the score given for the range)
1.5.5.8 How to use a File Question Type
File Question types are used when you require that a document be uploaded by the reviewer during the review process.

When you select the File Question Type a text box will appear. Provide the list of allowed file extension for the types of documents you will accept for this upload.
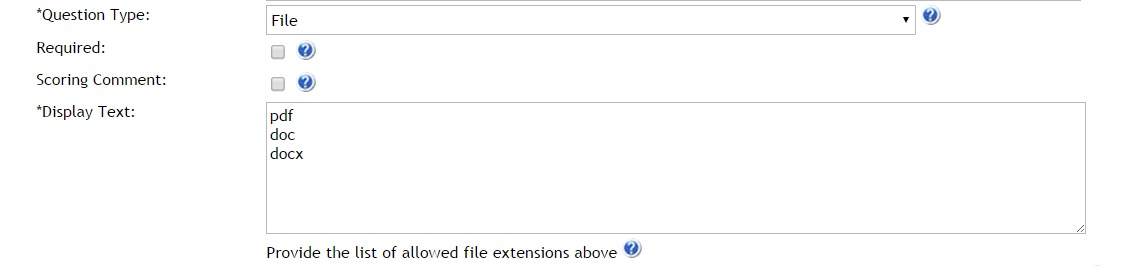
Accepted file types: xls, xlsx, pdf, doc, docx, html. When listing the extensions do not enter a period before the file extension.
Note: Although the above file types are accepted, if you are using the PDF feature it is recommended that all uploads be uploaded as PDF documents, formatted in Portrait mode, sized to 8-1/2” x 11”. Only files less than 20mb can be uploaded to the program.
1.5.5.9 The Use of Messages in Application
Message question types are used to create a message statement to the reviewer, instead of creating a question for the reviewer to reply to. Message questions are useful in creating a header titles to separate multiple parts of a section.
Example:
When using the message question type, you will type the message in the Question box and format it to how you would like it to visible by the reviewer.
1.5.5.10 How to Use Numeric Fields and Set parameters
Numeric fields are used when numeric values are required or you need to run exact calculations on the numeric values entered by the reviewer. The only separator characters allowed in numeric question types are decimals. Numeric replies will be calculated in the scoring total on the online scoring reports.
Any number that is used as the value in a Numeric question will be the actual number value that will be used in adding totals for your on-line score sheet numeric scoring. (Rubric scoring).
When using the Numeric question type you have the option to control the length of the reply value.

Maximum Length – Sets the number of numeric characters allowed when replying to this question. (i.e. 4.00 = Max. length of 4 characters. The reviewer will not be able to enter a numeric value longer than 4 characters long including the decimal.
1.5.5.11 How to Use Text Field
The Text question type is used when a brief text and/or numeric value is required. (I.e. entering a street address such as: 1234 Jones Street, or asking for Last Name, etc.)
![]()
1.5.5.12 How to Use Essay Box Text Field and Set Word Count
The Essay Box question type is used when a reply value requires a lengthy text statement to be typed.
When using the Essay Box question type you can control the length of the reply value entered by the reviewer by setting the minimum and maximum word count. (i.e. 500 words or less)
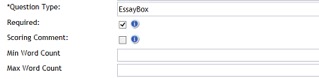
Min Word Count - Enter the minimum number of words you require for a reply to the specific question. If you have a maximum but do not require a minimum you can enter “0”.
Max Word Count - Enter the maximum number of words you require for a reply to the specific question. (I.e. max word = 500 will only allow the applicant to enter 500 words)
A dialogue box will appear on the reviewer’s dashboard next to the question, where they can type their reply to the essay question.
1.5.5.13 When to use the Email Type Question
The Email question type is used only when the required value is an email address. Using the Email question type will only allow a correct email format to be entered in the field. (i.e. jones@communityforce.com)
1.5.5.14 How to Use the Phone Number and Force Format
When a required value is a phone number you can use the Phone Number question type to force a specific format to be used when the reviewer enters their phone numbers.

The following format selections are available:
(XXX) XXX-XXXX
XXX-XXX-XXXX
(XXX)-XXX-XXXX
1.5.5.15 When to use the Currency Question Type
When a required value is a numeric currency value it is suggested that you use the Currency question type to allow for the formatting of the value in to a currency format. Once the value is entered by the reviewer a Currency symbol will appear on their reply. Prior to setting up the application the administrator should have already preset the main currency type of your organization, (i.e. Dollar $ or Euro €, etc.)
1.5.5.16 Marking a Question Required
In the Question Setup there is an option “Required”. Ifa question on the evaluation is required and must be answered by the reviewer, you can mark that question as required and the reviewer’s dashboard will not show as 100% complete until the question has been answered.
Important: In order for the task to show as a percentage completed in the reviewer’s dashboard or task scoring reports, there must be at least one question marked as required.
![]()
Check the box if the question is a required question and must be answered by the reviewer.
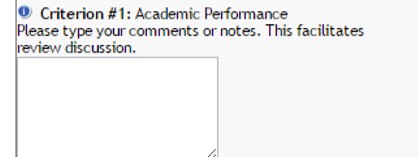
1.5.5.17 Adding the Scoring Comment
Only one question per task/stage is allowed to be checked as the Scoring Comment. It will be displayed in the Comment column “Comment” on your reports and is used for the reviewer to enter their comments regarding the scoring of the specific applicant on that task/step. The question type should be an EssayBox if the question is to be a comment question so that the reviewer can type their comment in the essay field.
Check the box if the question is the reviewer “comment” for the task/stage.
![]()
1.5.5.18 Setting up the Score Card Question Display Order
“Display Order” is the sort order sequence number of the question as it appears on the page as the reviewer is reading the questions. If you enter a number that is already being used by another question in that section, the new question will take that number in the sequence and move the prior question directly after it with the next number in the sequence and all other questions below will be moved down one count.
This is a required field when creating questions and cannot be left blank.
Enter the number that you want the question to fall in sequence on the page as the reviewer is completing the task/stage.
![]()
1.5.5.19 Adding a Downloadable File to a Question
If you have a document that may be informational to the reviewer in order to answer a specific question, or a template that the reviewer can fill out and upload to a question, you can attach that document directly to the question referring to it, (i.e. the reviewer needs to see the policy and procedures: you can create the question and attach the policy and procedures document directly to the question for the reviewer to view)
You would first enter the question as usual in the question editor box and create the question type for the type of question you want the file attached to. This can be any kind of question type, however, if this document is only informational and not to be re-uploaded it is preferable to make the question a message question. If it is for an upload question you can attached the download to the upload question, but be sure to explain to the reviewer that they need to complete the document and then re-upload it to the same question.
To upload the document that the reviewer needs to see, you will notice at the bottom of each question you create the Add File to this Question – Upload File:
Step 1: Click on the Choose File to select the file for upload.
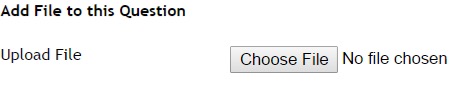
Step 2: Once you upload the file it will appear in the upload File field to the left of the Browse button.
![]()
Step 3: Once you Save and Exit and return to the question, you can click on the Remove File to remove the document.

Step 4: Be sure to click Save, or Save & Exit againto save the question and any changes.
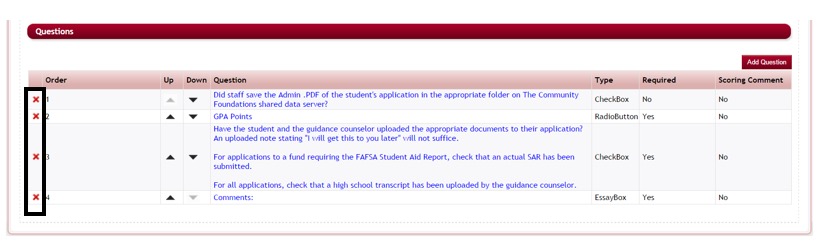
1.5.5.20 How to Delete a Question from the Score Sheet
You can delete a question in the Task Score Sheet by clicking on the red “X” next to the Question you would like to delete.
Caution: Use caution when deleting a question, you will lose any replies or scores that were already completed on the specific task by your reviewers once the question is deleted.
You will receive a message to confirm the deletion. Click yes.

Once the question has been deleted you will receive a message stating that is has been deleted. Click ok.

1.6 Adding Review Committee(s) or Group
You will need to setup the committees or groups that will be reviewing your applicants prior to assigning them to the applicants. Committees are setup on each separate application process. You will first need to create the committee name and then assign the individual members to the committees that will be reviewing them.
Exercise 1
Step 1: From the Evaluations>Evaluation Setup dashboard for the application form you are reviewing, select the Committees icon.
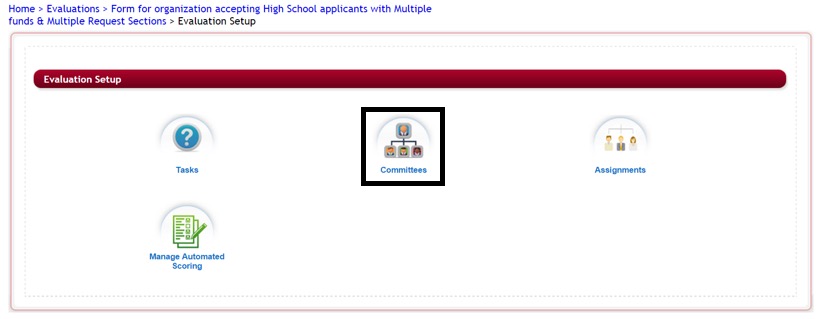
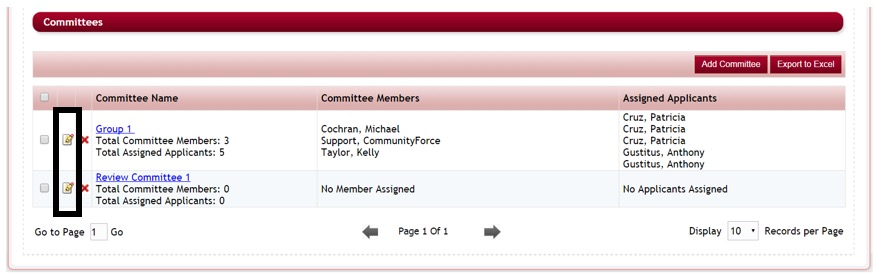
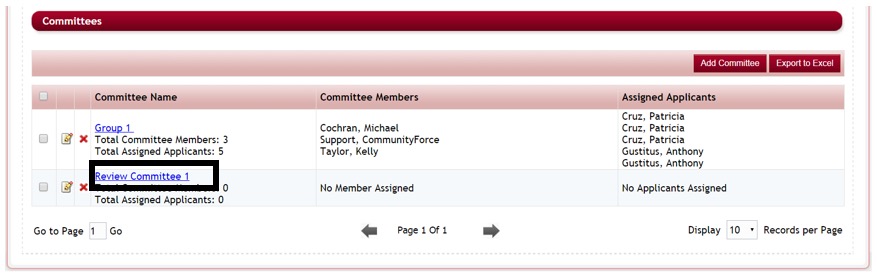
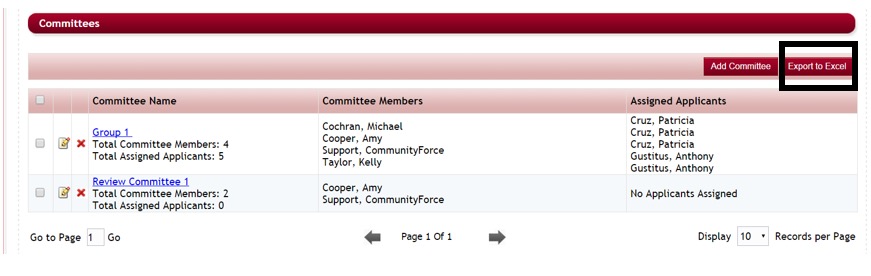
Step 2: The Committees listing will appear showing any committees that have already been created for this application. If you have not created any committee this listing will be empty.
The committee listing will show you the Committee Name, the number of members in that committee, the number of applicants assigned to the committee, the names of your committee members, and the names of the applicants that have been assigned to that committee.
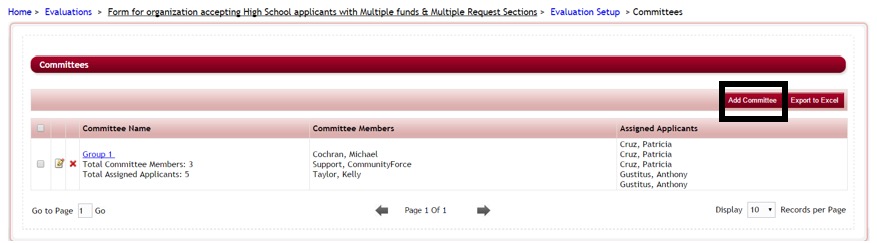
Step 3: To create a new Committee Group, click on Add Committee button.
Step 4: This will open the Create Committee screen. Enter the Name of the Committee under the Committee Name field and click Save and Exit.
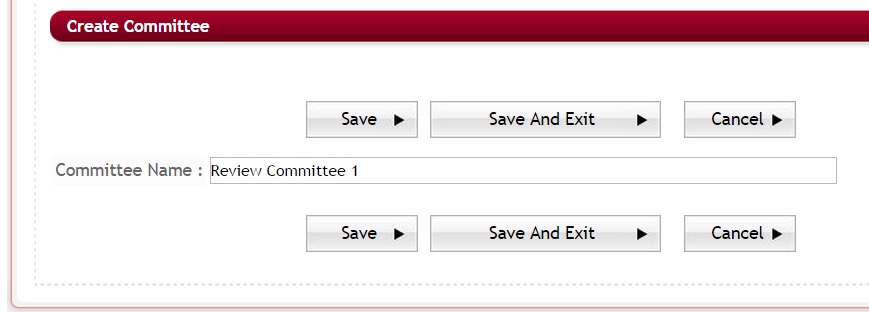
Step 5: You will directed to Manage Committee Members Screen and a Status Update message will appear notifying you that the Review Committee has been updated. Click OK.

Step 6: From this screen you will start assigning the individual members to your new Committee. (See the next section How to Assign Members to a Committee.)
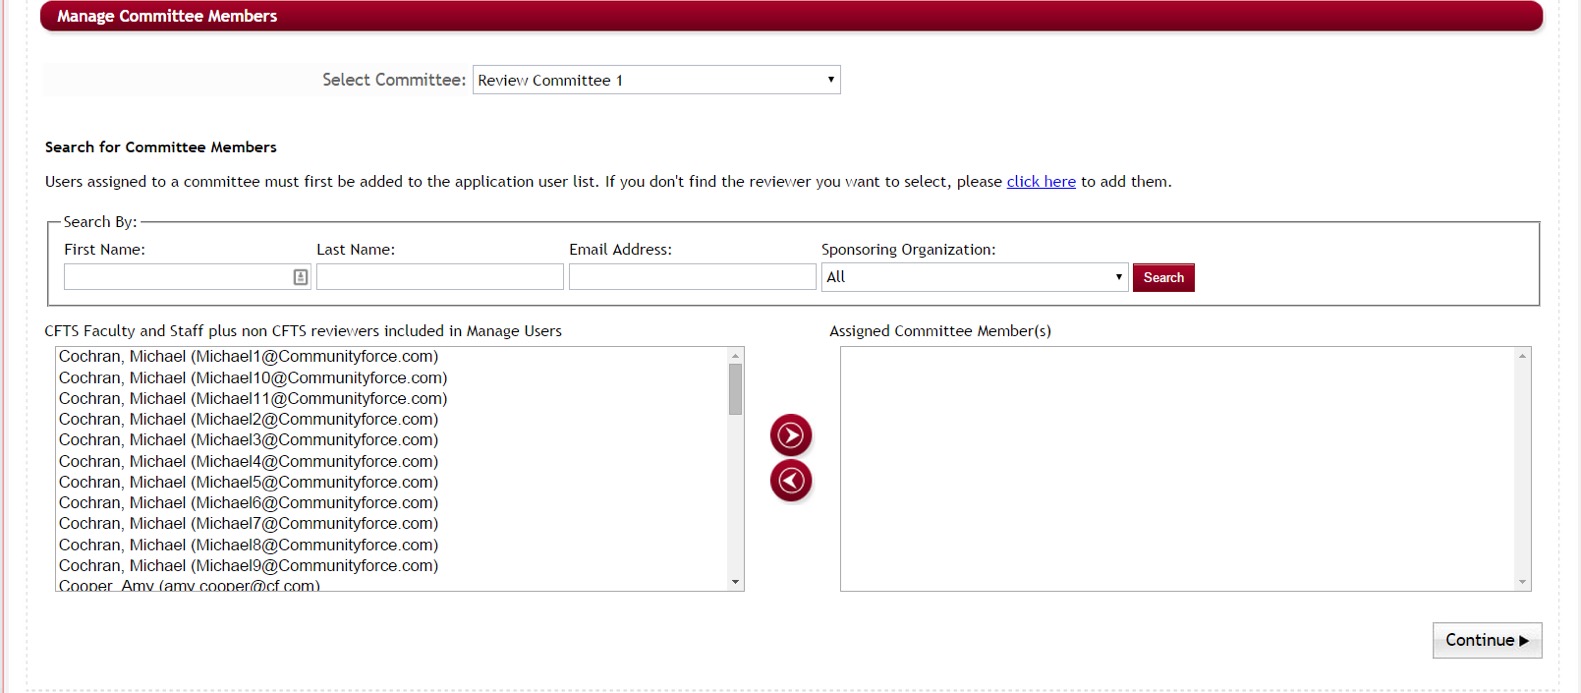
1.6.1 How to Assign Members to a Committee
You can Assign Members to the Committee using the Manage Committee Members section of the Committee Setup. You can access this one of three ways:
- When you first create your new committee this screen will automatically appear after you create the name of the committee and click Save and Exit.
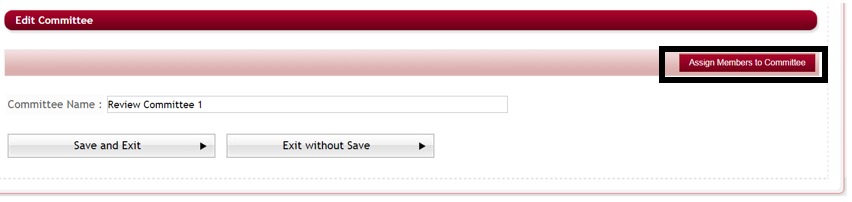
- While in the committees listing you can click on the Edit Icon next to the Committee that you want to add members to.
- From the Committees listing click on the Committee Name which will direct you to the Edit Committee Screen. From there you can click the Assign Members to Committee button.

1.6.1.1 Searching for Committee Members to Add to a Committee
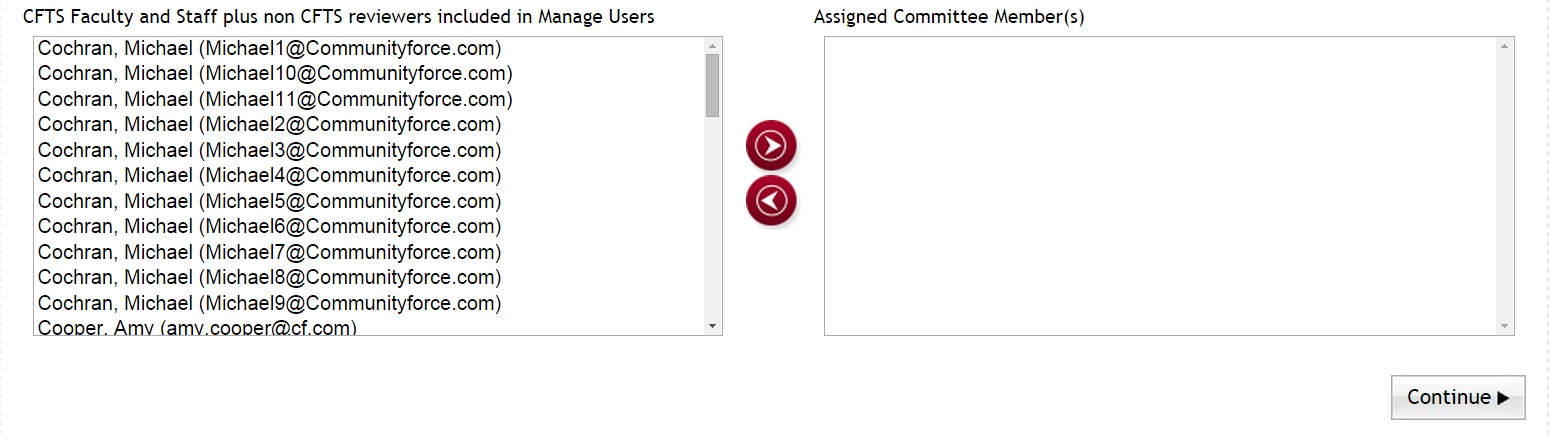
Once you are in the Manage Committee Members section you can search for the committee members you want to assign to a specific committee. The listing in the column to the left will show you all the existing users that you can assign to the specific committee listed in the Select Committee field. The column on the right will show the committee members that have already been assigned to this committee.

Important: In order to assign someone to a committee they will first have to have a user profile created in the site. They will need to be at least a reviewer or have a role type that has access to the Review Applicants icon in the Home dashboard. You can add those users’ profiles in the Setup Users, or while in the Committee setup. However, if you do not assign a manual password to your reviewers, you will want to notify them ahead of time that an account is being set up so that they are not alarmed when they receive the email that an account has been created.
Exercise 2
Step 1: You can use the Search By at the top of the Manage Committee Members screen to search for a specific user that has already had a user profile created by search on one or all the available search fields. Once the user is located their name will appear in the left column. (If their name is located skip to the next sub-section Add a User to the Committee, otherwise continue to Step 2).
Step 2: Only users that first have been added to the CommunityForce system will appear in the listing. If you do not find the reviewer you want to select, click the Click Here to add that member as a user in the system.

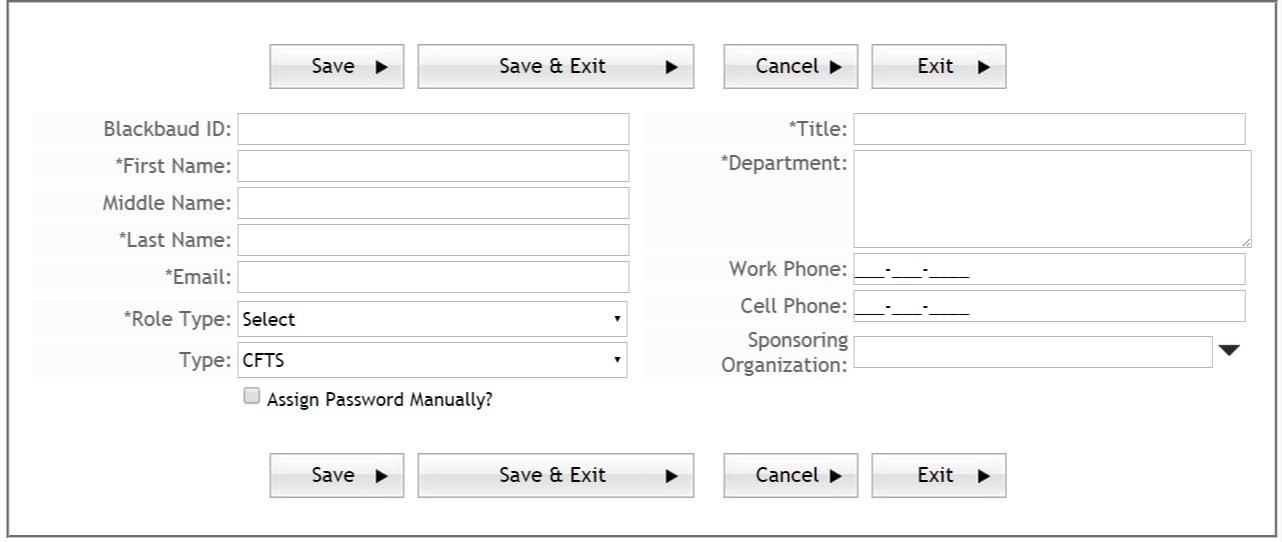
Step 3: This will open the Setup Users section and you can enter the information to create a new user account for the committee member. If this user will only be used as a reviewer to review applicants, select the Reviewer role type. Otherwise, if they are staff members that need to have additional access to other areas, be sure to select a role type that has access to the Review Applicants icon on the Home dashboard. (Click Save and Exit to save them as a user.)
Step 4: Once they have been added as a User you should then be able to see their name listed in the Manage Users box of the Committee Members assignment screen.
1.6.1.2 Add a User to the Committee in Manage Users
After you have located the user profile for the committee member you want to add, confirm that the Select Committee at the top of the Manage Committee screen is the correct committee that you want to add committee members to. Click the dropdown arrow in the field to change the committee if you want to add members to another committee.

Exercise 3
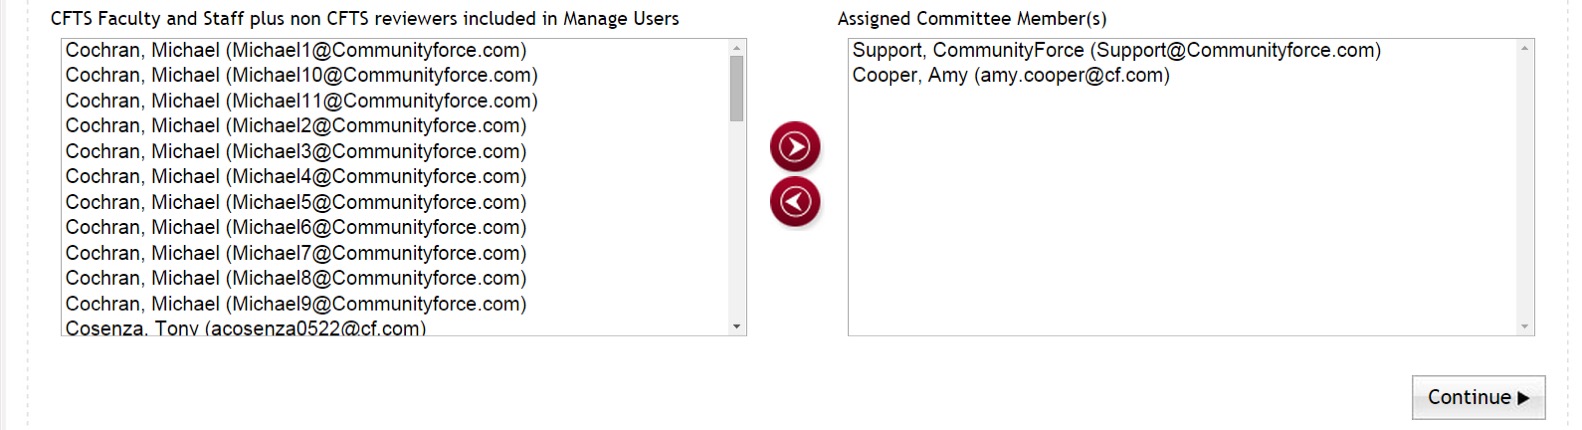
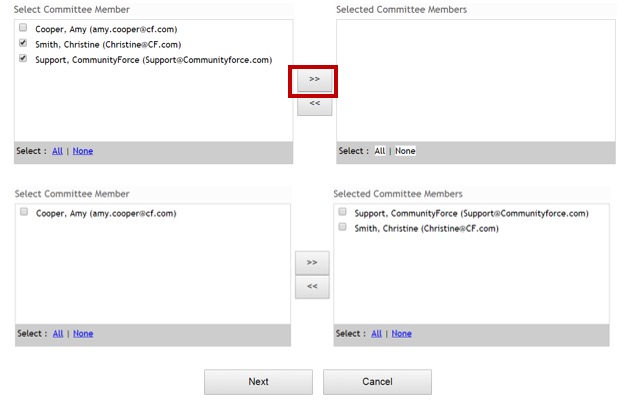
Step 1: In the Manage Users box to the left, select the user’s name and click on the right directional arrow to assign the person to the committee.
Step 2: This will move them to the Assigned Committee Member(s) box to the right.
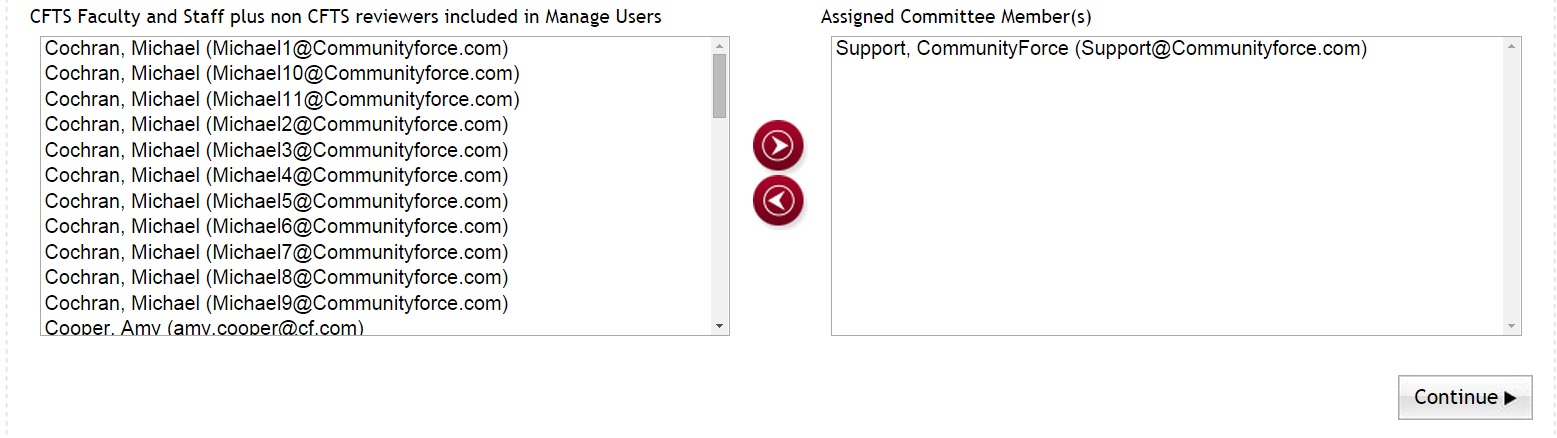
Step 3: Repeat this for each user you want to add to this committee. You can select multiple users on the left by holding down the control key on your keyboard, and at the same time clicking your left mouse button to selecting multiple names. Then click the right directional arrow to move all of them to the right Assigned Committee Members column.
Step 4: To remove a user from the Assigned Committee Members(s). Click on their name and click on the left directional arrow to un-assign a committee member.
Step 5: Once you have assigned all your members to that committee, you can select another committee in the Select Committee, or complete the assignments, by clicking on the Continue to save all your selections and be directed back to the Committees listing.
1.6.2 How to Edit a Review Committee or Group
To Edit your Committee Name, click on the Committee Name in the Committees listing section.
This will open the Edit Committee. Enter your new name and click the Save and Exit to save your changes.

To Edit your Committee members assigned to a Committee from the Committees listing, click on the Edit icon next to the committee you want to edit.
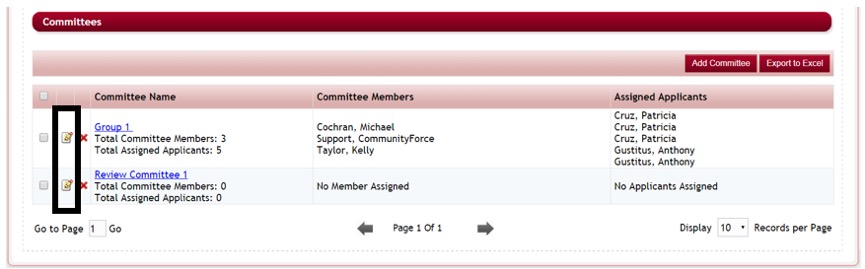
This will open the Committee Members screen. Make your adjustments and click Continue to be directed back to the Committees listing.

1.6.2.1 How to Delete a Committee
In the Committees listing section click the red “X” next to the Committee that you want to delete. This will delete the entire committee.
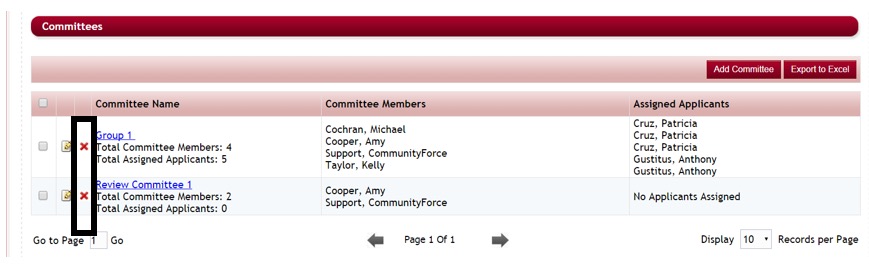
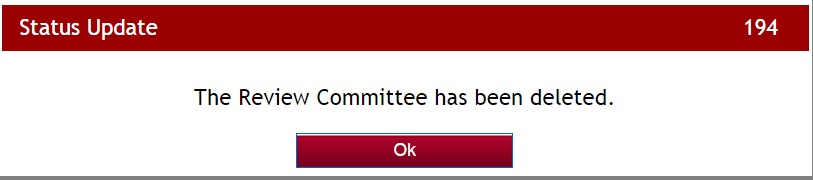
You will receive a System Alert notifying you that the Committee members also will be deleted. Select yes if you want to delete the entire Committee.
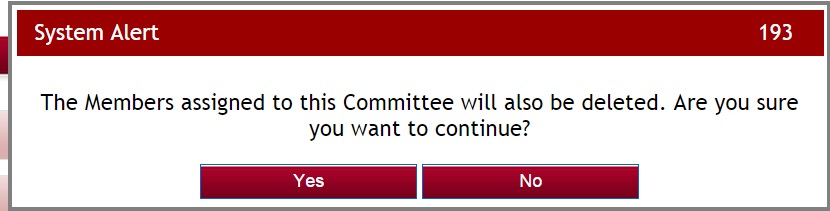
A confirmation message will appear confirming the deletion. Click OK to return to the Edit Committee Screen.
1.6.3 How to Export the Committee Listing to Excel
In the Committees listing section, click the Export to Excel button. This will create an Excel report of the Committees list.
1.7 Allowing Committee Reviewers to See Each Other’s Replies and Scores on the Same Applicant’s Application
Some of our clients have had the requirement that all their reviewers be able to see how each of the other reviewers have replied to questions and scored applicants in the review tasks.
If you would like all the committee reviewers to be able to see how each of the other reviewers have scored for all the tasks in the review process, the Global Admin can set a setting in the Administration>Site Settings: General Settings: Display Reviewer Comments on Application Summary – to Yes. This will allow the scoring information to show on the Application Summary report that the reviewers see for each applicant as follows:

Setting this to No in the Administration Site Settings-Display Reviewer Comments on Application Summary – will turn this functionality off and reviewers will not be able to see how the other reviewers have scored the applicant.
Important: This is a global setting and can only be set on a per site basis. This cannot be set on a per application basis. Therefore, if activated, all your application processes will allow the reviewers to see each other’s replies and scores.
1.8 Assignments – Assigning Applicants to Score Sheets and Reviewers
Assignments is where you will assign the selected task(s) to be completed by your review committee(s) or group(s) and then also select the applicant’s that they will be reviewing for that task(s).
Tasks can be assigned on a Committee/Group level or assigned to a committee or group based on the specific funds they are reviewing.
Exercise 1
Step 1: While in the Evaluations>Evaluations Setup dashboard for your application, select the Assignments Icon.
Step 2: The Assignments page will open:
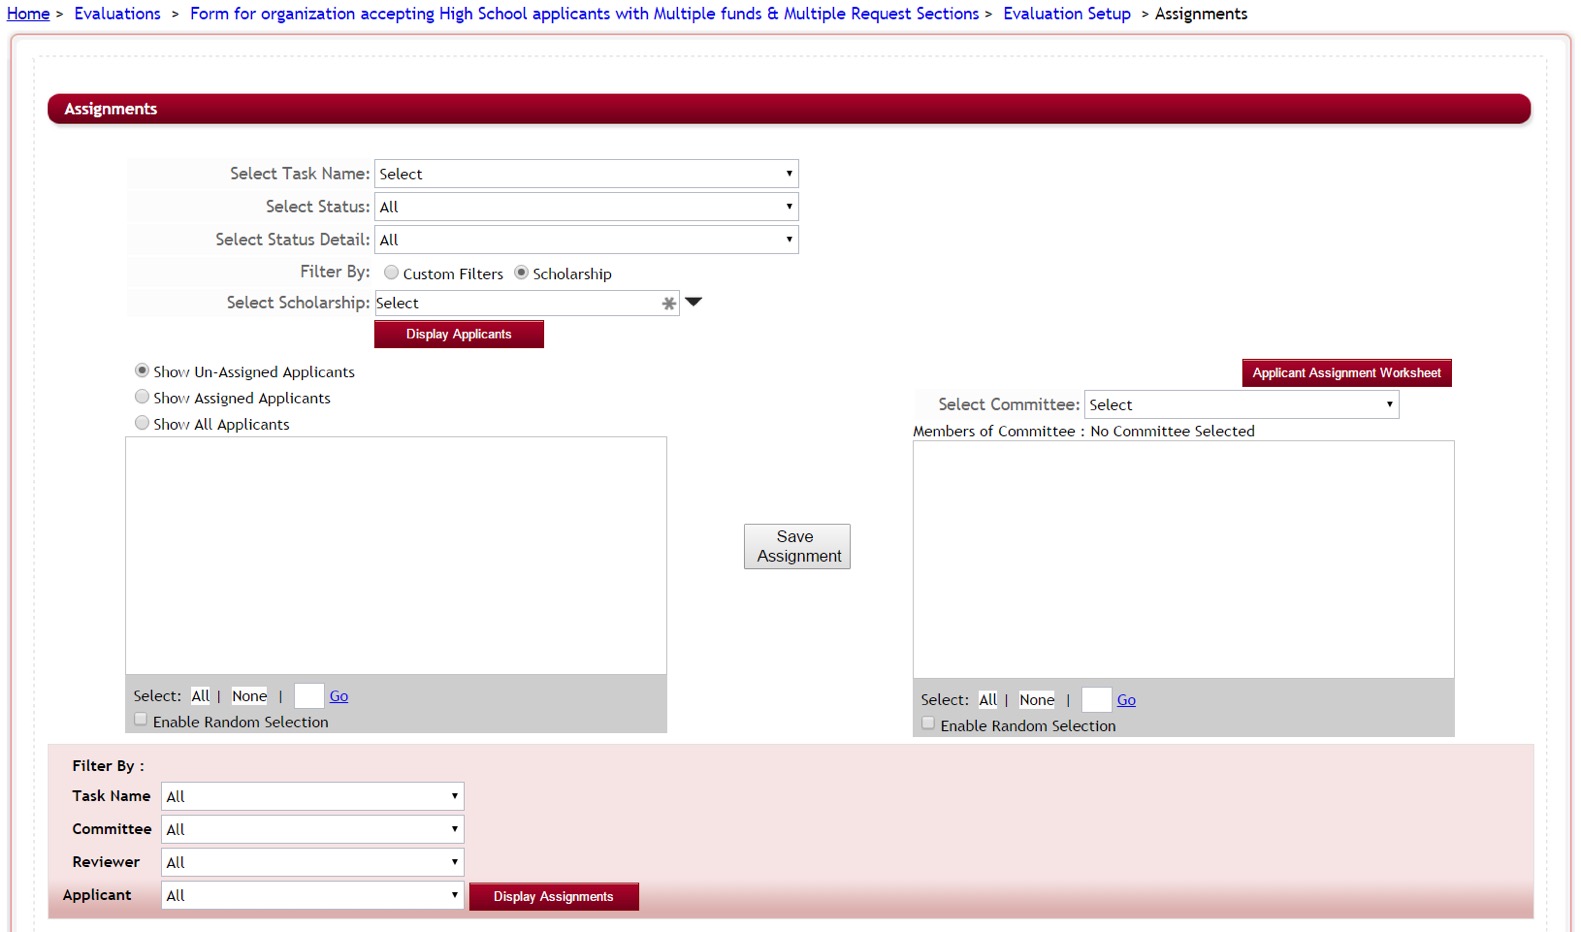
Step 3: Select Task Name: Select the Task that you are wanting to assign the committee and applicant’s too. Click on the dropdown arrow to view the listing of your active tasks.
Note: in order for a task to appear it must have the Display on Review Reports selected in the task’s setup.
Step 4: Select Status: This will filter and display only applicants set to the Status you select. If you only want applicants that are a set to specific Status to be displayed, select the current status of those applicants.
If you leave this selection as All, then all the applicant’s will display with the exception of those that are in pending submission or withdrawn.
Use the Submitted Status and Request Pending with caution, as if selected it will only pull those applicants that show a status of “Submitted” or “Request Pending”. Once an applicant is assigned in “any” tasks or to another committee, they are automatically moved to a status of “Under Committee Review”. Therefore, if you are assigning applicants that may be assigned in other tasks or to other committees, then you are probably better to leave this field as All.
For Example:
You have committees that review based on individual funding source. You select the task for that funding source, and then display the applicants that meet the qualifications for that funding source. Once those applicants have been assigned they are now automatically moved to a status of “Under Committee Review”. That same applicant may be eligible for additional funding sources that are part of this application process, therfore, when you go to assign a committee to that additional funding source’s task, that applicant will not appear if you filter for only the “Submitted” or “Request Pending” applicants, as they have already been moved to the “Under Committee Review” status due to the prior assignment.
Step 5: Select Status Details: This will filter and display only applicants set to the Status Detail you select. If you only want applicants that are a set to specific Status Detail to be displayed, select the current status detail of those applicants. This is usually set to All, unless you have filtered out applicants in a different review process step and have set a Status Detail on your applicants so that you know who was qualified to move on and who wasn’t qualified to the next review level, then you can use this Status Detail filter to filter only those applicants that have qualified by selecting the Status Detail you created to track those applicants on that step.
Remember, these are custom stages and applicants are only moved to a Status Detail manually, this is not automatic.
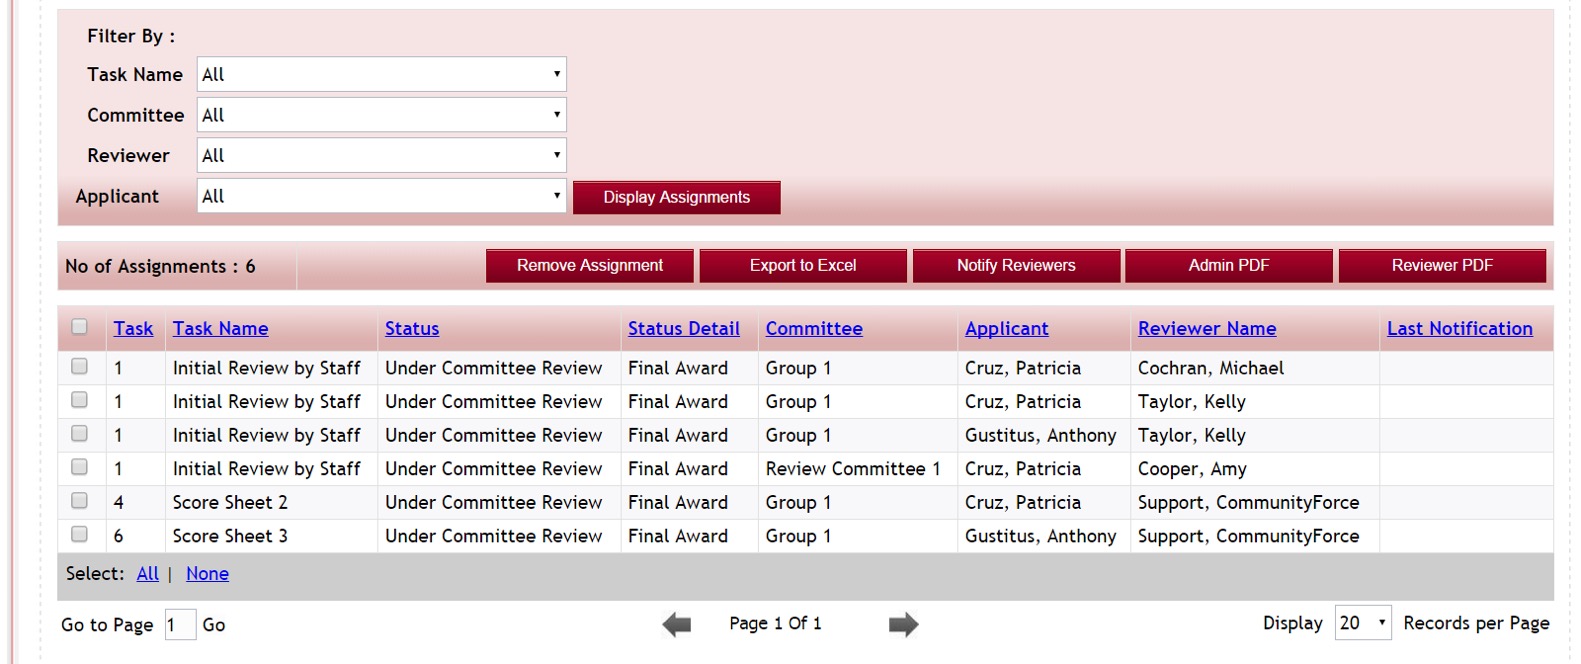
Step 6: Filter By: You can create Custom Filters or Filter By a specific funding source to display only those applicants that meet the custom filter criteria you select, or that are matched to a specific funding source.
Custom filters: will allow you to filter by a question that is present in your application. For example: if you only wanted a Reviewer to review Female Applicants. You could create a custom filter to fetch only Female Applicants. Once you create the filter click on the Display Applicants button. You can add as many filters as you want.
Filter By Scholarhips (funding source) if you have a one to many application process, and are using the Matching Funds Eligibility and Manage Funds functionality to match applicants to specific funds, you can filter on the fund to display only the applicants that have been matched to those funding sources. When filtering by Scholarship (funding source) a Dropdown Menu will appear with the list of funds that have been assigned to that application. Select only the fund(s) that will be reviewed using the task you selected, and select the only the committee that will be reviewing that specific fund.
If you have mulitple funding sources, that are assigned using the same tasks, and have the exact same committees reviewing those funds, you can select all the funds at one time that they will be reviewing. Then all the applicants that matched to all the funds will be displayed. This will keep you from having the same applicants appearing multiple times to that same review committee, if they are using the same task to review them and the scores will not be different based on each fund. They will only need to review them one time for that one task.
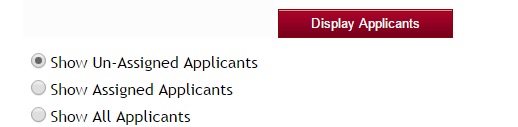
Step 7: Before clicking on the Display Applicants button you will want to determine what applicants are to be display for that task. This is on a per task basis, not a per committee, therefore if this same task is being used to assign applicants to other committees, you will want to make sure to select the appropriate display option.
Show Un-Assigned Applicants – shows a listing of only the applicants, based on the filtering you set above, that have not been assigned to the selected Task. If they were assigned in this task but to a different committee, and you want to reassign applicants that may have been on that first assignment, then do not select this option, this will not display applicants if they have already been assigned to this task and therefore will not allow you to assign those same applicants to that second committee, if needed.
Show Assigned Applicants– shows a listing of all the applicants that have been assigned to the selected task, based on the filtering you set above. Select, if you want only applicants to appear that have been assigned to this task already. This will not display any applicants that have not been assigned yet to this task.
Show All Applicants– shows a listing of all applicants that meet the filtering you set above. This will display applicants that have already been assigned for this task and all who have not yet been assigned in this task.
There are several scenarios to take into consideration before you begin to filter students.
1) 1:1 Application simply filter and assign to your committee.
2) 1:Many Application process – If you are assigning by funds, and applicants are eligible for multiple funds, you will need to filter by Show all Applicants if the same task is being used on the other funds with different committees.
Step 8: After you have completed filtering and sorting applicants, Click the Display Applicants button, the applicant’s names will appear in the box on the left along with the total number of applicants that appears in the box.
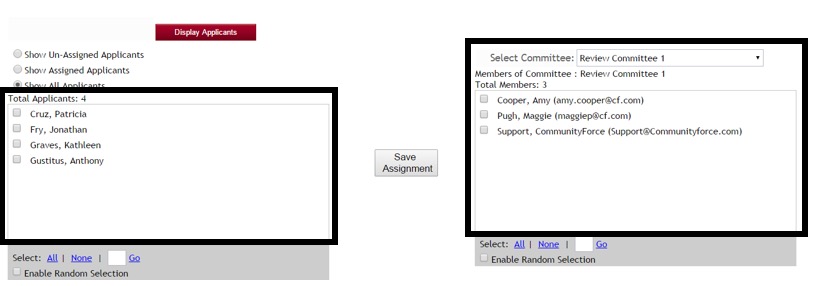
Step 9: Select the Committee in the Select Committee drop down, that you will be assigning to these applicants. All the committee members, and the number of members assigned to that committee will appear in the box to the left.
Step 10: To assign, you will need to select the applicants on the left that you want to assign to the committee members on the right. Then click the Save Assignment in the middle to save that assignment. You can do the selection multiple ways:
- All applicants get assigned to every committee member:
- At the bottom of both boxes click on the Select All. A checkmark will be placed next to every applicant, and a checkmark will be placed next to every committee member. When you click the Save Assignment, every applicant will be assigned to every single committee member.
- If you only want to assign a few at a time to each committee member select only those applicants for that one committee member and then select only that one committee members. Click the Save Assignments for each batch.
- You don’t want every committee member to review every applicant, but divide the applicants equally across the committee members so that each review an equal amount of applicants and the applicants are reviewed by an equal amount of reviewers. (I.e. three applicants to three committee members, but each applicant get three reviews.)
- You select the applicants on the left and then select only the reviewers on the right that you want to review that set of applicants, click the save assignments. Then repeat for the next batch, etc., selecting only those to be reviewed and only the committee members that will be reviewing.
- You want to have the system randomly check a specific number of applicants and/or randomly select a specific number of committee members to assign those applicants to.
- Select the Box next to the Enable Random Selection at the bottom of the Applicant listing and enter the number of applicants you want to be assigned randomly in the blank select field next to the Go, and click Go. Do the same for the Committee listing. The system will then automatically check that number of applicants and/or check that number of committee members. Click the Save Assignments to save that selection. Repeat for each batch.
Note: Once you have assigned applicants to a committee member their Status will automatically be changed to “Under Committee Review”.
Step 11: After the assignments have been completed, each individual assignment will appear in the listing at the bottom of the page. This will show the Task assigned, the applicants current Status and Status Detal, the Committee group and the what reviewer in that group was assigned that applicant.
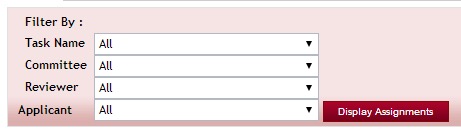
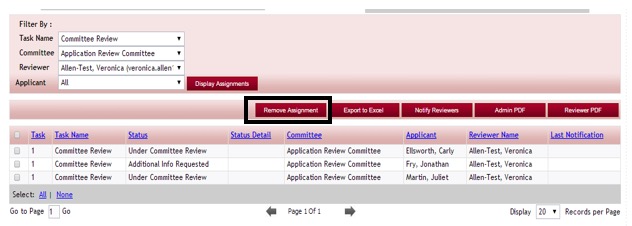
If you wish to change the view of the grid below you can Filter By:
Task Name
Committee
Reviewer
Applicant
Click on Display Assignments and the grid below will show applicants based on your filters.
![]()
The following workflow functions can be perfomed for the applicants in the grid:
Remove Assignment – from the grid you can remove an assignment from a reviewer
Export to Excel – export the grid to excel
Notify Reviewers – customize an email template will appear for you to send to your reviewers letting them know you have assigned applicants for them to review
Admin PDF – generate an Admin PDF of an application(s)
Reviewer PDF – generate a Reviewer PDF of an application(s)
1.8.1 Notifying Reviewers that Applicants are Ready for Review.
After you have made the assignments you will need to notify your reviewers that they have applicants waiting to be reviewed. You can do this notification in the Assignments section.
Important: Prior to notifying your reviewers you will want to confirm that you have the Display to Reviewer selected to “yes” on all the tasks that your reviewers will need to be reviewing if this is not selected and shows as “no” then the reviewers will not be able to see the tasks in their dashboard.
Exercise 1
Step 1: In the Evaluations>Evaluation Setup dashboard, open the Assignments section for the application that is ready for review.
Step 2: Scroll to the bottom section where it shows the assignments that have been made. In the Reviewer Name Column locate the reviewers you need to notify. Put a check in the box next to that assignment that has the reviewer’s name and then click on the Notify Reviewers button. You can select multiple reviewers at a time to send a batch of notification emails.
Note: if the reviewer has multiple assignments you only need to select their name once.
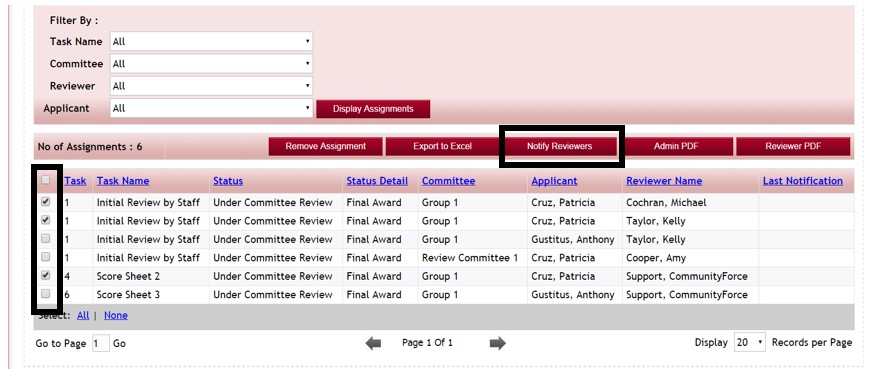
Step 3: This will open up the email notification box. You can create your own email message or select in the template field the email template: Committee: Applications are ready for review.
Step 4: Click on the Send now to sent the email at that time, or you can click on the Schedule the Email to have it sent at a later date and time.
Step 5: The email will then be sent to all the reviewers you had selected.
1.8.2 Remove Assignment from a Reviewer(s)
Caution:Removing an assignment will remove any scoring the reviewer has done on that applicant.
Step 1: To remove an assignment or multiple assignments first filter the list by Task Name, Committee and Reviewer. Click on Display Applicants.
Step 2: Place a checkmark in the student you wish to remove or use the Select: All|None feature.
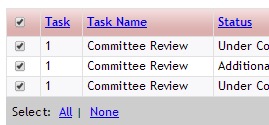
Step 3: Once you have selected your applicants Click on the Remove Assignment Button
![]()
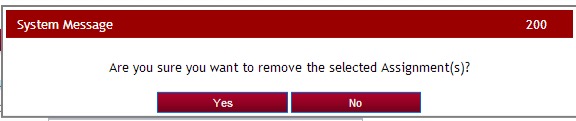
Step 4: A System Message confirmation will appear, select Yes to remove the selected Assignments.
Note: Do not delete a Reviewer from a committee or their assignments once you have assigned them to an applicant. Deleting or removing the assignment will delete any scoring they may have entered on a applicant.
If you are certain they have not scored their assigned applicants, first remove the assignment and then go into the Committee setup and delete the reviewer from that committee.
1.9 Automatic Assignment of Applicants
Automatic Assignment of Applicants, allows you to have the system automatically assign applicants to the committees for specific tasks. You can have all the applicants assigned or have filters to assign applicants that meet a certain criteria automatically assigned. (This is best used on a one to one application process when you are only reviewing one application and awarding one funding source)
In the automatic assignment, you would choose the task, choose the committee, and then all the applicants that have submitted will automatically be assigned or you can choose to select a filter based on a pre designed ad hoc report you have created to filter specific applicants for assignment to a specific task.
If you have multiple stages to your review process, you have the option to assign tasks that are dependent on other tasks being accomplished first. If a task is dependent on another task, reviewers in the second review would not be able to review an applicant until the first review was completed.
The use of the Automatic Assignment of Applicants feature is a universal site feature not a per application option. If selected all application forms will have to use the Automatic Assignment, and the ability to use the manual version where you get to select what applicants gets assigned to what task will not be available.
Important: Prior to using the Automatic Assignment feature you Global Administrator will need to set the Administration>Site Setting: General Settings: Automatic Assignment of Applicants to “yes”.
Once this is activated you would click on the Assignments icon in the Evaluation Setup dashboard for the application you are assigning.
If you want to be able to pull applicants based on a specific criteria filter(s) to assign to a single task, you will need to first create an Ad Hoc Report in the Evaluations>Reports>Ad Hoc reports. This report will need to pull on the same filter criteria conditions that you want to be filtered on for your task’s assignment.
Exercise 1
Step 1: While in the Evaluations>Evaluations Setup dashboard for your application, select the Assignments Icon.
Step 2: The Task Assignment Report page will open showing any task(s) that currently have been assigned, or if none have been assigned then it will be empty.

Step 3: To create a new assignment click on the Create New Task Assignment button.
![]()
Step 4: The Create Task Assignment will screen open:
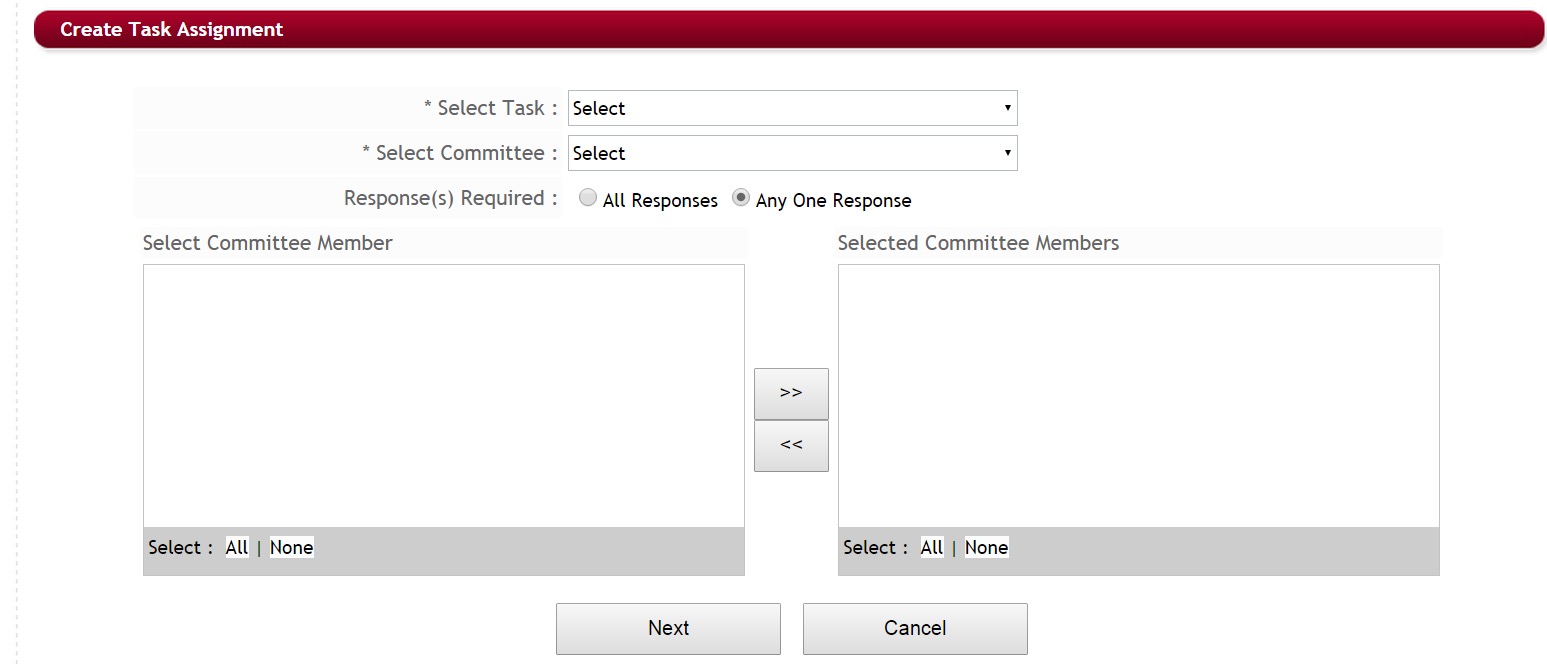
Step 5: Select the task you want to assign by clicking the drop down arrow in the Select task field and clicking on your task.
Step 6: Select the committee to be assigned to this task by clicking the drop down arrow in the Select Committee field. This will populate the Select Committee Member column.

Step 7: Responses(s) Required: If you have mutiple tasks to review, the other tasks will not be available to review until:
All Responses: All Responses in the prior tasks must be completed before the applicants will appear in the next level task for reviewers to see them for review.
Any One Response: The prior task can be started, but not completed, before the applicants will appear in the next level task for reviewers to see them for review.
Step 8: In the Select Committee Member column select all the committee members to be assigned to this task, and click the right directional arrow to move them to the Selected Committee Members Column. Use the left directional arrow to move them back to the select committee member if you do not want to assign that committee member.
Step 9: Click Next to go to the next page. This page will ask if there are any dependent task that must be completed prior to this task appearing to the reviewers.
Yes – there are tasks to be completed before this task
No – there are not tasks that need to be completed prior to activating this task.
If you Select Yes, the following screen will appear: (if No skip to Step 12)
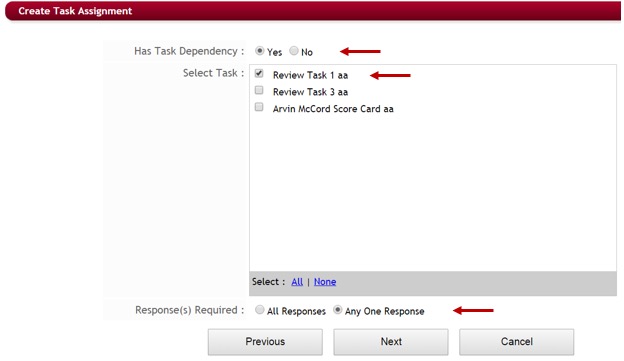
Step 10: Select all the task(s) that must be completed prior to this task appearing to reviewers. (i.e. you have three tasks and this is task three however task 1 and task 2 must be completed, select task 1 and task 2 since they must both be completed prior to this task appearing).
Step 11: For the Dependent task(s) do all responses have to be completed in those prior task(s) or just one before showing this tasks to reviewers. Select the one that applies to your task.
All Responses: All Responses in the prior tasks must be completed before the applicants will appear in the next level task for reviewers to see them for review.
Any One Response: The prior task can be started, but not completed, before the applicants will appear in the next level task for reviewers to see them for review.
Step 12: Click Next to continue to the next page.

Step 13: Does the task have a time frame for completion. (Start and end date to complete)
Note: The task will only be available to complete for the dates that the time dependency is set. If there are tasks that are to be completed after this task and this first task is not completed by the deadline date the dependent tasks will not open if All responses are required in the first.)
If you select Yes, the following screen will open, (If you select No, skip to Step 16)
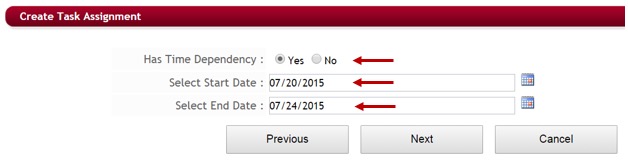
Step 14: Enter the start date that this task is to appear for review.
Step 15: Enter the End Date that the task is to be completed by (deadline date).
Best Practice tip: If you want the depedant tasks to open immediately after the first tasks is completed, go ahead a make your start and end dates the same dates, so that there is not a delay, from one to the next.
Step 16: Click Next to continue, and open the next page.
Step 17: Assign Applicant(s). How do you want to assign your applicants.
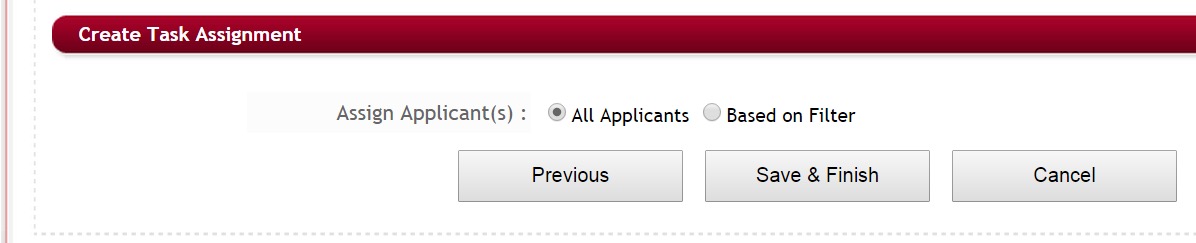
All Applicants: If all the applicants that applied that are Submitteed or Request pending are to be assigned click the all Applicants. (if this is selected continue to Step 19).
Based on Filter: If you have created an Ad Hoc report to filter out the applicants to be assigned for this task select the Based on Filter. When you select this option the Select a Report will appear:
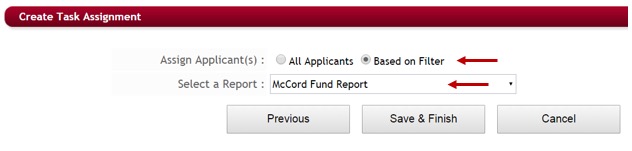
Step 18: Select the ad hoc report in the Select a Report dropdown listing that will filter only the applicants you want to assign to this task.
Step 19: Click Save & Finish.
Step 20: The applicants will then be assigned to that task based on your selections and you will return to Task Assignment Report screen.
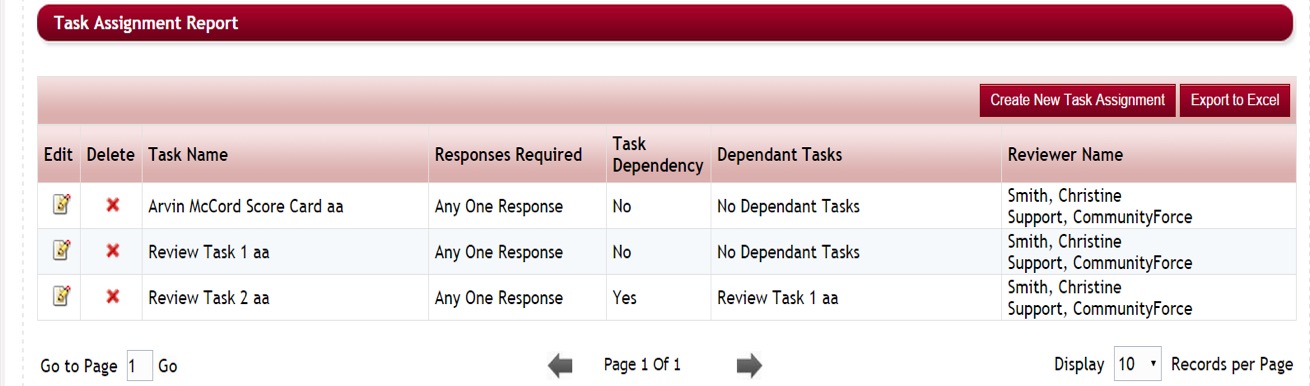
You will now be able to see in this report screen all the tasks you have assigned and if any are dependent on other tasks.
You can click on the Edit icon to edit a task or click the red “X” next to a task to delete. Use caution when editing or deleting tasks that have been assigned out already for review, as you will lose any data that reviewers have entered if you change that reviewer or delete the task completely.
1.10 Introduction to Automated Scoring
Automated Scoring is a feature that allows you to create scoring based on replies to specific questions. You would need to assign a score to a question and based on the answer given by the applicant, the system automatically computes the score and assigns them back to the applicant.
The applicant’s automated score is a combined total of all the scores set in the automated scoring section that they have meet the criteria for and not an average. The automated score will show as a separate score and is not calculated into the Total Score that you see, when reviewing and awarding your applicants.
There are two main screens used in Automated Scoring
- Manage Automated Scoring – To set up the scores.
- Automated Scoring Report – To review all the applicants and see their automated scoring scores.
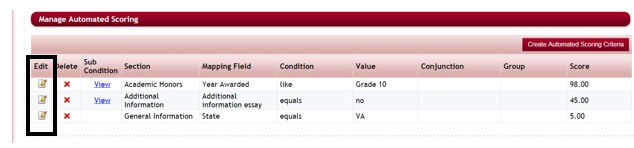
1.10.1 Manage Automated Scoring
Allows you to set automated scoring criteria for different questions in the application by adding a specific score to a reply value that is calculated on, if the applicant answers the question with the value that meets the criteria for that score.
To create automated scoring:
Step 1: While in the Evaluations Setup dashboard for your application, select the Manage Automated Scoring icon
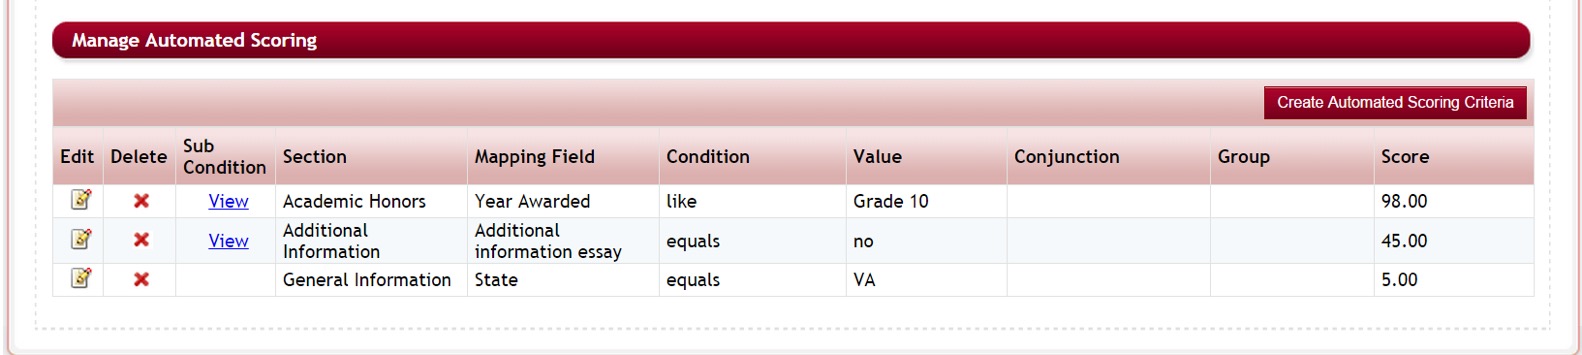
Step 2: The Manage Automated Scoring screen is displayed showing the questions that currently have automated scoring set on them.
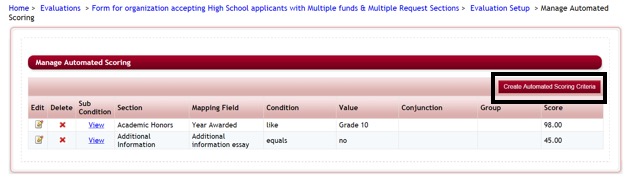
Overview of Manage Automated Scoring report listing:
- Section: The section that has the question that score will be set up on
- Sub Condition – If the words “view” are present in this column the scoring has sub condition scores as well.
- Mapping Field: The name of the Question that the score is set up on
- Condition: The condition of the value selected, that is to be met to add the score.
Possible conditions are:
- Contains – the answer/value contains this value
- Starts With - the answer/value starts with this value
- Does Not Contain – the answer/value does not contains this value
- Is Not Empty – the answer/value is not empty (applicant has answered this question)
- Is Empty – the answer/value field is empty (applicant has not answered this question)
- Is Exactly – the answer/value must exactly match the value.
- Is Less Than – the answer/value is numeric and is less than the value amount
- Is Equal To – the answer/value is numeric and is equal to the value amount
- Is Greater Than – the answer/value is greater than the value amount
- Is Not Equal to – the answer/value is numeric and is not equal to the amount.
- Value: The reply the applicant must answer in order to get the score
- Conjunction: Used with sub conditions only this can have two values “AND” or “OR”, and will be populated if the score is based on more than one question and has sub conditions.
- Group: Used with sub conditions only. This column groups for your sub conditions. You may have several groups of condition where the first group is executed and then the second group is executed etc. Assign each of the sub conditions in a group with the same number. The first group is 1; the second group is 2, etc.
- Score: The score that will be given for this question if answered according to the parameters set.
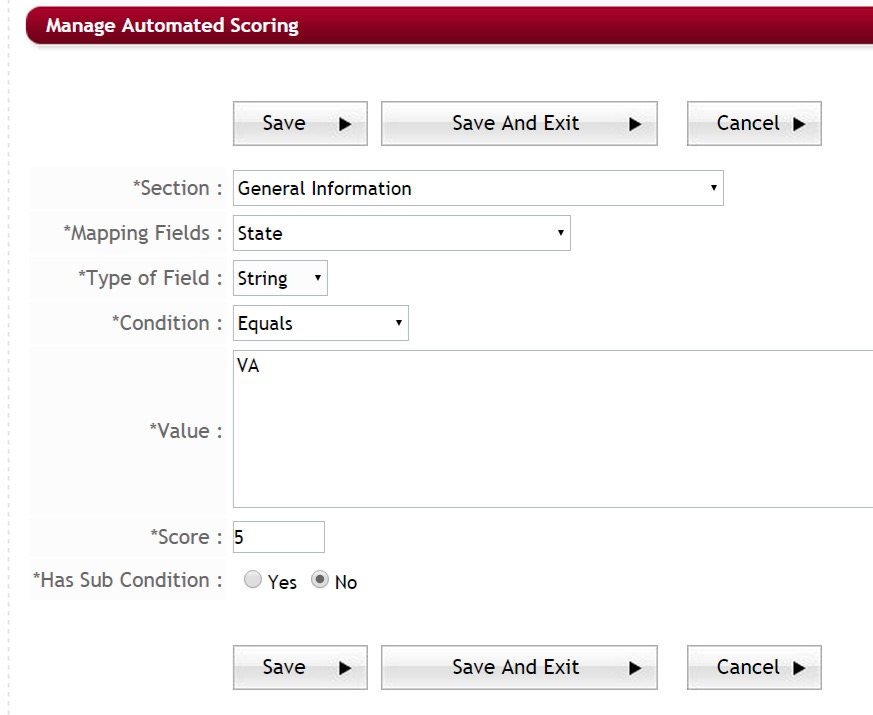
Step 3: To create a new automated score, click on the Create Automated Scoring Criteria button.
![]()
Step 4: The Manage Automated scoring set up page will open
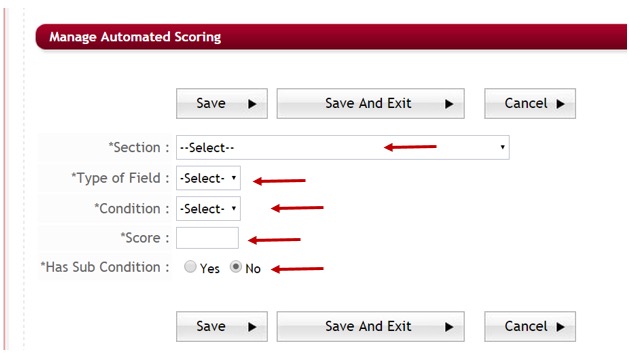
Step 5: Section: Select the Section that contains the question you want to set the score on.
Step 6: Mapping Fields: Select the name of the question that the score will be set up on.
Step 7: Type of Field: This is a read only field and gets auto filled based on the type of question that you select in Mapping Fields.
Step 8: Condition: set the condition type of the field
Possible conditions are:
- Contains – the answer/value contains this value
- Starts With - the answer/value starts with this value
- Does Not Contain – the answer/value does not contains this value
- Is Not Empty – the answer/value is not empty (applicant has answered this question)
- Is Empty – the answer/value field is empty (applicant has not answered this question)
- Is Exactly – the answer/value must exactly match the value.
- Is Less Than – the answer/value is numeric and is less than the value amount
- Is Equal To – the answer/value is numeric and is equal to the value amount
- Is Greater Than – the answer/value is greater than the value amount
- Is Not Equal to – the answer/value is numeric and is not equal to the amount.
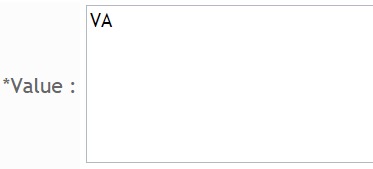
Step 9: Value: This field will appear based on the Type of Field you selected. Enter the answer the applicant must answer in order to get the score. The value will need to be entered exactly as it was entered by the applicant. (I.e. a drop down listing value, must be the same value that was entered in the dropdown.)
Step 10: Score: Enter the score that the value will receive
Step 11: Has Sub condition: Set this to yes, to set up a score based on “and” or “or” Conditions with other questions within the application. Meaning they have to meet both or at least one of the conditions to get the score. When you return to the Manage Automated Scoring listing this question will show a “View” in the Sub Condition column. You will add the sub-condition by clicking on that “View”.
Step 12: Click Save and Exit to return to the automated scoring listing.
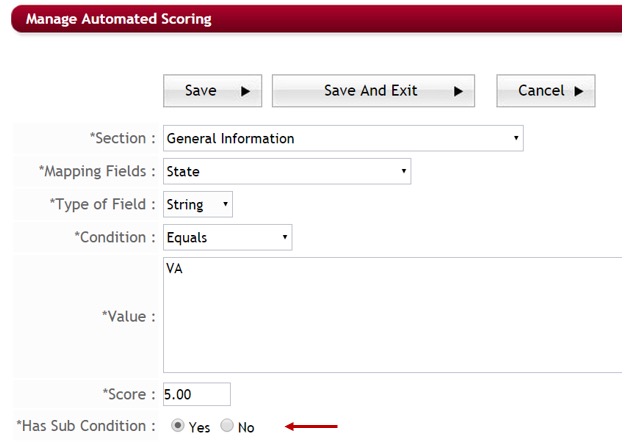
Example: You want to give a score of 5 points if the applicant lives in Virginia – When completing the “General Information” section the applicant would need to select the “State” “VA”.
You would set up the automated score as shown below:
1.10.2 Setting Sub-conditions on automated scores
Step 1: When creating the initial question select “Yes” for the “Has Sub Condition”.
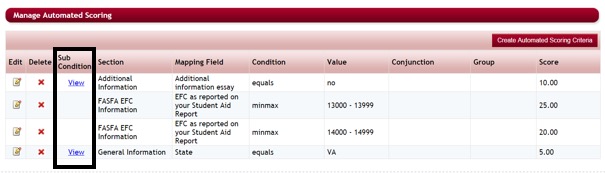
Step 2: Once you save that question and return to the Manage Automated Scoring the word “View” will appear in the Sub Condition column.
Step 3: Click on the View for the question you are adding the sub condition to.
Step 4: The listing of sub conditions for this question will appear, or it will be blank if you have not yet added a sub condition.

Step 5: Click on the Create Automated Scoring Sub Criterias button to add a sub condition.
![]()
Step 6: The Automated Scoring Sub Conditions page will open:
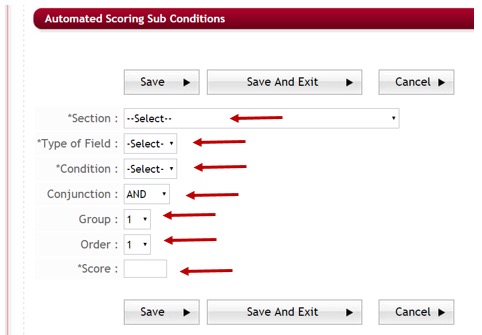
Step 7: Section: Select the Section that contains the question you want to set the score on.
Step 8: Mapping Fields: Select the name of the question that the score will be set up on.
Step 9: Type of Field: This is a read only field and gets auto filled based on the type of question that you select in Mapping Fields.
Step 10: Condition: set the condition type of the field
Possible conditions are:
- Contains – the answer/value contains this value
- Starts With - the answer/value starts with this value
- Does Not Contain – the answer/value does not contains this value
- Is Not Empty – the answer/value is not empty (applicant has answered this question)
- Is Empty – the answer/value field is empty (applicant has not answered this question)
- Is Exactly – the answer/value must exactly match the value.
- Is Less Than – the answer/value is numeric and is less than the value amount
- Is Equal To – the answer/value is numeric and is equal to the value amount
- Is Greater Than – the answer/value is greater than the value amount
- Is Not Equal to – the answer/value is numeric and is not equal to the amount.
Step 11: Value: This field will appear based on the Type of Field you selected. Enter the answer the applicant must answer in order to get the score. The value will need to be entered exactly as it was entered by the applicant. (I.e. a drop down listing value, must be the same value that was entered in the dropdown.)

Step 12: Conjunction: is this Value to be meet as “and” or “or”. (For Example: They have to live in the state of Virginia “and” in the County of Stafford in order to get the score. If “or” was selected then either/or would be the case to get the score.)
Step 13: Group: This groups your conditions into sets of conditions. You may have several groups of condition where the first group is executed and then the second group is executed etc. Assign each of the conditions in a group the same number. The first group is 1, the second group is 2, etc.
Step 14: Order: The order in the grouping that this should occur.
Step 15: Score: Enter the score that the value will receiveif sub condition is met
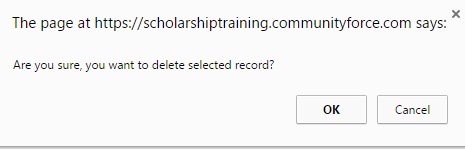
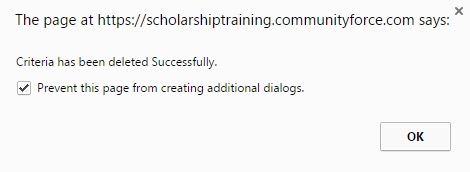
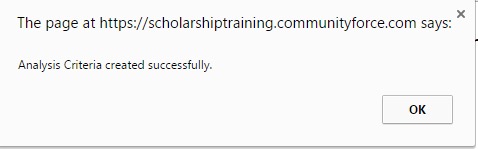
Step 16: Click Save and Exit. To return to the Sub criteria’s page.
Step 17: You will get the following message that the Criteria was created successfully. Click OK.

Step 18: To return to the Manage Automated Scoring, click on the Manage Automated Scoring in the breadcrumb navigation at the top of the page.

1.10.3 To Edit an Automated Score
While in the Mange Automated Scoring or in the Sub – Condition setup click on the Edit icon next to the Score you want to edit.
This will open the scoring setup and you can make your appropriate changes to the question. Be sure to click Save or Save and Exit to save any change you may make.
1.10.4 To Delete an Automated Score
While in the Mange Automated Scoring or in the Sub – Condition setup click on the Edit icon next to the Score you want to edit.
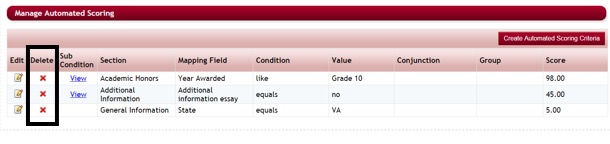
You will receive a confirmation message, and then a Successful deletion message, click ok on both to complete the deletion.