In this section we will walk you through step-by-step instructions for building your application form.
2.1 Accessing Application Form Set up
The Setup Application Forms is where you create new applications forms as well as modify or edit your existing application forms.
Exercise 1
When you login to the System the first screen you view is the Home Screen.
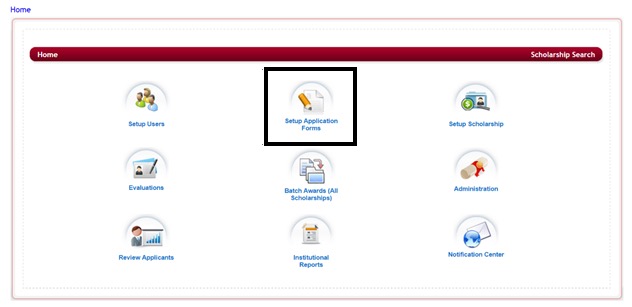
Step 1: Click on the Setup Application Forms Icon to view the Applications List.
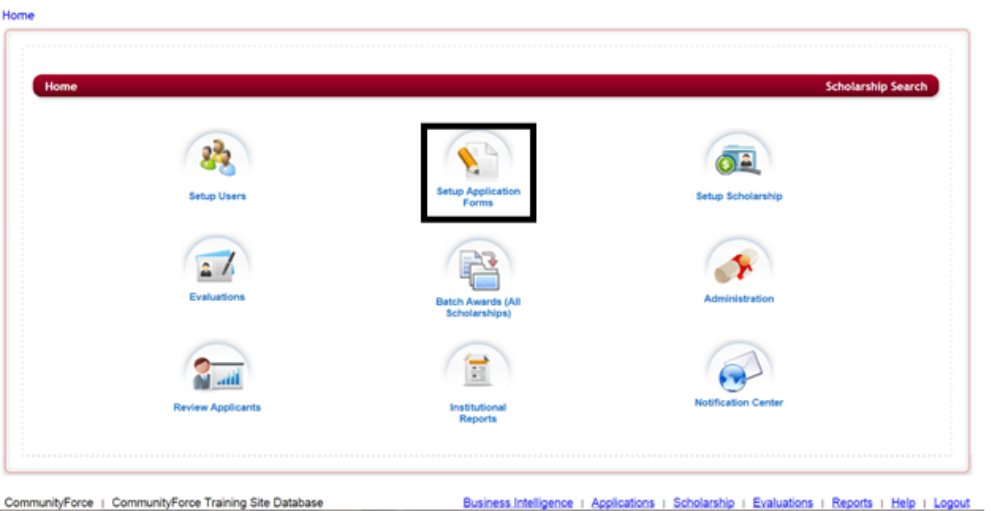
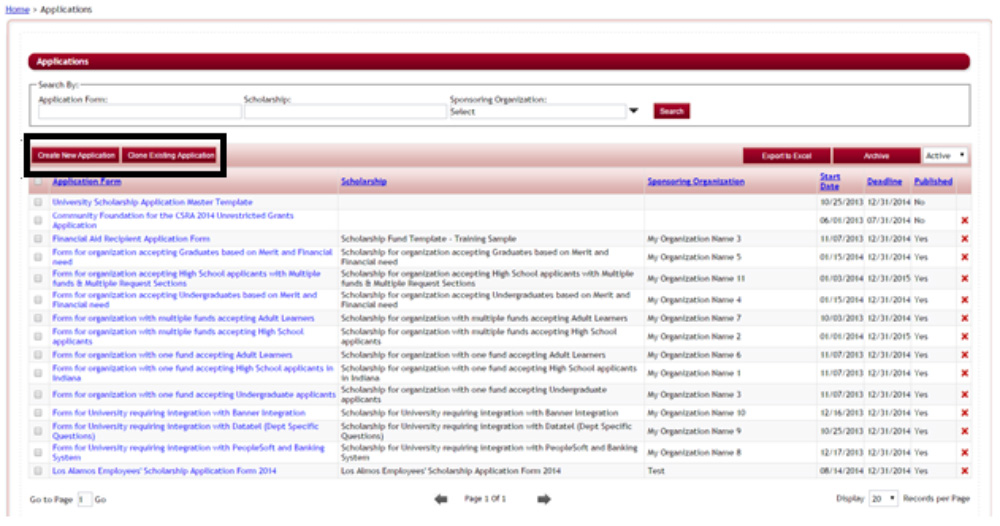
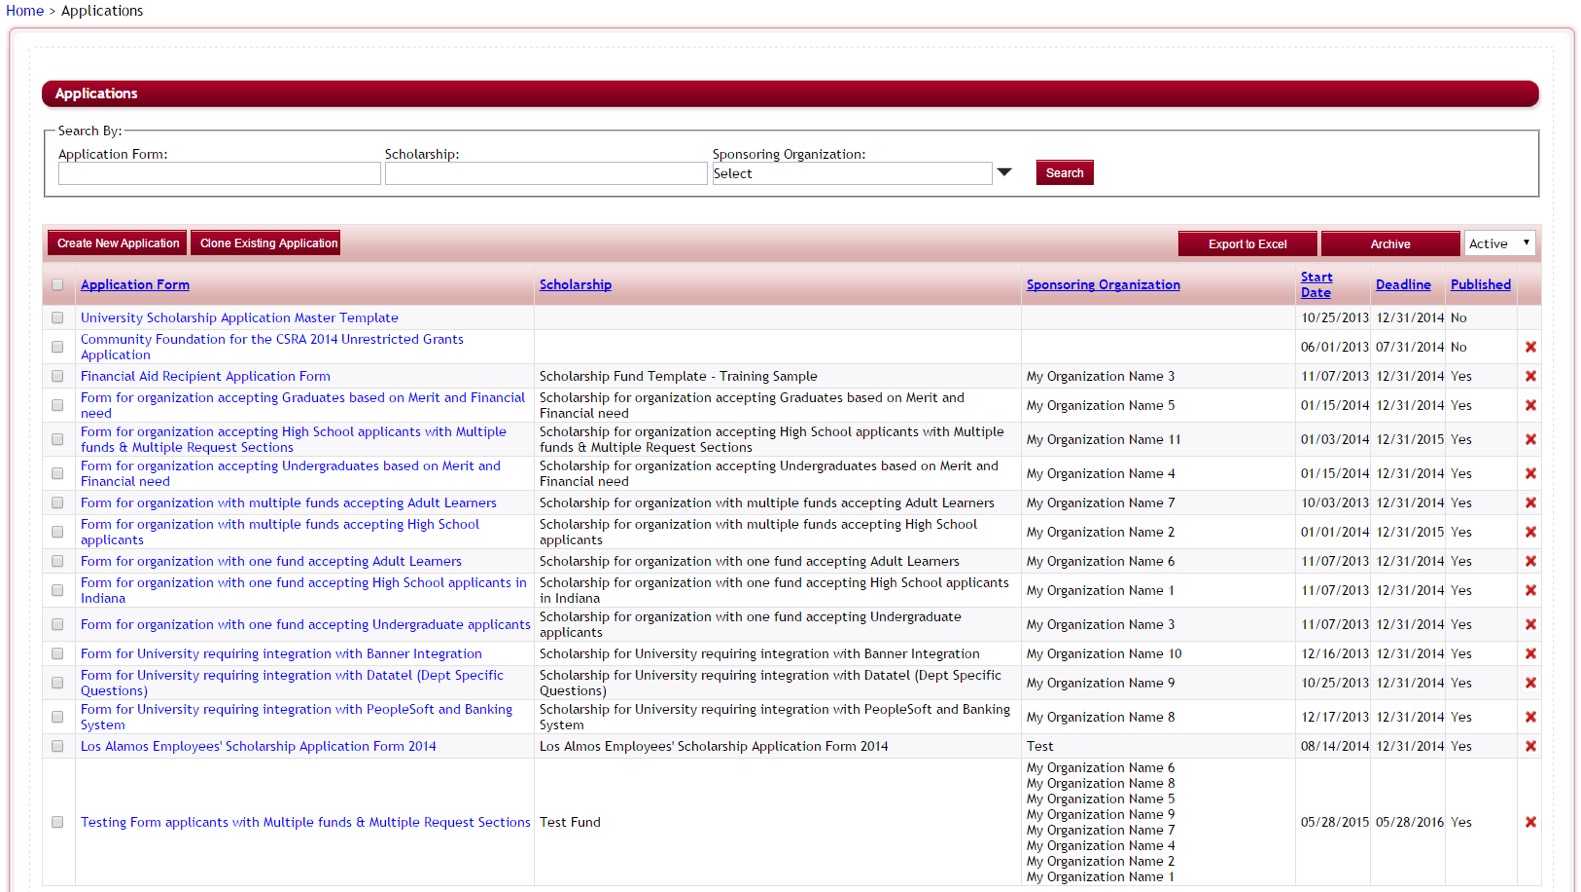
This will open the Applications table listing all the applications currenlty on your site, provided you have already created some applications. If you have not created any applications the listing will be empty.

From this screen you can click on an existing application to modify its setup or create a new application.
This listing will give you the name of the Application Form, the funding source that is linked to it, the sponsoring organization responsible for it, the start date that the application begins, the deadline (if applicable) and if it has been published.
The red X on the far right is a delete application feature. Applications should only be deleted when there are no applicants.
Search By: To find a specific application you can use the Search By: feature at the top of the page by entering all or part of the Application Form Name, Funding Source Name that it is linked to, or search for a listing of all applications for a specific Sponsoring Organization.

![]() – Allows you to export the listing to an Excel format
– Allows you to export the listing to an Excel format
![]() – Allows you to mark an application as archived by selecting the box next to the application and clicking the Archive button. Archiving removes the application from the active listing so that the listing in not extremely long.
– Allows you to mark an application as archived by selecting the box next to the application and clicking the Archive button. Archiving removes the application from the active listing so that the listing in not extremely long.
![]() - Active/Archive sets the view listing to view only the active applications or to see only archived applications; the default for this setting is Active.
- Active/Archive sets the view listing to view only the active applications or to see only archived applications; the default for this setting is Active.
2.2 Creating an Application Form
There are two functions available to create a new application. Create New Application and Clone Existing Applications.
2.2.1 Creating a New Form
Exercise 1
Step 1: While in the Set up Application Form/Applications Listing you will notice two buttons Create New Application and Clone Existing Application.
![]() - Create New application button creates a new application.
- Create New application button creates a new application.
Step 2: Click on this button to see how the General Information page appears when creating a new application.
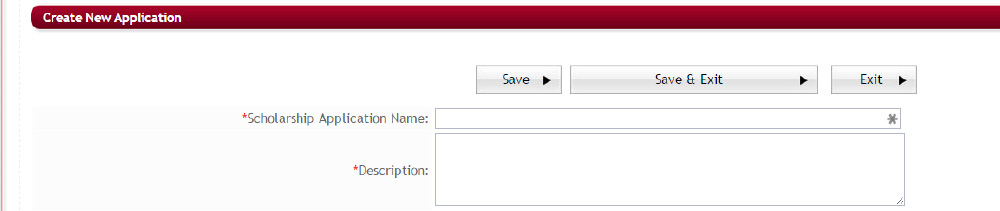
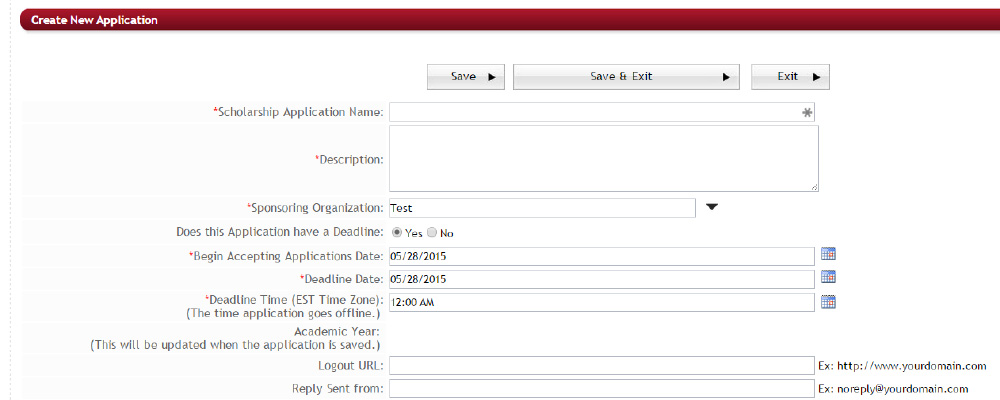
Step 3: Enter the Scholarship Application Name that you want to call your application
Step 4: Enter the Description of this application.
Refer to the General Information section for a detailed explanation of the remaining functions.
2.2.2 Cloning an Existing Application
Cloning the application will create an exact replica of the application you choose, including all the application’s general information setup settings, sections, questions, pre-qualification questions, request instructions, submit message, and the evaluation setup for that application.
Exercise 1
Step 1: from the Application Setup Applications listing, select the Clone Existing Application button.
![]() - If you do not want to create a completely new application, you can clone an existing application that you have previously made.
- If you do not want to create a completely new application, you can clone an existing application that you have previously made.
Step 4: Click the Clone Existing Application button to see how the General Information page appears when cloning an existing application.
Notice it has the Select the template for an application.
Step 5: Select the application you are wanting to clone. Only active applications will appear in this listing. Archived applications will not appear.
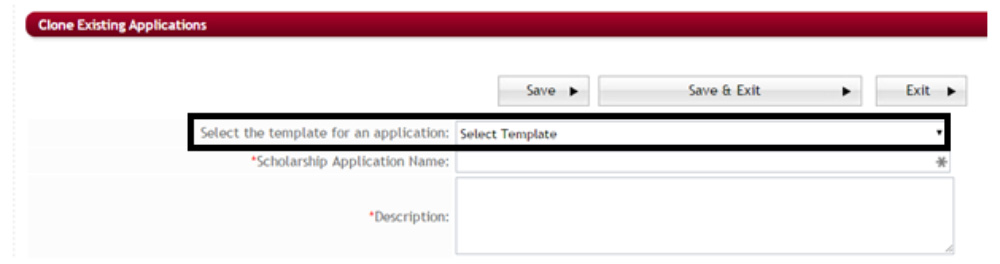
Step 6: Enter the Scholarship Application Name that you want to call your application
Step 7: Enter the Description of this application.
Once you select the template application all the data below will populate with the data from the template application.
Note: if cloning an application to create a new application it is very important that you go in and make the necessary setting and form changes to the new application so that they meet the needs of the new application (i.e. deadline dates will reflect the dates from the cloned application, committees may be different, task may different, etc.)
Refer to the General Information section for a detailed explanation of the remaining functions.
2.2.3 General Information Setup
Once you select an application setup option (Creating a New Application or Cloning an Existing Application) the Application’s General Information Section will appear. Once you have created an application form and you want to return to this screen you will select the application from the Application Listing screen and once you are in the Application’s Setup Dashboard, select the General Information iconand make any changes to your set up features from this screen.

2.2.3.1 Application Form Name
Enter the name of the application. This name will display to the Applicants exactly the same way it is entered here.
2.2.3.2 Description
Enter a brief description to describe the use of this application, or you can re-enter the application name. This is currently only viewable to the admin.
2.2.3.3 Sponsoring Organization
Select the organization(s) that is responsible for maintaining the Funding Source. If you only have one organization/department, then select that organization and click Ok to save the selection. This is used to connect applications to specific organization / departments. If you have more than one organization that you are setting up applications for then you can select the organization that owns this application process. Then you can filter applications by sponsoring organization so that only those users that are assigned to that sponsoring organization can access the specific application. Multiple sponsoring organizations may be selected.
2.2.3.4 Does This application have a Deadline
Yes – select if your application has a deadline. Once you select, yes the Deadline Date field will open to enter the Deadline Date.
No – select if this is a rolling application and there is no deadline associated with it.
2.2.3.5 Begin Accepting Applications Date
This is the date the application will be available for applicants to apply. This date must be converted to EST (Eastern Standard Time).
Note: The application will not be visible to applicants until the scholarship is published and the begin accepting applications date is current or in the past. If the scholarship is published but the application begin date is not yet current, the applicant will be able to view the scholarship/fund details and add to their interest cart. For testing purposes, you will use the ‘Applicant Invitation’ functionality.
2.2.3.6 Deadline Date and Time
Deadline Date: This is the date the application closed. This date must be greater than or equal to the current date and converted to EST (Eastern Standard Time). The application will lock out on this date at the time specified in the Deadline Time.
Deadline Time: The last time of day on the Deadline Date an application will be accepted. (Note this is set per Eastern Standard/Daylight Time)
2.2.3.7 Academic Year
(This will be updated when the application is saved.) The academic year calculated from the application start and deadline date and per settings in the Administration Site Settings – Enable Academic Year setting.
2.2.3.8 Logout URL
Redirects the user to this URL when they log out. Enter the URL for the landing page you want the applicant to go to when they log out of their application.
2.2.3.9 Reply Sent from
When setting up emails in the Notification Center, if the merge field Reply-To-Email is available for use in a template, this is the item that the merge field would be linking to.
When emails are sent out from the site, they automatically are sent from the CommunityForce server. If an applicant replies to the email using the reply button in their email, then the email will be returned to CommunityForce. If you do not want the email returned to CommunityForce, you must enter the email of the individual you want to receive those replies for the email recipients. It is good practice to add to your email templates the Reply-To-Email merge field. That way applicants know who they need to contact for information.
That merge field will link to this “Reply Sent From” item. Therefore, you would want to add the email address of the key contact person you would want to receive replies from emails that are sent from this application. If you leave this field blank it will default to admin@communityforce.comand all replies will be returned to CommunityForce.com.
Important Note: this is not the Contact field’s information that is available in email templates. That is a separate Contact that is entered in this same General Information section, but does not appear until after the application setup has been saved. You will need to then access that contact setup by clicking on the General Information Icon in the Application Forms Setup Dashboard. See below in the section Contact Information.
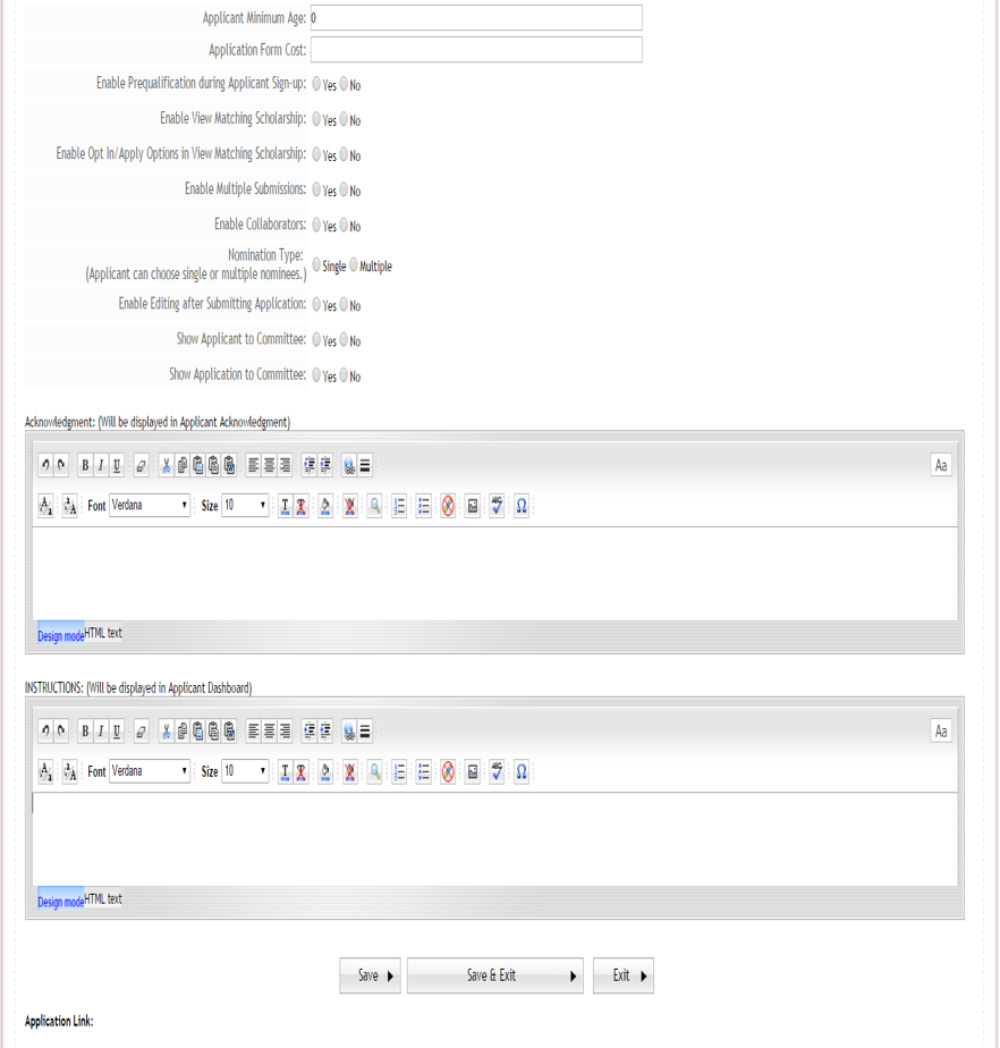
2.2.3.10 Applicant Minimum Age
The minimum age to apply for this application, if applicable. Enter 0 (zero) if no minimum age is required. If the applicant’s age is below the specified age, he/she is directed to a screen which gives them an explanation as to why they cannot apply. This message is entered in the Acknowledgement section of this setup screen.
The minimum age is based on the user’s date of birth entered when they first create their account. If their age is less than that for the application, the applicant will be directed to a new page where the acknowledgement statement will display.
2.2.3.11 Application Form Cost
If your application form requires an application fee you would enter the amount of the application fee that the applicant must pay prior to submitting their completed application.
This setting will appear only if it has been enabled in the Administration/Site Settings and you have purchased the integration functionality to accept payments using a third party payment software.
(For more details on the Application Form Cost functionality see: Additional Application Setup Features, Application Payment Form)
2.2.3.12 Enable Prequalification during applicant Sign-up
Enables the feature to allow you to create Pre-Qualification yes/no questions for an applicant to answer prior to having access to the application. These questions must be arranged in a combination format, meaning if the applicant answers the specific combination of yes/no questions they have access or are denied access. (For more details please see Pre-Qualification Question Setup).
Yes - Activates the Pre-Qualification questions to appear and applicant will not be allowed access until they answer the correct combination.
No - The Pre-Qualification questions will not appear to the applicant and they will have immediate access to apply.
2.2.3.13 Enable View Matching Scholarships
Used if you have multiple funding sources with separate applications for each. If you want the applicant to be able to see additional applications for funding sources similar to the one they just applied to, based on similar criteria, you would set this to yes. The other funding opportunities available would then appear after they submitted with the option to Opt/In and apply to those additional applications. This will require additional set up in the Manage Application Funds, and the Manage Funds Criteria Information sections of the application setup. Both applications would need to have the same xml on the criteria questions that are used to determine the match.
Yes – Activates this feature and the applicant sees a list of funds they are matched to.
No – The applicant would not be able to see the listing, and/or this is not an option you want to set up for your applicants.
2.2.3.14 Enable Opt In/Apply Options
If using the Enable View Matching Scholarship feature an applicant can opt in to apply to other applications or if it is disabled and is being used with the View Matching Scholarships the applicant can view fund details.
Yes – Activates this feature and the applicant sees a list of funds they are matched to and given the option to opt in and apply to those additional applications. They would then appear in their “My applications” tab and they would click on each matched application to completed and submit.
No – The applicant would not be able to see the listing, and/or this is not an option you want to set up for your applicants.
2.2.3.16 Enable Proxy
This enables an applicant to apply on behalf of someone. To activate this functionality, ‘Multiple Submissions’ must be enabled.
(For more details on the Proxy Functionality see: Additional Application Setup Features, Proxy)
2.2.3.15 Enable Multiple Submissions
This allows an applicant to apply multiple times to a specific application without having to create two accounts. To apply to the application after the first, the user returns to the scholarship list and there would then be an option to start a new application. Select ‘Yes’ to enable.
(For more details on the Multiple Submission Functionality see: Additional Application Setup Features, Multiple Submissions)
2.2.3.17 Enable Collaborators
Collaboration allows an applicant to collaborate with other individuals to help complete specific sections, of their application. Select ‘Yes’ to enable.
When “Enable Collaborators” is set to “Yes”, an Add Collaborators button will display on the applicant dashboard for that specific application, where the applicant can click on and assign specific sections to other individuals to complete. The completed sections will be viewable by the applicant.
(For more details on the Collaborators Functionality see: Additional Application Setup Features, Collaboration)
2.2.3.18 Nomination Type
If there are request section in your application this will allow the ability to have the applicant select one nominator to complete all the request sections in an application or have the ability to select multiple nominators, one per each request section, in an application.
Single – All request sections go to a single nominee. Applicant will click a single icon on their dashboard and enter the contact data for one nominee to complete all the required request sections.

Multiple – Each separate request section can go to a different nominee. Applicant selects each separate request section and enters the nominee’s contact information just for that one specific request section.

2.2.3.19 Enable Editing after Submitting Application
Determines if an applicant can re-enter/change data on their application after they have clicked the Submit button and submitted their application.
Yes - The applicant can go back in to their application after it has been submitted and make changes to the application
No- The applicant is unable to change any information once their application is submitted and the section must be released back to the applicant by the Admin if a correction/addition is to be made. (See Release a Section to Applicant)
2.2.3.20 Show Applicant to Committee
Allows you to perform a blind process review of the applicants determining if the Applicants identifying information will be shown on the evaluation committee reviewer’s dashboards when reviewing their applications.
Yes – Allows the committee reviewers to see the identifying information of an applicant
No – Allows for a blind process review in which the committee reviewers are not able to see the names of the applicants they are reviewing in their review dashboard or any application pdf’s created specifically for Reviewers.
2.2.3.21 Show Application to Committee
Allows the committee reviewers to see the applicant’s application. However, sections and/or questions can be hidden from their view when setting up that section and/or question in the application. (See Section Setup and Question Setup)
Yes – The committee reviewers can view all allowable fields of the application.
No – The committee reviewers cannot view any part of the application.
2.2.3.22 Acknowledgement
The message displayed to an applicant if they do not meet the Applicant Minimum Age as set above.
2.2.3.23 Instructions
These instructions are displayed on the Applicant’s application dashboard once he/she enters the application to begin completing the various sections.
Example of an Instruction message for the applicant dashboard:
Once the application has been submitted, no additions or corrections to the application will be allowed. Each section below must read 100% in order to submit your application. If a section does not read 100%, you have missed a required question(s) in that section.
IMPORTANT: Click on the Request Section Icon to send an email to your Guidance Counselor to provide your transcript. This should be done immediately so that your Guidance Counselor can complete this section by the January 17th deadline. You will not be able to submit your application if this information is not attached.
2.2.3.24 Application Contacts
This will not appear in the initial setup when first creating or cloning your application. This will only appear after you have save the application setup and clicked the General Information Icon in the Application Setup Dashboard.
This allows you to select a key contact for the application process. If your Global Admin selected in the Administration/Site Settings - General Settings, “yes” to the “Send an email to Application Contact, when an Application is Submitted”, this is the contact that would receive that notification email. If you do not enter a contact here, then the emails will not be sent. (Please see your Global Admin to confirm if this has been selected or not)
This is also the Contact information that is used if you select any of the “Contact***” fields in your email templates. If you do not enter a contact, then those fields will return as blank in the email that you send.
An application Contact must already have a user account set up in order to be added as a contact.
Exercise 1
Step 1: Select the Add a Contact button

The following screen will appear for you to search for the contacts name in the listing of users.
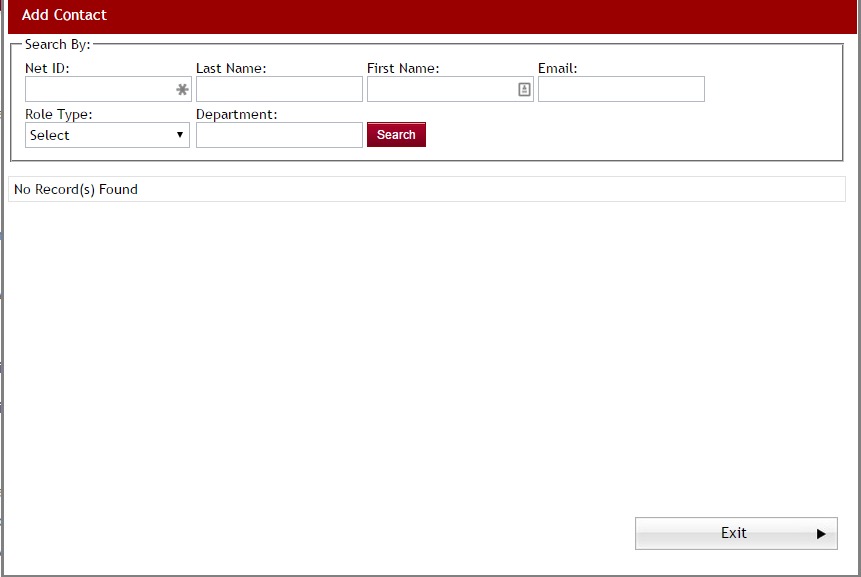
Step 2: Enter the contacts information into any of the fields to search for their information and click the search button.
A listing of all the users that match the search will appear at the bottom of the screen
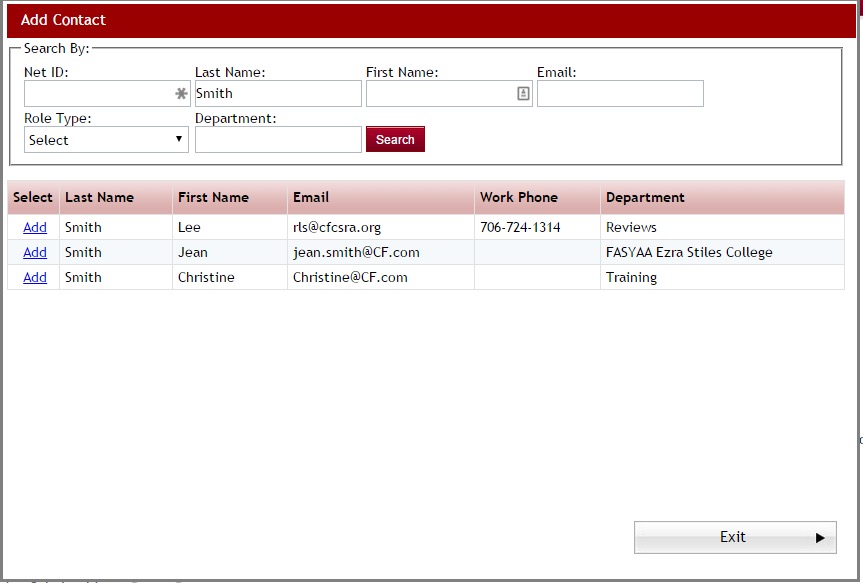
Step 3: Click the Add next to the user that is your contact. You will get a message that they have been added, click Ok.

The contacts information will now appear at the bottom of the General Information Screen

2.2.3.25 Application Link
This will not appear in the initial setup when first creating or cloning your application. This will only appear after you have save the initial application general information setup and clicked the General Information Icon in the Applications Setup Dashboard.
This is the URL link that can be used to post to a web page or in an email to invite someone to apply to that application.
2.3 Accessing the Applications Dashboard
After you have created the initial application using the Create A New Application or Clone an Existing Application button you will be returned to the Application Listing table. This is also the same listing you see when clicking on the Setup Applications Form in your Home Dashboard or clicking on the Applications Navigation link at the bottom of each page.
Exercise 1
Step 1: Locate your new application in the listing and click on the name in the Application Form column.
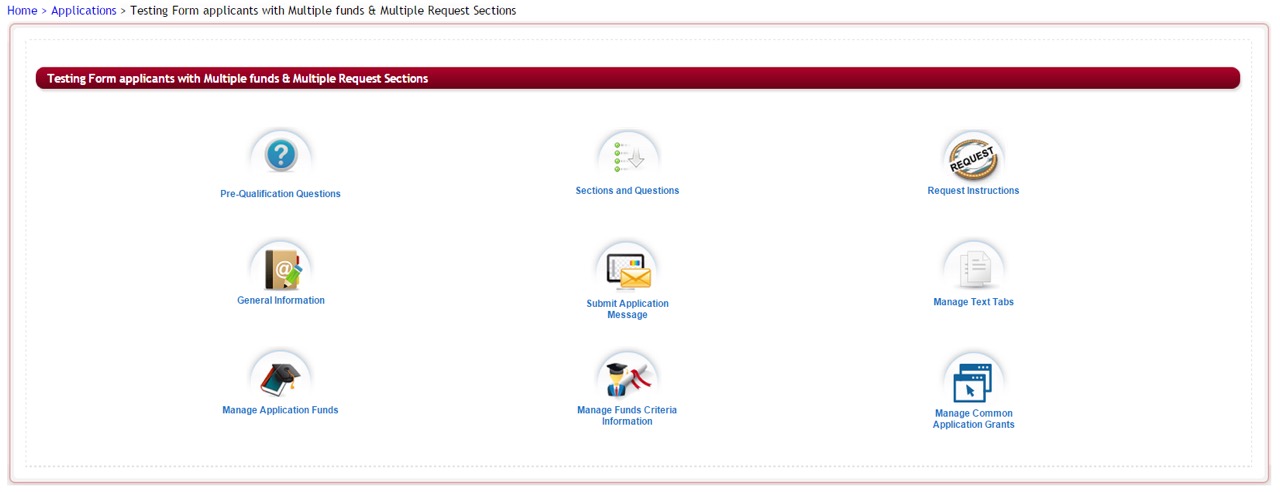
The Applications Dashboard for the application you selected will appear.
2.4 Setting up Pre-Qualification or Prescreening Questions
This section will pre-qualify the applicants before they can apply to an application.
This is an optional feature that you can choose to add if pre-qualification is required.
When using Pre-qualifying questions in an Application, you can create yes or no pre-qualification questions along with different answer combinations for those questions that allow the applicant to login to the application. Depending on how the applicants answer the combination of those questions, will determine if they qualify to proceed with filling out the application or if they are redirected to a denial message.
To assign pre-qualification questions to an application you must first go into the Application Form in the General Information setup and select “yes” to Enable Prequalification during applicant Sign-up if this was not already done when creating the application or form.
If Enable Prequalification during applicant Sign-up is set as “yes” the pre-qualifications section will be assigned to an application and if it is set to “no” then the pre-qualification questions will not be assigned to the Application.
Once the Enable Prequalification during applicant Sign-up has been selected you can open this section in the Application Dashboard and set your pre-qualification questions.
Exercise 1
Step 1: From the Application Dashboard, click the Pre-Qualification Questions Icon
The pre-Qualification Questions page will open:
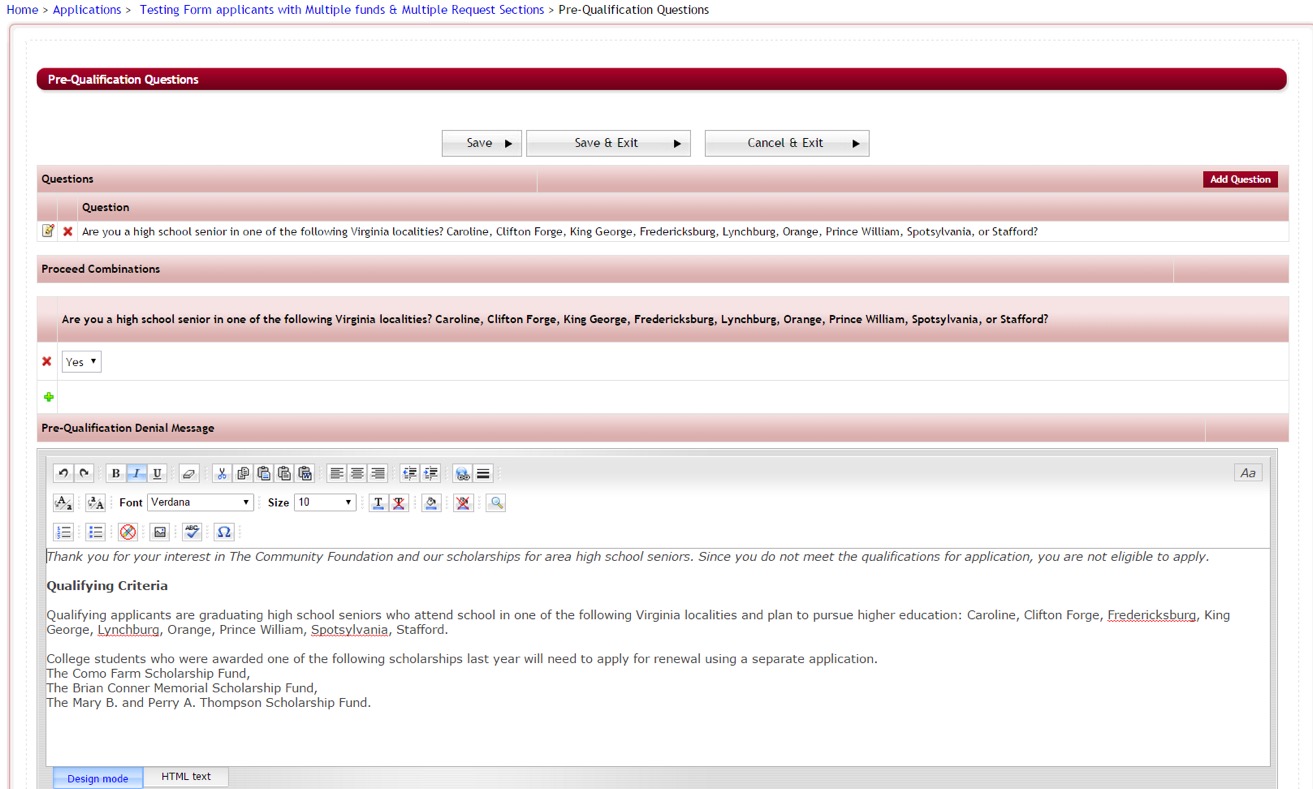
Step 2: Locate the Questions section at the top of the page:
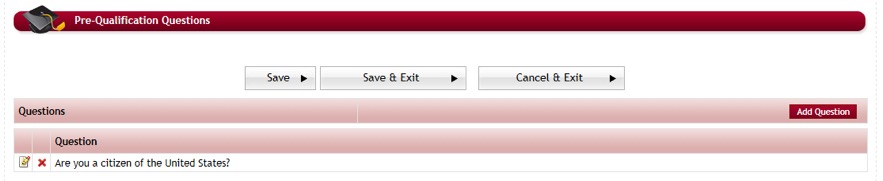
Step 3: Click on the ![]() button to add a new question. The following screen will appear:
button to add a new question. The following screen will appear:

Step 4: Enter the question in the Question field and click on the Save button to save the question entered.
There are no limitations on how many questions you may add. You can click the Add Question button again to continuing adding additional questions.
Tip Best Practice: Keep it simple. Reports or any tracking are not done on these questions. If you go back in and edit, add, or delete a question. Remove the combination and reset it.
Step 5: After you have entered all your questions, in the Questions section you’re ready to set the reply combinations for your questions. LocateThe Proceed Combinations Section in the middle of the screen.
There should be a column for each question that you have created along with a Yes/No box. You will enter the appropriate Yes/No reply that will allow.
Step 6: Locate your questions column, then under that question enter the Yes or No reply that is the correct eligibility reply that the applicant would need to answer to continue with the application. Do this for each question.

Step 7: Locate the Pre-Qualification Denial Message at the bottom to the screen
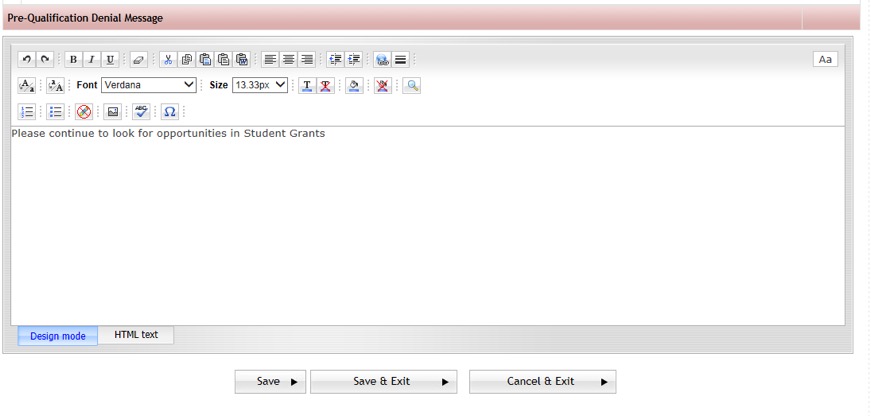
This is the message that appears for the applicants who don’t meet the required qualifications set in the Pre-Qualification Questions.
Step 8: Enter the Message in the editor box that you want to appear to applicants that are denied access to apply.
Design Mode: The HTML editor works exactly the same way as Microsoft Word works. Type the information into the body of the editor as you would be typing and formatting it in a Microsoft Word document. You can also copy and paste the formatted text from other documents.
HTML Text: You can create the Message page using html tags by clicking on the HTML Text tab present beside the Design Mode tab. Enter the html tags with the content and it will display all the content as formatted.
Step 9: Once you have entered all your questions, the combination replies, and the Denial Message Click Save or Save & Exit to save your changes and return to the Applications Dashboard.
2.5 Adding Sections
Once you have created your application you will need to create the individual sections and questions within the application.
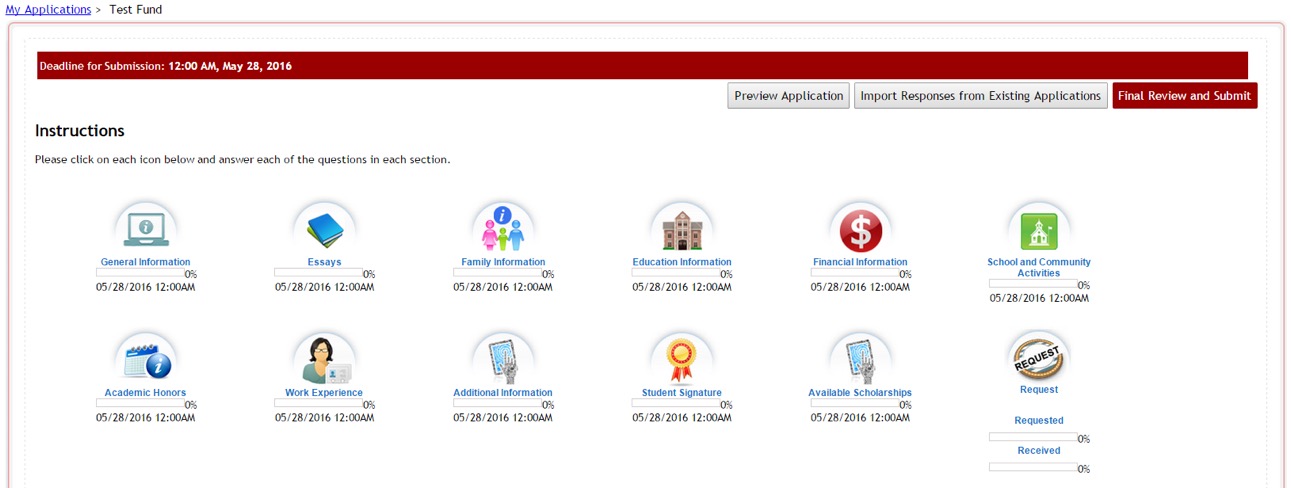
The questions are categorized into various sections for the applicant to navigate easily through the process. Each section will be identified with a separate icon on the applicant’s dashboard that they see when they login to the application.
Sections and Questions is where you will create these sections and their individual questions for your application. Below is an example of the applicant’s dashboard and how these sections are viewed by him/her. Notice that each icon represents a separate section in the application.
Note: if you clone an application from a previously existing application these questions and sections will be cloned as well and will show those cloned sections when you come to this section.
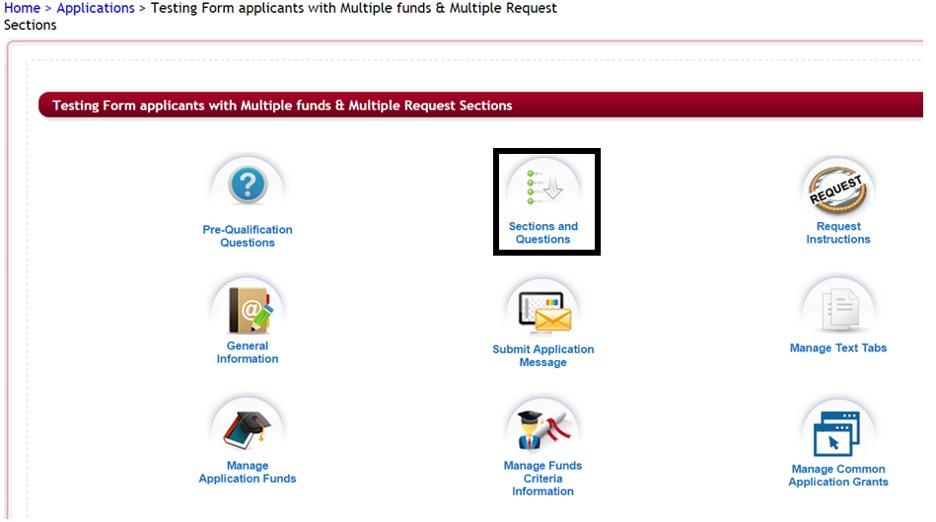
2.5.1 Navigating to Section and Questions Setup
Exercise 1
Step 1: Select from the Home Page – Application Setup
Step 2: Select from the listing of applications the application you want to setup the sections and questions for by clicking on the name in the Application Form column.

This will bring you to the Applications Dashboard.
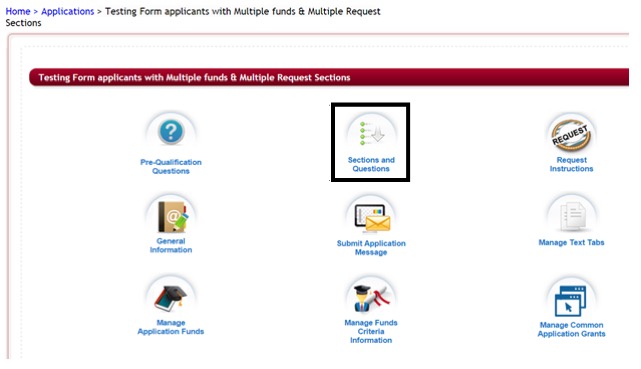
Step 3: Select the Sections and Questions Icon.
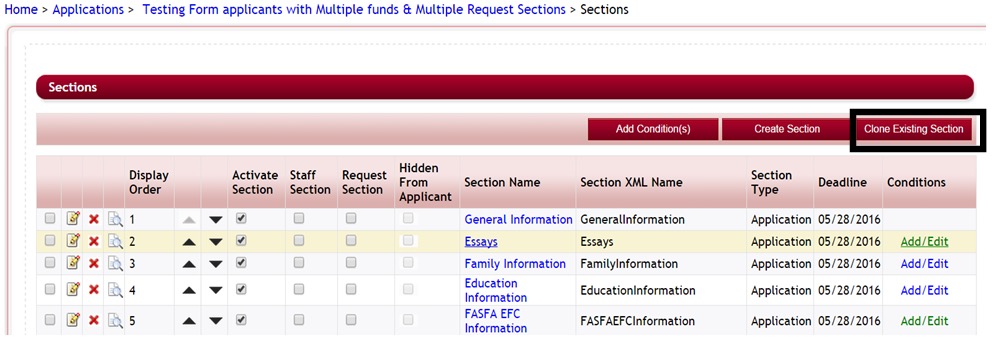
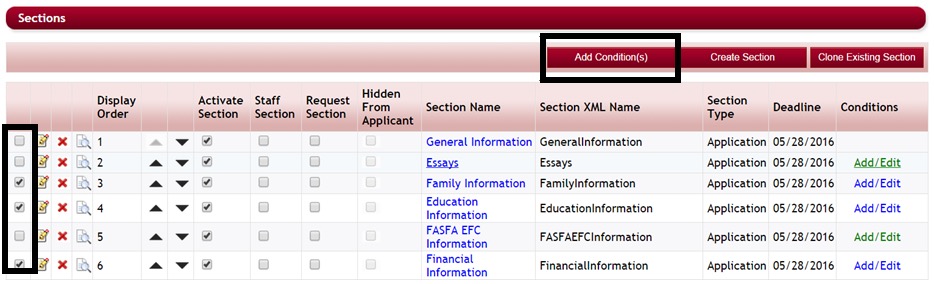
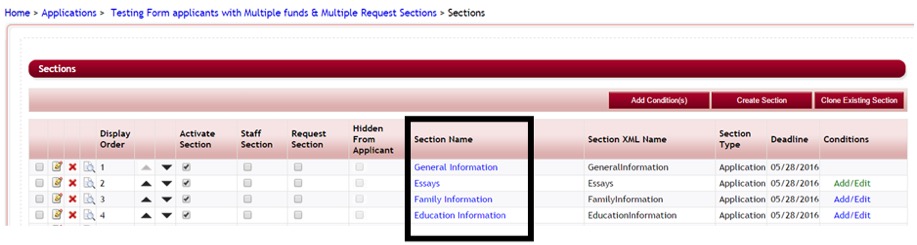
This will open the Sections page, listing all the available sections in your application.

2.5.2 Overview of the Sections Listing:
Menu Buttons:
- Add Conditions(s): Allows you to add conditions to multiple sections
- Create Section: Allows you to create new sections within your application form.
- Clone Existing Section: Allows you to clone a section from another application or within the same application.
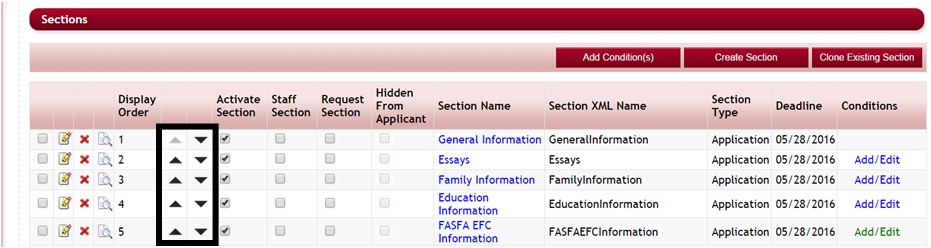
Section Listing Columns
- Selection Box: used to select specific sections when adding conditions.
- Edit Icon: Allows you to edit the section setup information
- Red X: Allows you to delete sections within your application form.
- Preview Icon: Allows you to see a preview of what the complete section will look like on the applicant’s dashboard.
- Display Order: The order sequence the section will appear on the applicant’s dashboard.
- Up and Down Arrows: Allows you to move a section upwards or downwards to adjust the display order.
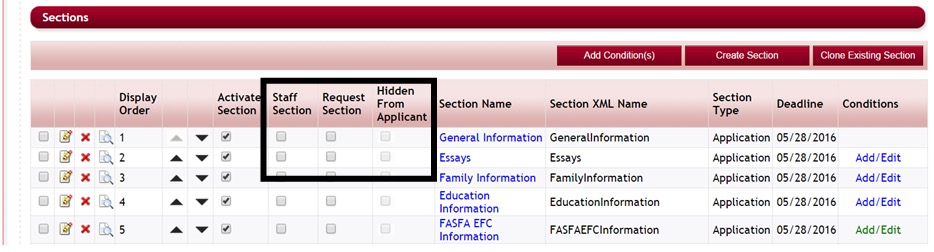
- Activate Section: Makes a section active and visible on the applicant’s dashboard
- Staff Section: If checked this will be a staff section only visible to staff
- Request Section: This is a request section and not viewable by the applicant, applicant will assign a designated individual to complete this section.
- Hidden from Applicant: This is a section that is not viewable by the applicant
- Section Name: The name of the section
- Section XML Name: The XML mapping name given to the section for linking data to external databases or other applications for report pulling and data export/import.
- Section Type: The type of section
- Deadline: The deadline date given to the specific section
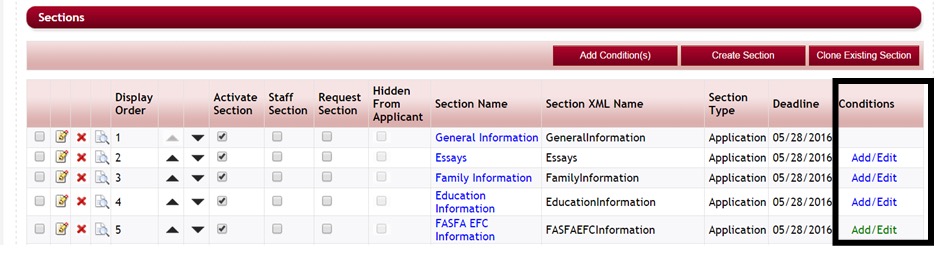
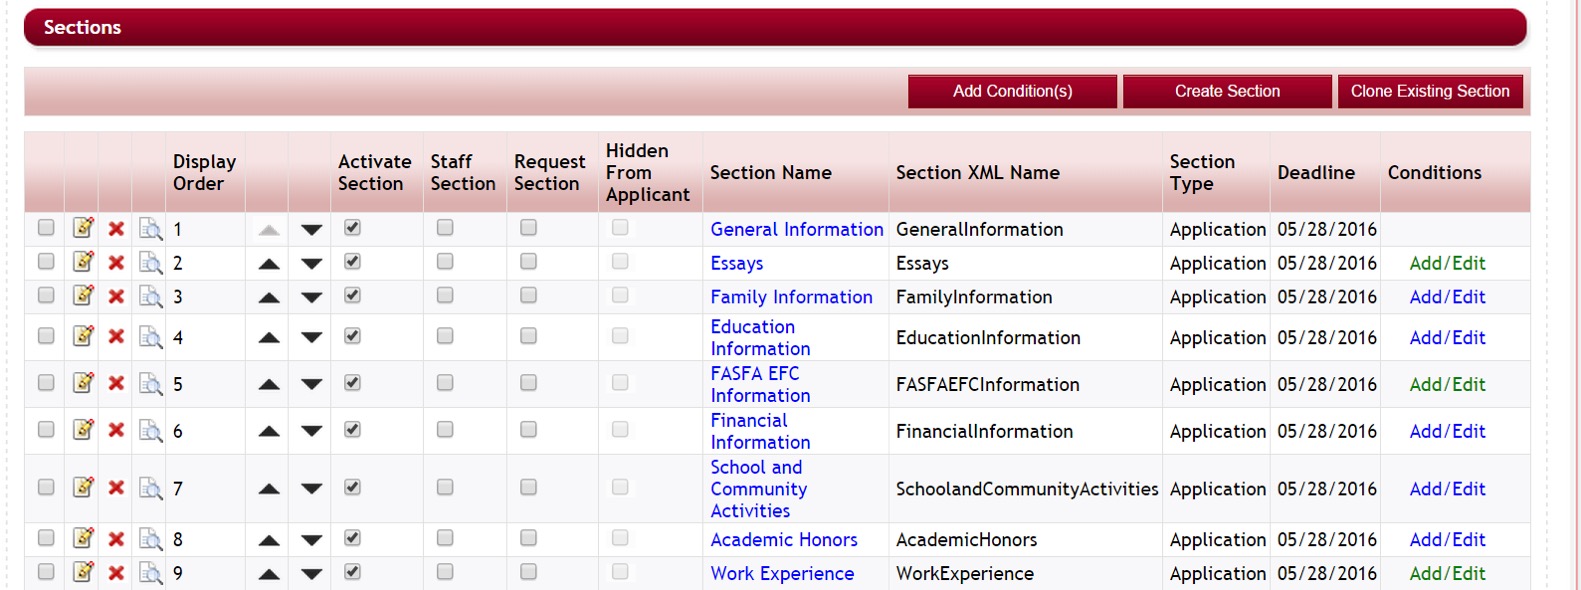
- Conditions: Add/Edit: Used to set specific logic conditions to allow the section to appear on the applicant’s dashboard based on how the applicant answers specific questions elsewhere in the application. If green then there are conditions set on this section.
2.5.3 Creating a New Section for Your Application Form
There is no limit to the number of sections you can create.
A section must be marked as Activate Section in order for it to be visible on the application.
Exercise 1
Step 1: From the Application Dashboard click on the Sections and Questions icon. This will open the table view of the application Sections.
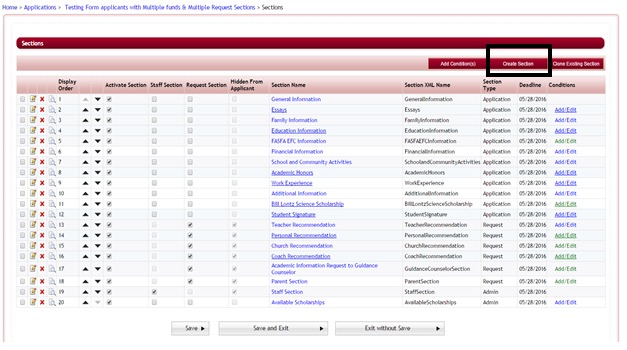
Step 2: To create a new section Select the Create Section button.
![]()
A new screen will open up
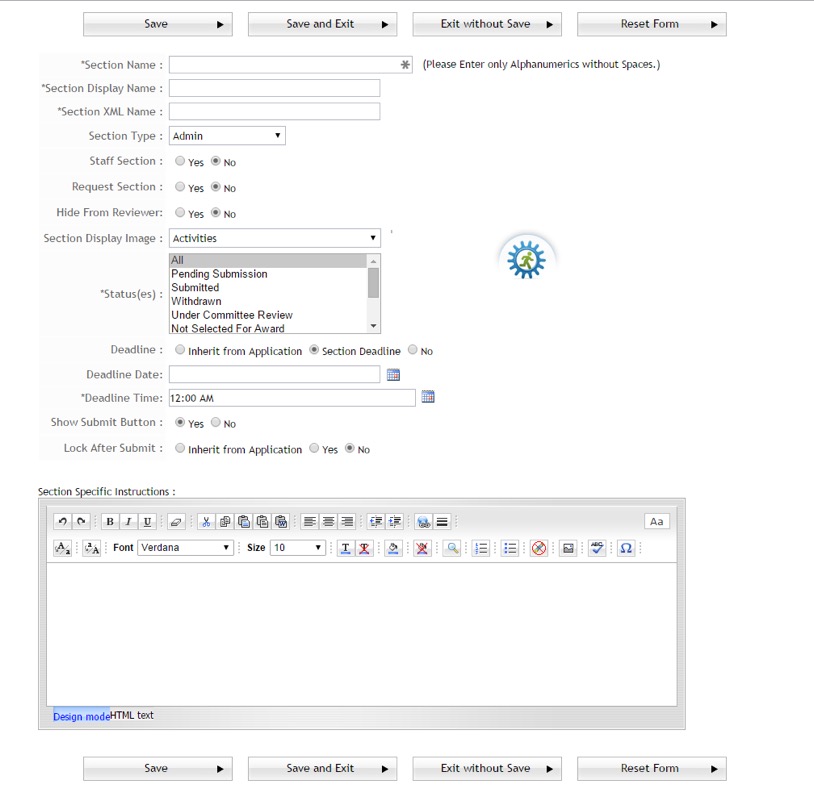
Note: As you’re completing this form, items marked with an * are required and must be completed.
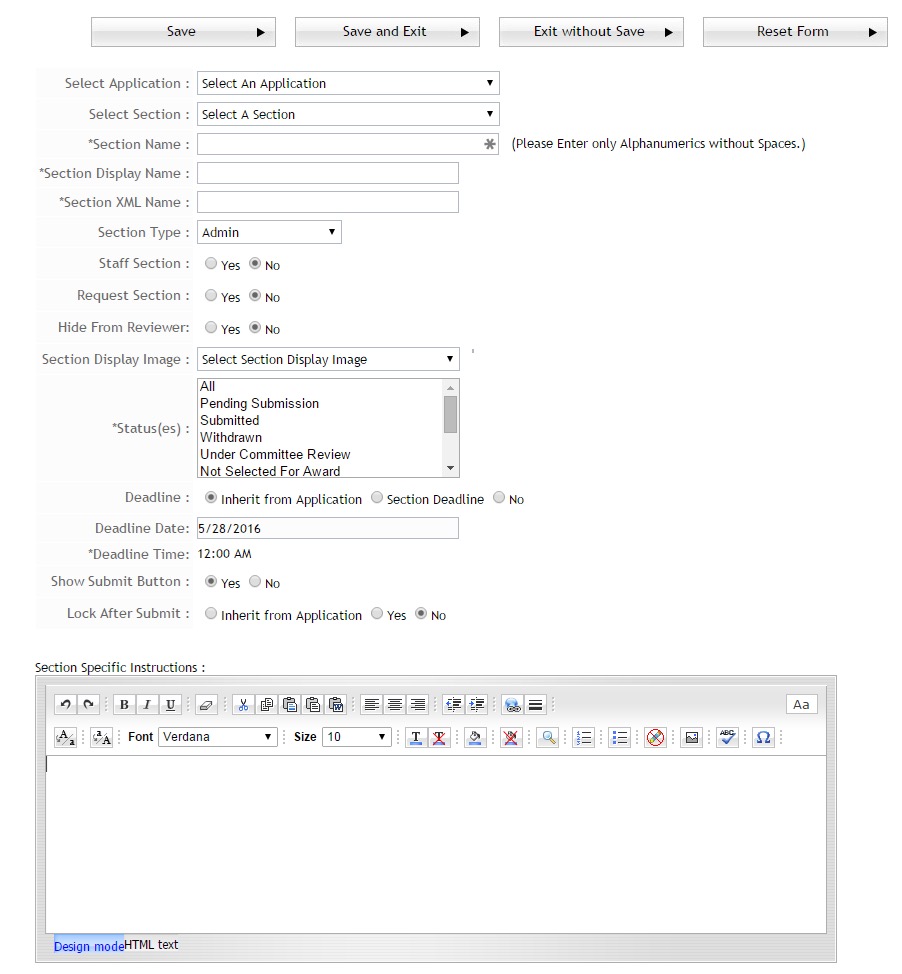
2.5.3.1 Section Name and Display Name
Step 3: Fill in the Section Name
This is used for reporting purposes and won’t be visible to the applicant. The user should refrain from using any spaces or other special characters other than alphanumeric. If you enter a Section Name with spaces or special characters other than alphanumeric it will remove them when you tab to the next field.
Step 4: Fill in the Section Display Name
This is the title name that is displayed to the applicant on the applicant dashboard.
2.5.3.2 Importance of Section XML Name
Step 5: Fill in the Section XML Name
When importing/exporting data from the CommunityForce system and integrating this same data with another database system, the Section XML name is the most important factor in accomplishing this task successfully. XML names must be created as the same XML name of your integrated database item in order to be able to map the data effectively. Once an XML name is created and mapped to your database, it is important to never change this name. Doing so will break the mapping of data between the two systems.
2.5.3.3 Section Type
Step 6: Enter the Section Type
Sections are organized into Section Types. Section Types describe the type of section it is and helps determine what part of the process this section is used in. Some types are necessary in order to cause other triggers in the system.
- Admin - Sections that are created for use by staff to be completed only by them. If using this type you will want to select that it is also a staff section so that it is not visible to the applicant.
- Application - These are the main sections of the application and are what the applicants see when they first begin to apply for an application. An applicant must complete all of the Application sections prior to submitting their initial application.
- Acceptance - Sections that an applicant can see and complete if offered an award to acknowledge their acceptance or denial of an award. You would also want to use a status of Selected For Award when using this section type. This will allow an applicant to accept or deny an award, and will cause two buttons to appear in this section, Accept Award and Deny Award. Depending on which button they click their status will automatically move to either Award Accepted or Award Declined.
- Post Acceptance - Sections that an Applicant can see and complete regarding how they are to receive the award, i.e. payment information, travel arrangements for a formal awarding event, etc. You would also want to use a status of Award Accepted when using this section type. Using this section type is important in running Post Acceptance reports. Only sections marked as Post Acceptance will appear in those reports.
Requests - Sections created that must be filled out by an outside source, not the applicant, via an on-line form. Only the person who receives the request via email (and the authorized staff) sees the questions in these sections, (i.e. letters of recommendations, sections to be filled out by school counselors, etc.)
2.5.3.4 What a Staff Section Is and How You Could Use It
Step 7: If you want this section to be viewable only to staff or reviewers, select “Yes” otherwise select “No”.
Sections marked as Staff Sections are only view-able by authorized staff and not the applicant and can be used to create questions to be filled out for internal purposes. You can mark a section as a staff section by selecting “yes” for the Staff Section. These sections can be used for internal purposes including uploading additional information to the applicant’s application used for internal review, tracking colleges that applicants chose, staff interview notes, site visit notes, etc.
2.5.3.5 What a Request Section Is and How You Could Use It
Step 8: If you want this section to be a Request Section, select “Yes” otherwise select “No”.
Request Sections require the applicant to assign a designated person to fill out a specific section on their behalf.
This section is private and not viewable by the applicants, but the applicant can see when the designee has completed this section or if the designee has rejected their request. Questions can be created by the Admin that the designee can answer regarding the applicant as well as upload any documents that may be requested of them.
When the applicant enters the designated persons information in the request section, an email will go out to that individual with a link and access code that they can click on to be directed to the section they are to complete.
This is useful for requesting applicant transcripts, entrance exam scores, letters of recommendations, parent signatures, etc.
If you are using Request sections in your application, it is important that you selected the correct Nomination Type when creating the initial application in the General Information Setup. Either Single or Multiple.
Important:  If using a Request Section you will want to also enter the instructions to the Applicant under The Request Instructions Icon on the Application Dashboard.
2.5.3.6 Request Section Email Template
When creating a Section and selecting “yes” for the Request Section, and additional Email Template Field will appear.

Step 9: If you did not already select “yes” for the Request Section, please do so now so that you can see how this appears.
In the Notification Center for your application, there is a default email template Application: Request From Applicant if you select the Default Email Template selection this is the email that will go out to the designated individual.
However there are times when you will have multiple request section in your application form, therefore you can create, in the Notification Center for each Application, separate Nomination templates with different messages for each separate request section. If you have created additional Nomination Templates those templates will appear in this field for you to select the correct template for the correct request section.
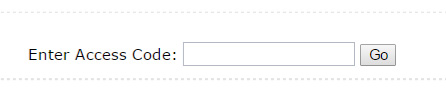
In this email template there is a link directing the indiviudal to the section they are to complete as well as an access code. If for some reason they are not able to click on the link and be directed to the section, they can also go to the site and click on the Nominator Login located in the bottom right hand corner of the Login screen and enter the access code that was given them. (Important: If you create additional Nomination templates it is important to make sure you include the links and the access code fields).
The nominee can then enter the access code received in their email to access the nominated request section.
Note: Once the section has been completed by the designated individual an email will be sent to the applicant notifying them that the section has been completed (See Notification Center email template Application: Request Completed)
If a designated person does not want to complete the section they will have the option to deny the request once they have opened their assigned section. If they deny it the applicant is sent an email notifying them of the denial (See Notification Center: email template Application: Request Declined).
These emails are application specific so you will want to go to the Notification Center for each of your applications and make the needed changes to each.
2.5.3.7 What the Function of ‘Hide from Reviewer’ Button Is and How You Could Use It
Step 10: Select “Yes” if you don’t want this section to be viewable by your Reviewers, otherwise select “No”.
Hide from Reviewer allows an entire section to be hidden from all Reviewers so that they cannot see the section in their review process. This is helpful for staff sections, or section that contains personal information that you do not want the reviewers to have access to or may contain data that is not pertinent to the reviewer making their decisions and may cause the reviewers to be biased when scoring (Address Section, Personal Information Section, Demographic statistical sections, etc.)
Note: This will hide the complete section, however, if you do not want the entire section hidden there is also the option to hide just specific questions when you are creating the questions for the section.
2.5.3.8 Display Order
Step 11: Enter the order number that you want this section to appear in the applicant’s dashboard (i.e. 1 = this will be the first icon in the line of section, 2 = the second, etc.)
This defines the read order in which the applicant views the specific sections on their dashboard, the sections are viewed left to right and you can adjust the order of where the sections fall within the applicant’s dashboard.
2.5.3.9 Choose a Section Display Image
Step 12: Click on the drop down arrow and scroll through the listing of available images, select the image you want for this section. The image that you selected will appear to the right of the screen. If this icon is not want you want then you can select another one until you get the desired icon.
Every section on the applicant dashboard has an image assigned to it. In the Section Display Image, the Admin can select an image icon from a variety of images. Choose an image that is descriptive of the section the applicant is filling out.
2.5.3.10 Statuses and How You Could Use Them
Step 13: Select the Status that you want the applicant to be at when they see this section in their dashboard.
Status(es) are automatic triggers that move an applicant through the application process depending on where the applicant is in the process, and are mainly driven by the by the Admin.
You can set a status on your section so that applicants will not see that section until they have been moved to a specific status in the process.
Each status is described below along with the trigger that moves the applicant to that status:
When creating sections by a Section type you would want to select only applicants with a specific status to see that specific Section type’s sections.
Example: You create a section with a section type of Post Award and a Status of Award Accepted so that the applicant can fill out information pertaining to the award they received and how they have used it, like a final reporting. Only those applicants that have the status of Award Accepted would be able to go in and complete the additional sections. All other applicants would not be able to see this section.
Status Types:
- All - No specific Section type or Status Detail needed to be accessible. All applicants can view this section no matter what status they are in the process.
- Pending Submission - The applicant has started their application but has not yet submitted.
- Submitted - The applicant has clicked the submit button on their application and submitted their application and if present all request sections have been completed by the designee.
- Withdrawn - The applicant has chosen to withdraw their application for this application process by using the withdraw feature of the program.
- Under Committee Review – The applicant has been assigned to a committee anywhere within the application process.
- Not Selected For Award – The applicant has been marked as denied an award in the awards section
- Selected For Award - The applicant has been selected for an award in the awards section.
- Award Accepted - The applicant has accepted an award
- Award Declined - The applicant has declined an award
- Request Pending – Applicant has submitted their application form but the designated individual has not yet completed the request section on behalf of the applicant.
2.5.3.11 Setting a Section Deadline Options
Step 14: Select the Deadline Type, as well as the Date and Time if applicable. If you want the same deadline information as the application select the Inherit from Application option.
Sections of the application can carry the same deadline information as the application or have deadlines specific to that section.
A Section’s deadline determine when the section will no longer be available for the applicants to fill out and will be turned off according to the Deadline Date and Deadline Time selected.
Deadlines can be set according to the following options:
- Inherit from Application - Uses the same deadline date and time as the application deadline. The Deadline Date and Time will automatically be populated with the applications deadline information.
- Section Deadline - Has a separate deadline than the application and is section specific.
- No Deadline - There is not a deadline for this section.
Examples:
Application section types should inherit the deadline from the application.
Request section types may have a different deadline then the application so as to allot enough time for the requester to fill out their information.
Post Acceptance section types may not need a deadline because the Admin may just monitor that they have been completed and withhold payments if they have not.
Award Acceptance section types may have a deadline to accept or forfeit the award. This deadline would be later than the original applications deadline.
2.5.3.12 Adding a Section Submit Button
Step 15: If you have more than one section in your application then click “no” for the Show Submit button.
If you are creating only one section for an applicant to go in and fill out, you can have the Submit button appear within that section instead of having the applicant return to their dashboard. Yes – Allows the submit button to be present within the section. No – Will only have submit on the applicant dashboard and the applicant will need to click out of the section to submit.
Best Practice: Only use the submit button on sections you are opening up to different status and deadlines.
2.5.3.13 Lock an Individual Section after Submit
Step 16: Select the Inherit from application option if you want the same rule as you created for the application. However, if this is a section that you want the applicant to be able to modify even after they submit, select “No”.
After the applicant has filled out their application or a separate additional section within the application they must submit their application/section information. Once they have submitted, you can determine if a section can be modified after it has been submitted or locked so that no modifications can be made to that section.
Inherit from Application – When creating a new application you have the option in the General Information setup to Enable Editing after Submitting Application. Depending on the selection on the application level the section would inherit the same option.
Yes – Overrides whatever the application selection was and will not allow the applicant to make edits after submittal on this section only.
No – Overrides the application selection and will allow the applicant to make edits after submittal to this section only.
2.5.3.14 Importance of Section Instructions and How to Create Them
Step 17: Enterinstructions regarding how to complete this section. If this is a request section the instructions would be directed to the designated individual not the applicant.
Section Specific Instructions are the instructions that will appear below the Section heading in the applicant dashboard when the Applicant clicks on that section. These will be instructions on how to appropriately fill out this section. Type your instructions in the instructions box, which has an html editor that can be used to create the instructional message or you can use the design mode to edit and format the instruction features similar to Microsoft Word.
Step 18: Once you have created your sections, click the “Save and Exit” button to save your information and you will be returned to the Sections listing for the specific application.
![]()
Reset Form – allows you to cancel and reset the form to start over.
2.5.4 Cloning an Existing Section
Cloning an existing section allows you to create a new section within you application that is an exact clone of a section that has already been created within another application you have previously set up, or can be used to copy a section that is currently within the application you are working on.
When you clone a section all the data from that section will be copied along with the questions that were included as part of that section.
Important Note:When cloning a single section any conditional logic that has been set on that section, as well as on any questions within that section will not be cloned. You will have to re-enter the logic.
Exercise 1
Step 1: From the Section and Question Setup listing, click on the Clone Existing Section button.
A new screen will open:
Note: Cloning an Existing section screen is the same screen as Creating a New section with the exception of the following:

Step 2: Select Application - Select the Application that you want to clone the section from. You can choose a section within this same application or you can select a section from another application. Only published Applications will appear in this listing.
Step 3: Select Section - Select the Section from the application that you want to clone
Important: The remaining information will be populated according to the cloned section. Please be sure to update the data accordingly, to fit the new section you are creating.
Step 4: Be sure to click “Save” to save any changes you may have made to the section.
2.5.5 How to Change the Sections Display Order to Applicant
While in the Section display table you can click the up and down arrows ![]() on a specific section to move that sections display order to the next order level or to the prior order level depending on which direction you want to move the sections order. The display order is the read order in which the applicant views the sections on their dashboard. Sections display left to right in the applicant’s dashboard.
on a specific section to move that sections display order to the next order level or to the prior order level depending on which direction you want to move the sections order. The display order is the read order in which the applicant views the sections on their dashboard. Sections display left to right in the applicant’s dashboard.
2.5.6 How to Activate a Section
![]()
After a section is created you will need to activate that section for it to appear in the application.

While in the Sections listing, click on the Activate Section check box next to the section you want to include in the application and click “Save”.
If there is not a check mark in the box the section will not appear on the applicant’s dashboard.
When cloning applications and there are sections from the cloned application appearing that you do not want to include in the new application, to de-activate unclick the Activate Section check box and click “Save”.
Best Practice: If you have sections that are set by a specific statuses, you may want to leave those sections without a check mark until you are ready to release those sections to the applicants.
For Example:
You have a section created for the applicant to provide you additional information prior to accepting the award. You created that section to trigger as soon as the applicant’s status is Selected for Award. If you are awarding applicants in the awarding section, as soon as you award them, their status will automatically change to Selected for Award. Since you have not notified the applicant yet of the award you may not want that section to appear in their dashboard. Therefore by leaving not Activated you can notify the applicant’s and then activate the section for them to complete.
2.5.7 Hiding a Section from Applicant and How to Use It
This is located in the Sections listing.
If you have a section that you need to be active on the application, but you do not want the applicant to have access to this section, you can hide that section from the applicant. This is used on Request Sections and Staff Sections that need to be completed by someone other than the applicant and the information is to be confidential.
On this section you will need to have check marks in both the Staff Section and the Hidden From Applicant or Request Section and Hidden From Applicant.
Note: To fully understand the functionality of these two areas, please be sure to refer to the training modules for “What a Staff Section is and How You Could Use it” and “What a Request Section Is and How you Could use it”.
2.5.8 How to Edit an Existing Section
To edit an existing section within an application, while in the Sections listing select the Edit icon next to the section to be edited.
This will open the Add/Edit Section setup; edit the appropriate information and click “Save” to save any information you have updated.

2.5.9 How to Delete an Existing Section
To delete an existing section within an application, while in the Sections listing select the click on the red X next to the section to be deleted.
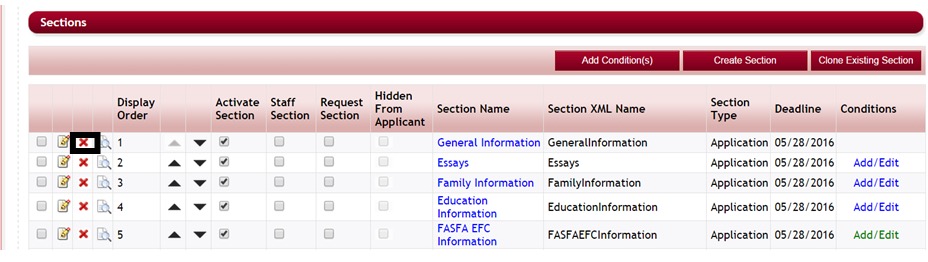
Use extreme caution when deleting a section as you will not be able to retrieve it once it has been deleted.
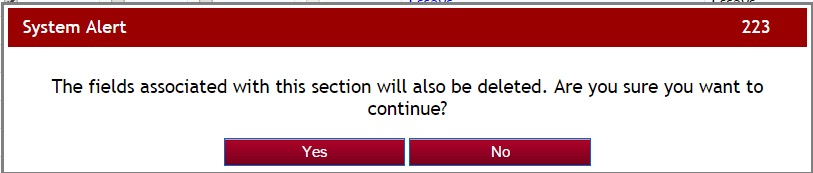
You will receive a confirmation stating that all the fields/questions associated with this section will also be deleted, if you are sure you want to delete, click yes to continue.
Note: If data has been entered by an applicant you will not be able to delete that section.
2.5.10 How to Set Conditional Logic on a Section
There may be instances in which you need an applicant to fill out different sections of an application that may not be necessary for all applicants to fill out that same section. Conditional Logic can be set on a section that will trigger it to appear depending on how the applicant answers questions within other sections of the application.
Conditions are set on the section that is going to be affected by the conditional logic and appear when the condition is met.
Exercise 1
Step 1: While on Section and Question Setup Listing, set conditional logic on one specific section, by clicking on the Add/Edit in the Conditions column next to that section.
Note: The first section will not have conditions, as this is the first screen that the applicants will see and cannot be blocked with conditions. Sections that have conditions set on them will be have the Add/Edit under the conditions column highlighted in green.
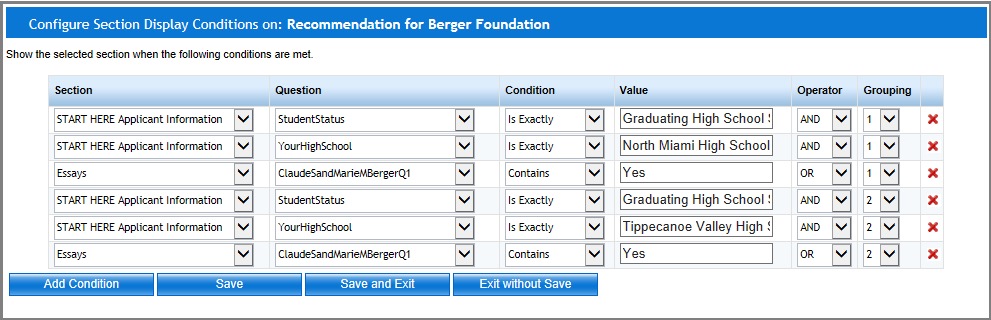
The Conditional pop-up is used to define when a section is shown to the applicant based on how the applicant answers specific questions within your application. These can be set on a single data value or a combination of data values. When creating conditions you are selecting the values that will allow the selected section to appear in the applicant’s dashboard, if the condition is met. Sections that do not have conditions set on them will automatically appear and do not need conditions to be visible.
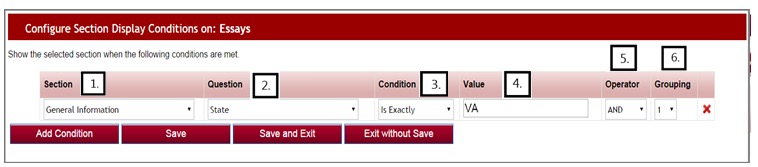
Step 2: Try entering a condition on a section using the following guidelines. Once you enter your first condition, click the Add Condition button to enter additional lines of conditions. The red X will allow you to delete a condition you do not want.
To add a condition to show a section:
1. Section: What section has the question that will trigger this section to appear? Select that section.
2. Question Name: What question is the trigger for this section to appear? Select that question.
3. Condition Type: What is the condition of the answer/value that has to be met in order for the section to appear? Select that condition. Possible conditions are:
- Contains – the answer/value contains this value
- Starts With - the answer/value starts with this value
- Does Not Contain – the answer/value does not contains this value
- Is Not Empty – the answer/value is not empty (applicant has answered this question)
- Is Empty – the answer/value field is empty (applicant has not answered this question)
- Is Exactly – the answer/value must exactly match the value.
- Is Less Than – the answer/value is numeric and is less than the value amount
- Is Equal To – the answer/value is numeric and is equal to the value amount
- Is Greater Than – the answer/value is greater than the value amount
- Is Not Equal To – the answer/value is numeric and is not equal to the amount.
4. Value: What is the answer/value the applicant must answer in order for the section to appear? Enter the value. (The value must be entered exactly as it is in the question setup)
5. Operator: Used when entering multiple lines of condition values. And means all of the conditions in the listing need to be met in order to cause a section to appear. Or means either of the conditions needs to be met. This applies to the row that and/or is on, and the next condition row following. If you have groups of conditions, it applies to each line in the group and then on the last line of the group, how it relates to the next group of condition values.
6. Grouping: This column groups your conditions into sets of conditions. You may have several groups of condition where the first group is executed and then the second group is executed etc. Assign each of the conditions in a group the same number. The first group is 1, the second group is 2, etc.
Example 1: You want the Work Experience Section to only appear for applicants that have completed the General Information Section and selected “Yes” to the question: “Are you currently employed?” And they selected “yes” to the question: “Do you have employment information to include?” You would enter the condition as follows on the Work Information Section:
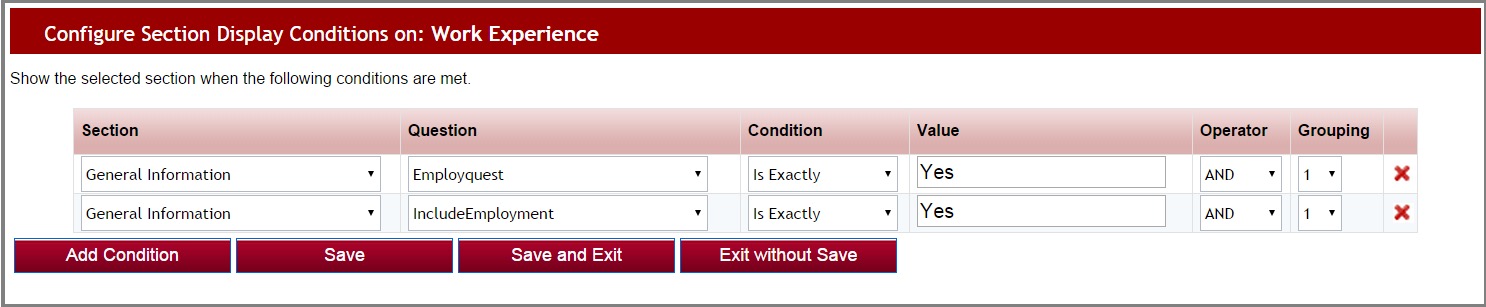
The section would not appear unless the applicant answered exactly this way on both of the questions. If they answered “yes” on one and “no” on the other it would not appear. If you used “or” then it would have appeared on just one of the questions answered as “yes”.
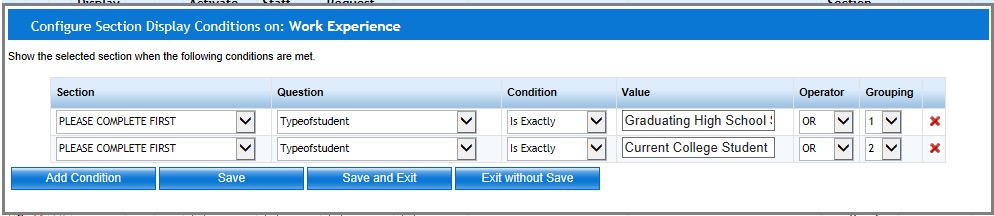
Example 2: The essay section is only necessary if you are a Male older than 25 or a Female older than 20. So you want the Essay Section to only appear for applicants that have completed the General Information section and selected Gender: “Male” and answered Age: as any age greater than 25. Or Gender: “Female” and answered and answered Age: as any age greater than 20. The condition would be set as follows:

The section would appear if the applicant answered he was a male and his age was above 25, both conditions would have to be met for group 1.
Or the other reason the section would appear would be if:
The applicant answered she was a female and her age was above 20, both of her conditions would have to be met for group 2.
Step 3: after you have entered your conditions information, be sure to select Save to save any conditions you have added.
Step 4: Once you return to the Section listing screen the Add/Edit in Condition column next to your section will now display as green, showing that conditions have been entered on that section. If it is not showing as green click ”Save” on the Sections listing screen to refresh your information.
Additional examples of Section Logic:
2.5.10.1 Setting Conditional Logic on Multiple Sections
If you have sections that have the exact same conditional logic on multiple sections you can set the logic for all the sections at the same time without having to go in on each separate section to set it.
Best Practice Tip: Once a section has logic set on it you will not be able to select it for the multiple selection option. Therefore, when setting logic on multiple sections, set that multiple logic first. Then go back in on the individual sections and add the additional conditions that apply only to that single section.
Step 1: While in the Section and Question Setup Listing, select the all the sections you want to enter the logic on, by entering a check mark in the box next to that section.
Step 2: Click the Add Condition(s) button.
This will open the Add condition box, notice that it list at the top of the box all the sections it will be adding that condition to:

Step 3: Enter the conditions, as you would if it was just for one section, that apply to all the sections and click the Save and Exit to return to the Section Display. All the sections will now have the condition set on them.
Note: If you need to add additional conditions on just one of the sections that you just updated in the group, you can click on the Add/Edit next to that section and add the additional conditions that apply only to that section.
2.6 Adding Questions to your Sections
Once you have created the sections of your application you can create questions under each section of your application for the applicant to answer. If you are not already in the Section and Questions set up you will need to navigate to that section as follows:
Exercise 1
Step 1: Select from the Home Page – Setup Application Forms

Step 2: Select from the listing of applications the application you want to setup the section’s questions for by clicking on the name in the Application Form column.
This will bring you to the Applications Dashboard.
Step 3: Select the Sections and Questions Icon.
This will bring you to the Sections listing, showing all the sections of your application.
Step 4: To create questions for a specific section, you will need to click on that section’s name under the column “Section Name”.
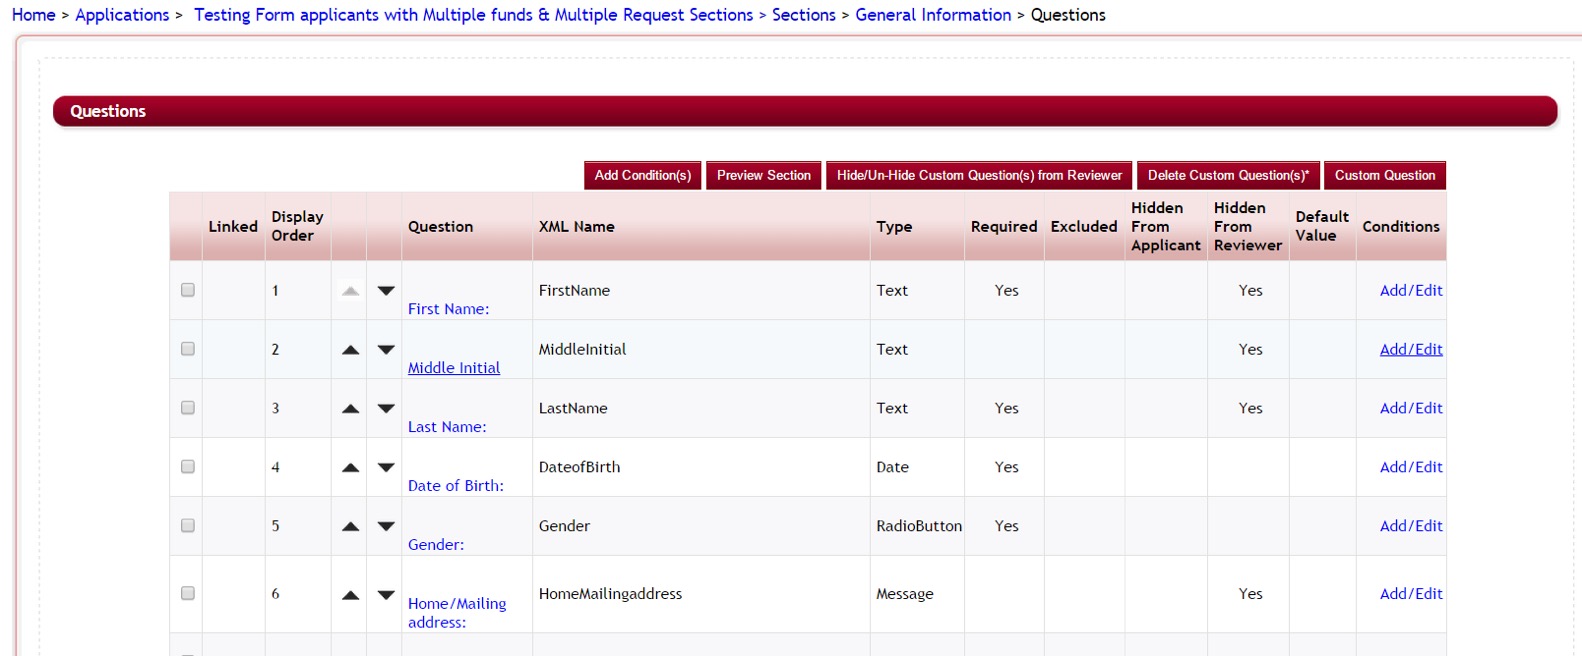
The Questions grid will appear listing all the questions already created in your section. If you have cloned this section from another section all the questions that were in the cloned section will appear in this section.
Note: If this is a new section and you have not created any questions this screen will show as follows:

The questions grid will show all the questions currently set up for the section.
2.6.1 Overview of the Questions Grid

Menu Buttons:
- Add Conditions(s): allows you to add conditions to multiple questions
- Preview Section: Previews the section layout
- Hide/Unhide Custom Question(s) from Reviewer: Allows you to hide questions so that it does not display the selected question when the reviewer views the application.
- Delete Custom Question(s): Deletes a selected question. A question that an applicant has responded to on any application cannot be deleted, but can be marked as Excluded so that it does not appear on the application.
- Custom Question: Adds a new question
Columns:
- Linked: Showsif this question is linked to another question within the application
- Display Order : The order in which the question is displayed on the application
- Up down Arrows: Allows you to adjust the display order by moving the question upwards or downwards in the listing.
- Question: The Question Name
- XML Name: TheXML mapping name given to the question for linking data to external databases or other applications for report pulling and data export/import.
- Type: The question type
- Required: Is it required that the applicant responded to this question
- Excluded: This question has been excluded from the application, but cannot be deleted
- Hidden from Applicant: This question is not viewable to the applicant.
- Hidden from Reviewer: This question is not viewable by the reviewer.
- Default Value: The response that the question automatically defaults to if not answered
Conditions: Add/Edit: Used to set conditional logic for the specific question. If green than there are conditions set on this question.
2.6.2 What is the Preview Section button
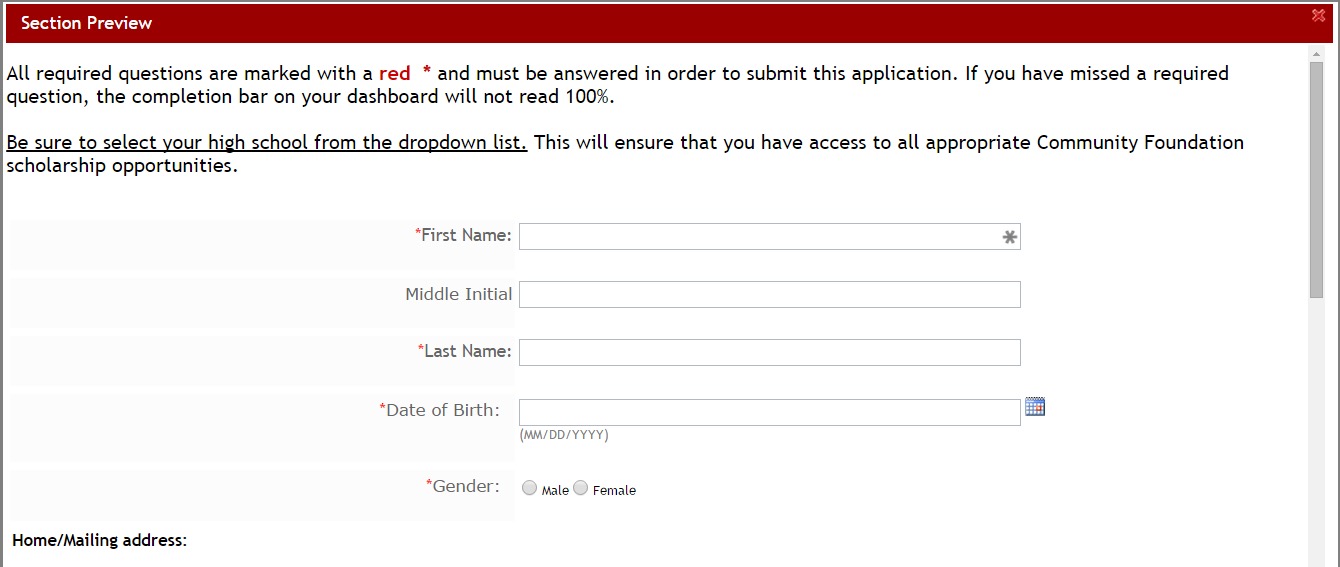
The Preview Section is extremely helpful when setting up your application. You can click on the Preview Section as you create questions within the section to view how they will be visible to the applicant on their dashboard as well as enter data as if you were an applicant to test how the application flows. You can also use the Preview Section to test conditional logic that has been set on a specific question to confirm that the question is hiding or appearing as desired.
2.6.3 How to Create a New Question
Exercise 1
Step 1: While in the Question Grid of a specific Section, click on the Custom Question button.
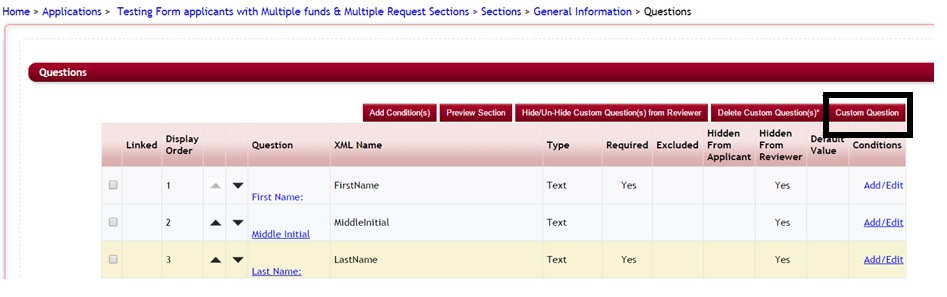
This will open the Add/Edit Question information screen.
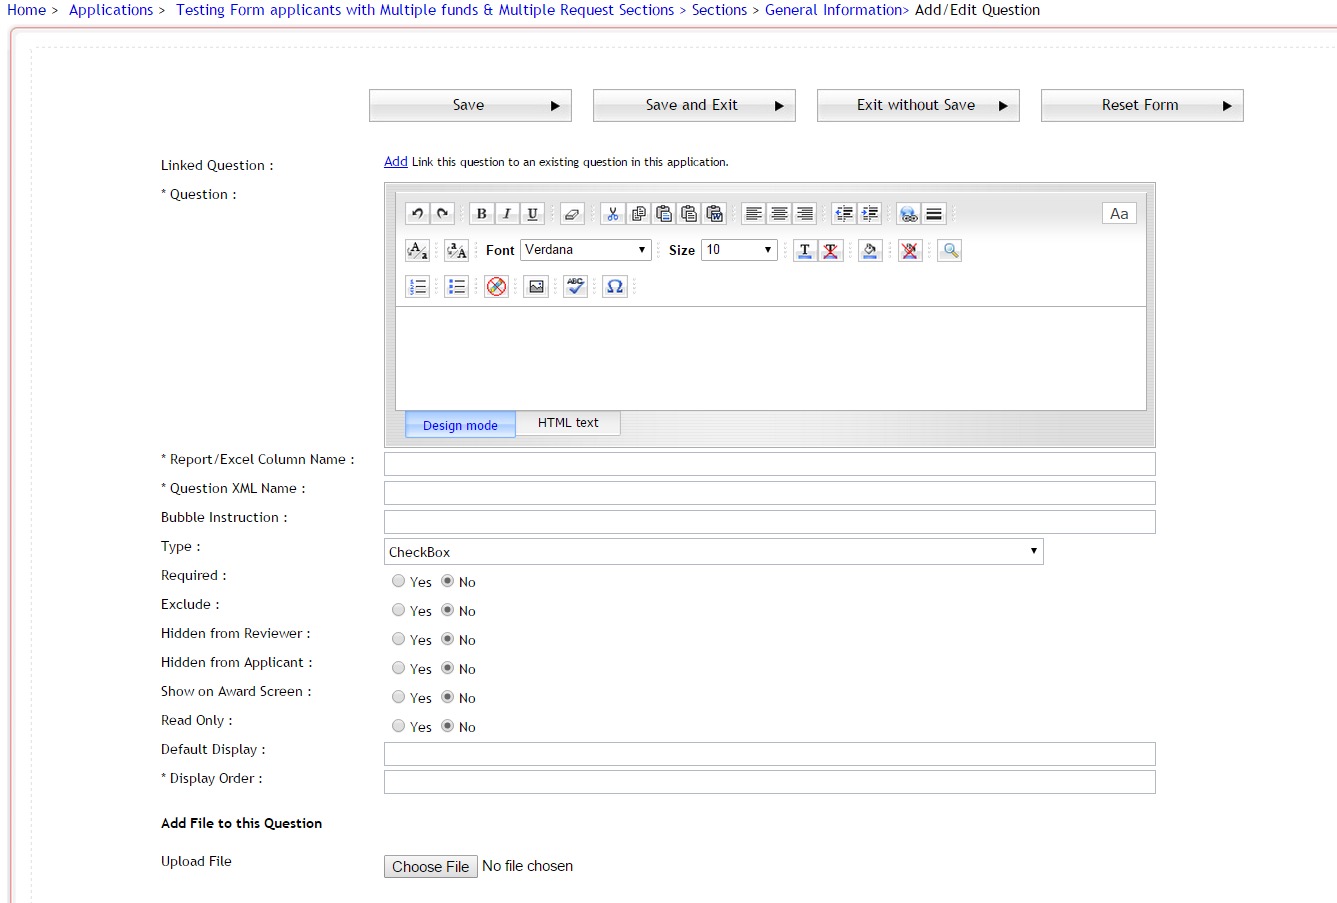
Step 2: Fill in the data as detailed in the following sections.
Step 3: Be sure to save your work when you are finished editing.
- Save – Allows you to save your work without exiting the page.
- Save and Exit – Saves you work and exits you back to the Questions data grid.
- Exit without Save – Exits to the Questions data grid and cancels any updates you may have made.
- Reset Form – Allows you to reset the form back to the default parameters
2.6.3.1 Creating a question Caption using question editor box
The Question: Editor Box is where you enter the question that will be viewable by the applicant. If you desire to enter this text using HTML, you can do so by clicking on the HTML text tab at the bottom of the editor box.
Question: Enter the question that will appear in the applicant’s application.
Note: This formatting is how the question will appear in the applicant’s application.
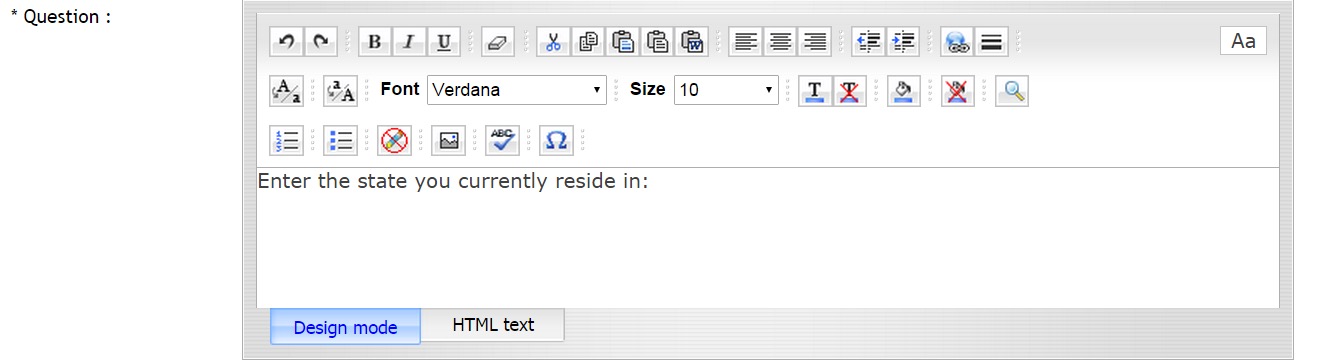
Design Mode - This editor will allow you to format text similar to how you would do so in Microsoft Word. Using this feature you can change the font-size, color, style, etc., as well as add additional formatting features to your question as needed.
HTML text - If you desire to enter this text using HTML you can do so by clicking on the HTML text tab at the bottom of the editor box.
2.6.3.2 Creating Linked Questions
![]()
Linked Question: A linked question is a read-only display of a question that is linked to another question in the application that is the same question located in another portion of the application that the applicant will respond to.
You may need to see this data in another area of the application; therefore, this keeps the applicant from entering the information multiple times.
The linked question will automatically default to the response value of the question it is linked to. This is especially useful in Request sections where you may need to show the requester how certain questions were answered by the applicant, but don’t want them to have to answer them.
Note: If using linked questions in request section, the linked questions must be answered by the applicant prior to the applicant assigning a request section to an individual.
Exercise 1
Step 1: To link questions together click on the Add link next to Linked Question: in the Question setup.
NOTE: The linked to question will need to be added to your application prior to linking additional questions to it.
The “Select the Question to link to:” box will appear. This listing will show all the questions within your application by the section XML Name and Question XML Name.
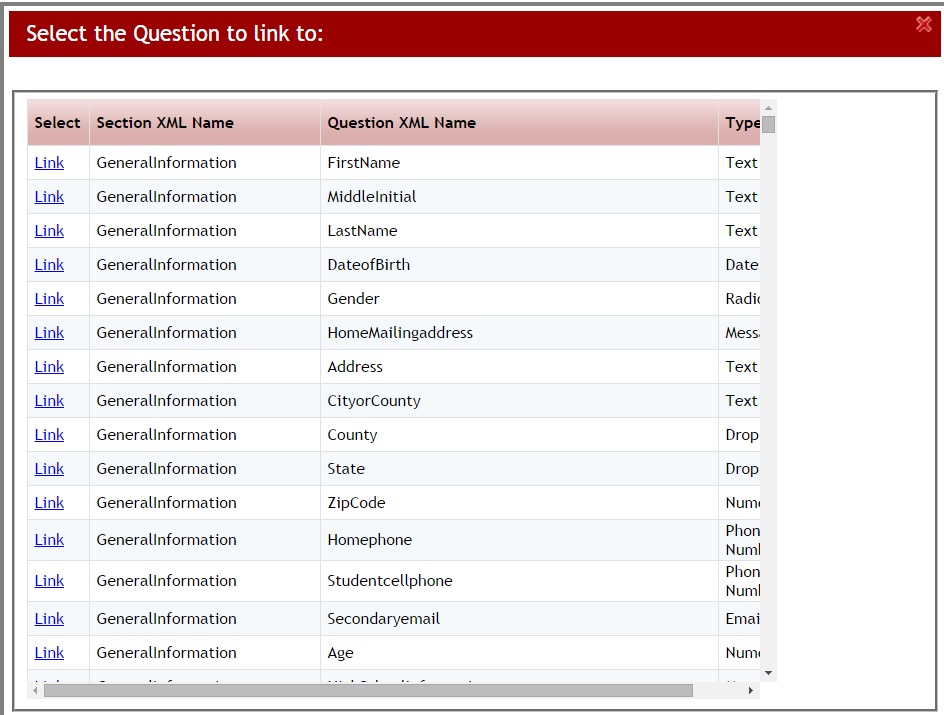
Step 3: Scroll through the listing until you find the question you want to link to and click the Link button next to that question.
Once linked, you will see in the top left the words “This is a linked Question” and the remaining data in the question setup will default to the same setup data as the “linked to” question. You will to still need to list the display order you would like this question to fall in on the page you are entering it for.
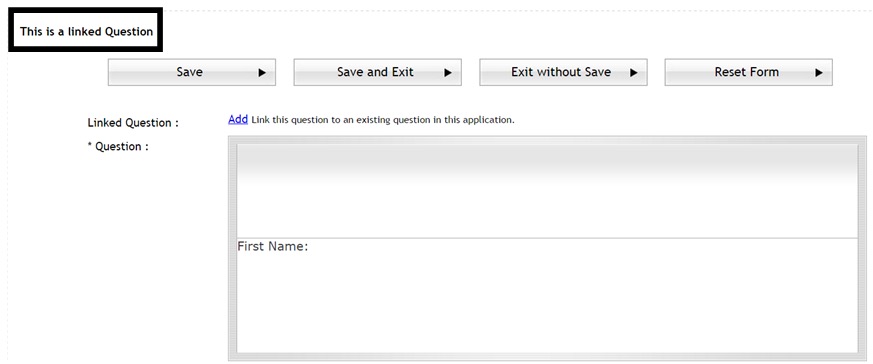
Step 4: Be sure to click Save or Save and Exit to save your data before exiting.
When you return to the Question Data Grid under the Linked Column next to that question you will see a Linked Icon showing that it has been linked to another question within the application.

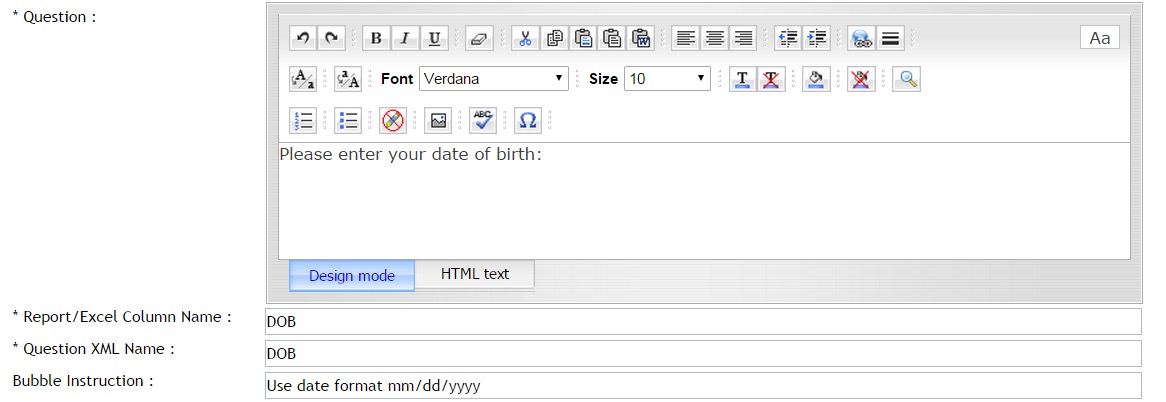
2.6.4 Adding a Report/Excel Column Name (Best Practice tip)
This is the name that appears as your column headings in Excel exports and reports created in the CommunityForce system. Therefore, it is important to keep this name as a short descriptive version of your question so that you do not make your column headers in your reports so long that you have to scroll through multiple pages to be able to view. The Report Display Name and the XML Name should be the same except the XML Name eliminates spaces between words. (See example below).

Question XML Name: This is the abbreviated name that the database uses to refer to the question.
- The XML Name is very important when importing applicant data from one application to another or when integrating data from CommunityForce to another database.
- In order for this data extraction (mapping) to be successful, the source application’s task question and the destination application’s task question must have the same XML names.
- Once an application has been created, and data is being exported/imported, it is very important to never change this name in your application. When creating additional tasks that the reviewer can export/import scores from one task to the other task, so as not to have to reenter data, the Fields within the one task must have the same XML names as the fields of the new task they are importing data to be populated with.
- The XML Name and the Report Display Name should usually be the same except the XML Name eliminates spaces between words. (See example below)
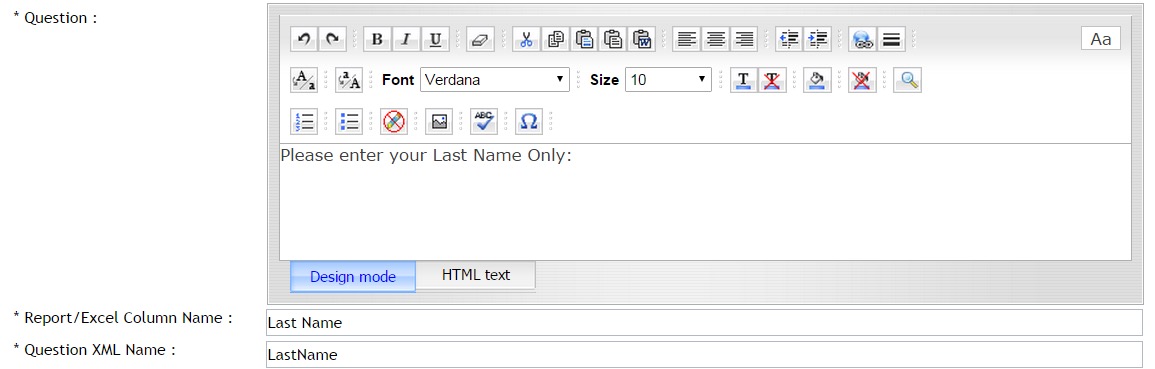
2.6.6 Adding Bubble Instruction (Best practice tip)
Bubble Instruction: These instructions are brief helpful hints displayed to the applicant regarding the information requested on this question.
- A blue icon will appear next to the question in the application. When the applicant places their cursor on this icon the information will be displayed to them. Enter any instruction for the question that will be helpful to the applicant.
- If you have important detailed instructions regarding how to answer a question, it may be better to include that explanation as part of the Question itself or to add an additional “message type” question prior to this question. This will insure that the instructions are not missed by the applicant.
Example of Bubble Instructions:
![]()
2.6.7 Overview of Question Data Types
The question Type is used to describe thetype of answer field appropriate for the desired response from the applicant.
- Checkbox - The applicant is presented with predetermined values to select from via a checkbox. All values are displayed on the application. Applicant can check multiple values.

- Currency - A numeric field formatted with a dollar sign. Currency fields when displayed in the application will only align left when viewing.

- Date – Allows for a date format of: mm/dd/yyyy

- Date Day Validation – Same as the date field, however, the system will look at the minimum and maximum numbers of days and allow the applicant to apply if they fall within the allowable number of days. For example an applicant has 30 days to enter an application for a specific event. That date must be within the last 30 days.
- DropDown - The applicant is presented with predetermined values to select from a dropdown listing. Applicant can only select one value from the list.

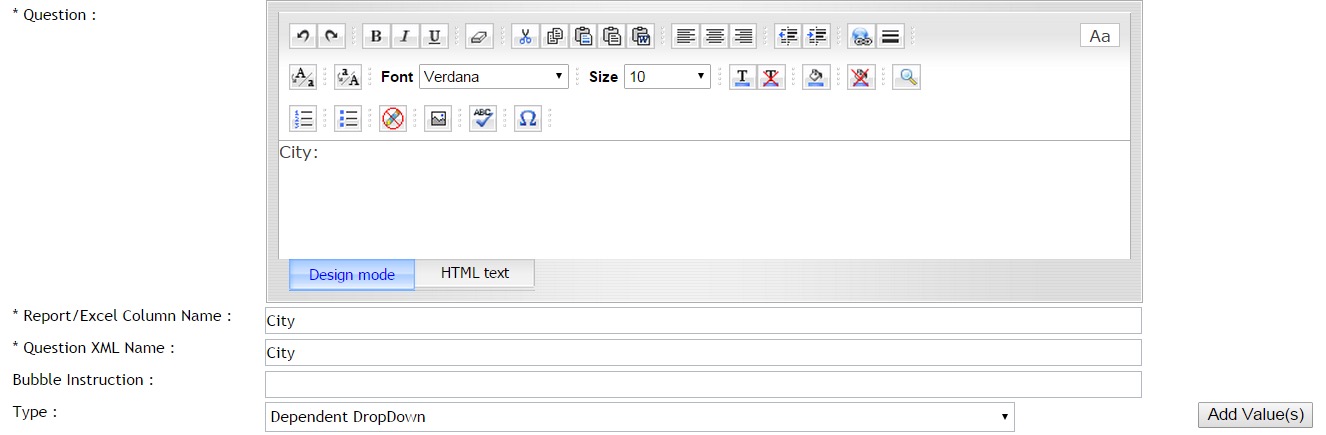
- Dependent DropDown – Allows you to build dropdowns dependent on selections in another dropdown selection. If they choose a value in one dropdown then in the dependent question the dropdown would only be a listing for specific items that apply to just that value in the originating question.For example: if applicant selects the state of Virginia you can then have the City question appear with just a listing of all the cities in Virginia for the applicant to select from. That one city question can carry all the dependent cities depending on each separate state, but only show the cities for the state selected.
- Electronic Signature - The applicant is prompted to provide an electronic signature in the required format. The required signature has to match the First Name and Last Name the applicant entered when creating their user login profile.

- Email – Allows for an email format: xxxxxx@ccc.com
- Encrypted Field – Creates a text field that only the Global Administrator can view. For example you want the applicant to enter their SSN but not allow all other role types to be able to view it. If you create the question as an Encryptedfield only the Global Administrator can view the applicant’s reply.
- EssayBox - A large data entry area that allows text entry. May have a minimum and maximum number of words.

- Extended Checkbox - The applicant is presented with predetermined values to select from via a checkbox. Similar to a dropdown where the values are only displayed when the applicant clicks on the checkbox dropdown. However, multiple values can be selected.

- File – Allows the applicant to upload a document to the question.

- Matching Fund Eligibility – Used when you have one application, and that one application is used to apply to multiple scholarships. The Matching Fund Eligibility matches applicants to the funds they are eligible for based on their replies to eligibility questions within the application. Depending on how the applicant answers those questions, they are given a list of Scholarships they can apply to. They then select or unselect the scholarships they want to apply to from that listing.

- Numeric – Exact numeric numbers. Best for using arithmetic calculations for exact results. Numeric fields when displayed in the application will only align left when viewing.
- Payment Gateway – Used to collect payment for an application form. Requires integration with a third party payment software.

- Phone Number - Allows for a phone number format of: xxx-xxx-xxxx, (xxx) xxx-xxxx, or (xxx)-xxx-xxxx. This does not allow for international formatting and therefore a text box must be used if needing international numbers.

- RadioButton - The applicant is presented with predetermined values to select via a radio button. Only one value can be selected. All values are visible on the application.

- Text – A short data entry text field.

- Organization Validation – Requires integration setup with your organization’s software program or a subscription requirement purchased through GuideStar and an additional plugin through CommunityForce. Creates a dropdown listing of pre-approved organizations information from your organization’s program that has been integrated with CommunityForce (i.e., Grants Edge) or with Guide Star

- Application Link – Allows you to create a question that allows the applicant to click a link and directs them to another application to apply to. Select the application that they are to be directed to, once they click on the link.Note: the application they are linking to, must have a future begin date in order to show in the listing of available applications.


- Awarded Scholarship – If selected this question type will automatically populate the scholarships that were awarded to the applicant in this application process. If there was more than one award given to the applicant all the names of the awards will appear. This can be used as a question in the staff question for the staff to review or in a post acceptance section that shows the applicant the awards they have been awarded.

- Calculation - Read only field in which the value of the question equals the calculated sum of other numeric or currency question within the application. This question type allows you to create a formula that adds questions together to get a final total. (i.e. you have multiple question fields that are numeric that you need to add together for a final total) Note: you cannot create a formula that is calculating on another calculation question.

- Float – Numeric with special characters. Approximate numeric numbers.
- Message - Allows you to enter a read only message statement, instead of a value related question. Textonly. Does not require the applicant to respond.

2.6.7.1 Adding a Checkbox, Extended Checkbox, Dropdown, or Radio Button Question Type
Checkbox, Extended Checkbox, Dropdown, and Radio Buttons all allow you to create a listing of values for the applicant to choose from.
Checkbox – allows for multiple selection from a listing of values (used when you only have few items to select from.

Extended Checkbox – allows for multiple selection from a listing of values (used when there is a long listing of items to select from.

Radio Button – Allows for a single selection from a listing of values (used when you only have a few items)

DropDown – Allows for a single selection from a listing of values (used when you have a long listing of items to select from. (i.e. Listing of States). Once the applicant clicks on the arrow in the dropdown field a listing with the available selections will appear.
![]()
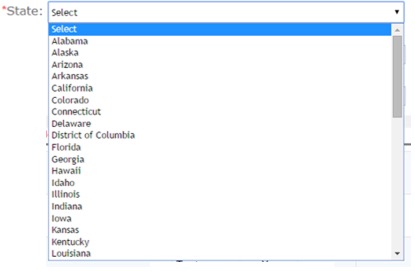
Step 1: Create a new custom question and select one of the listing type question types listed above.

Once you select the question type an Add Value(s) button will appear to the right.
Step 2: Click on the Add Value(s) button
The Display Values table will appear. This is the table where you will enter the listing of the possible reply values for this question

Step 3:To enter the values enter the label name and click on the Green plus sign at the end of that row to save the data in that row. The Value field will be auto populated with the same value that you entered as the Label. If you want a different Label then your Value, enter the label name then tab to the Value and enter the Value name, and click the green plus sign to save your data.
Important: When using Checkbox and Radio buttons enter only the items for selection. However when using the Dropdown always start your list with Select~Select so that this is the first field in the listing and what is populated in the questions before the applicant answers.
Note: Clicking on the green plus sign will save each line of values that are entered. Your information will not be saved for that row until the green plus sign has been selected and a new line appears.
Label - The value that the applicant sees in the listing of values to choose from.
Value – This is the actual value result given to the selected value. Not viewable by the applicant, this can contain additional data regarding this value that you may only want viewable by staff. This is the value that will show in reports, as well. (Useful for internal coding of values that you may not want the applicant to see the code.)
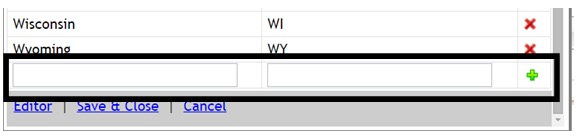
Editor – If you have a long listing of selection items, the editor box allows you to make changes to the values you have entered so far. The editor can also be used to copy and paste long listings of values. In the Editor each label and value must be separated by a “~” and no spaces between. The item to the left of the ~ is the label and the item to the right is the Value.
Step 4: Click on the Editor listed at the bottom left of the Display Values and enter a listing of value items such as states: (list one item per line)
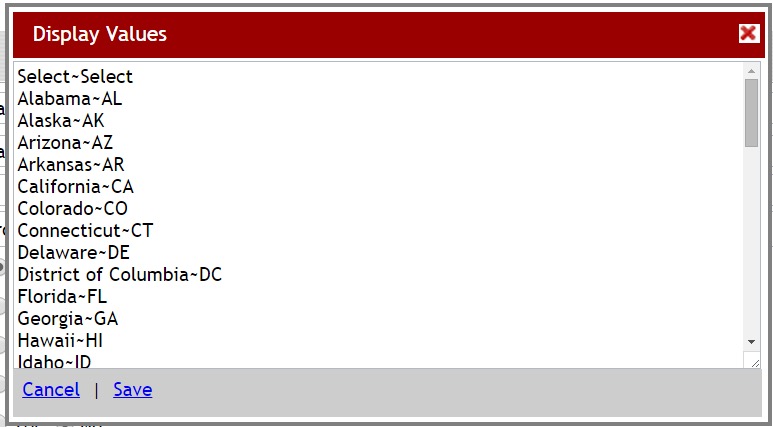
Step 5: Click Save to return to the Display Values Table, each item should now be listed as a separate row in the table.
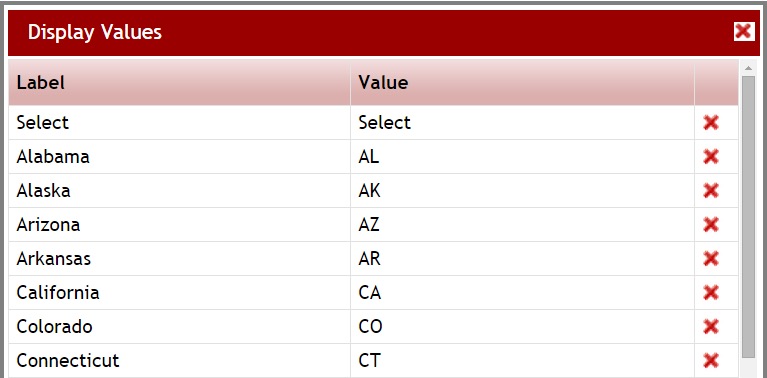
To Delete Items in the Table: Click on the Red X next to the row you want to delete.
Step 6: On the Display Values click the Save & Close to save the values you just entered.
Important: Make sure that you have a blank line of text with a green plus sign before exiting or the last item will not be saved.
2.6.7.2 Adding a Dependent Dropdown
Allows you to build dropdowns dependent on selections in another dropdown selection. If they choose a value in one dropdown then in the dependent question, the dropdown would only be a listing for specific items that apply to just that value in the originating question.
For example: if applicant selects the state of Virginia you can then have the City question (if created as a Dependent Dropdown questions) appear with just a listing of all the cities in Virginia for the applicant to select from. That one city question can carry all the dependent cities depending on each separate state, but only show the cities for the state selected in the State question.
Exercise 1
Step 1:Create a custom question and select the Dependent DropDown for the question type.
Step 2: Click on the Add Values button to set up the values.
A new Dependent Display Values box will open.
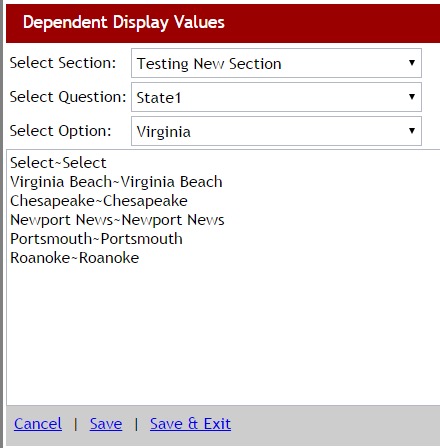
Step 3: Select Section: Select the Section that has the original question that this question is dependent on.
Step 4: Select Question: Select the actual dependent question that contains the trigger value
Step 5: Select Option: Select the trigger value from that question that the new list is dependent on.
Step 6: Add the new values that are to appear in the new question, if that trigger value was selected in the dependent question.
Each possible value will need to be added twice on a separate line with the “~” separting each duplicate no spaces between. i.e. Richmond~Richmond (this is the same as if using the editor section in adding values for a regular dropdown.) Important, be sure to add the Select~Select at the beginning of each listing.
Step 7: Click Save but do not click save and exit. You still need to add the additional values for all the other possible replies in the dependent question. Be sure to click Save on each option after you have entered its values.
Step 8: To add another Options values, click the Select Option dropdown again and select the next value from that dependent question. The screen will clear where you will enter the possible values for that new option. Save and Repeat this for all the values in the dependent question.
Step 8: Once all the options have values added to them and Saved. Click the Save & Exit, to complete the question set up.
For Example: You want a listing of cities to appear for just the state that was selected in the State Question.
The State question was created as a DropDown question type with a listing of states for the applicant to choose.
The City question would then be created as a Dependent DropDown question type.
The dependent city values would be set on each individual state value that was set in the original State Question.
You would select the state in the Select Option, then in the listing put all the cities for that state. Save it but don’t exit And then click the Select Option again choosing the next state in the dropdown and listing all of its cities, repeating for each state.
Once you entered all the cities for all the states you would Save & Exit to return to the question set up.
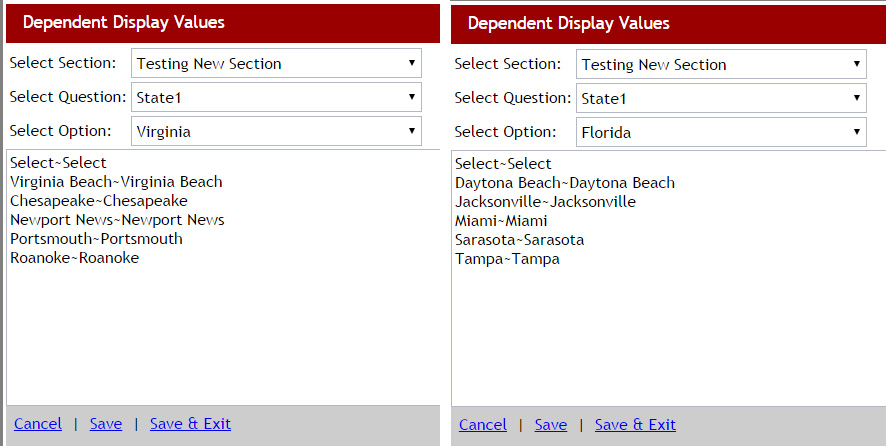
2.6.7.3 Adding a Currency Question Type
When a required value is a numeric currency value it is suggested that you use the Currency question type to allow for the formatting of the value into a currency format.
Once the value is entered by the applicant a Currency symbol will appear on their reply.
Prior to setting up the application the Global Admin should have already preset the main currency type of your organization, in the Administration/Site Settings (i.e. Dollar $ or Euro €, etc.)
To create a currency question select the question type of “Currency” when creating your question in the custom question setup.
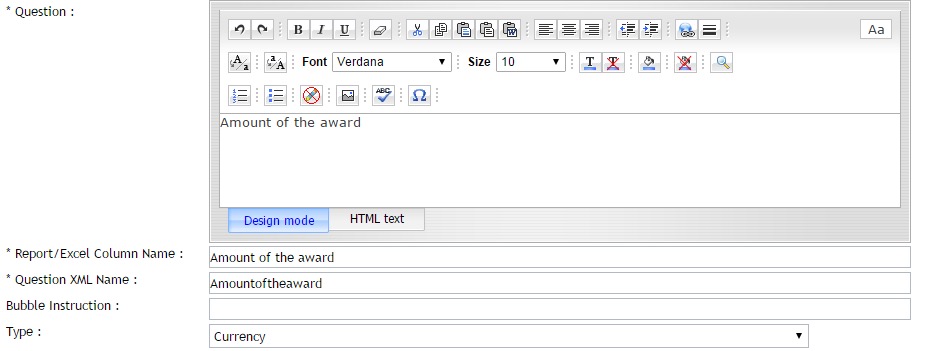
2.6.7.4 Adding a Date Question Type and Setting Parameters.
The Date Question Type allows you to set the question type as a date field in which the applicant enters a date as the value. A calendar will also appear that the applicant can select the date from.
Important: when cloning applications with date type questions, you will need to make sure that the new application’s date ranges have been moved forward appropriately, the system will not do this for you.
When you select the Date question type you will be required to enter a minimum date and maximum date range so that the selection calendar can be created.

Min Date – Enter the minimum date that the applicant can enter.
Max Date - Enter the maximum date the applicant can enter.
2.6.7.5 Adding a Date Day Validation Question Type
When using the Date Day Validation question type the system will look at the minimum and maximum numbers of days and allow the applicant to apply if they fall within the allowable number of days.
For example an applicant has 30 days to enter an application for a specific event that occurred. The date of that event must have been within the last 30 days in order to proceed with completing the application.
When you select the Date Day Validation Question Type the Minimum and Maximum fields will appear. Enter a minimum and maximum number of days of 0 to 30.
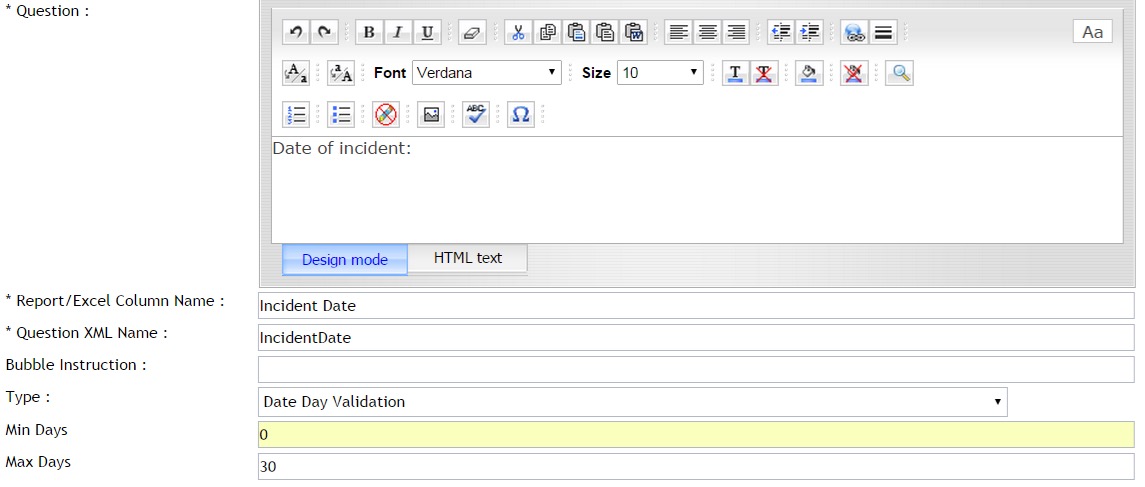
The applicant will have to enter a date that is no older than 30 days. If it has been past the 30 days the applicant will not be able to enter the date.
2.6.7.6 Adding an Electronic Signature Question Type
The Electronic Signature Question type creates a predesigned format in which the applicant must enter their name to mark the application as signed by them and it will create a date stamp marking the date and time the applicant signed their application.
This is usually entered on the last section of the application along with some kind of acknowledgement certification questions and serves as the applicant’s signature for the application process.
The required signature has to match the First Name and Last Name the applicant entered when creating their user login profile.
Note: Electronic Signature can only be used for the signature of the applicant only.
The applicant will be required to type in the field their name as it appears in the User Setup.

Once the applicant types his/her name, it will be considered signed and a date stamp will appear to the right of the applicant’s signature.

2.6.7.7 Adding an Email Type Question
The Email question type is used only when the required value is an email address.
Using the Email question type will force the applicant to enter a correct email format in the field. (i.e. jones@communityforce.com)
2.6.7.8 Adding an EncryptedField Question type
Using the EncryptedField question type allows you to create a text field that only the Global Administrator can view. This is useful if you have sensitive secure questions that you do not want everyone in your organization to be able to view.
For example you want the applicant to enter their SSN but not allow all other role types to be able to view it. If you create the question as an EncryptedField only the Global Administrator can view the applicant’s reply.
This will not be viewable to anyone else when viewing the Applicant’s application dashboard, in the Preview Application-Application Summary.
2.6.7.9 Setting an EssayBox Text Field and Setting Word Count
The EssayBox question type is used when a question’s reply requires a lengthy text statement to be typed (i.e. essay questions).
When using the EssayBox question type you can control the length of the reply value entered by the applicant by setting the minimum and maximum word count. (i.e. 500 words or less).
When you select the EssayBox question Type the Min Word Count and Max Word Count Fields will appear.
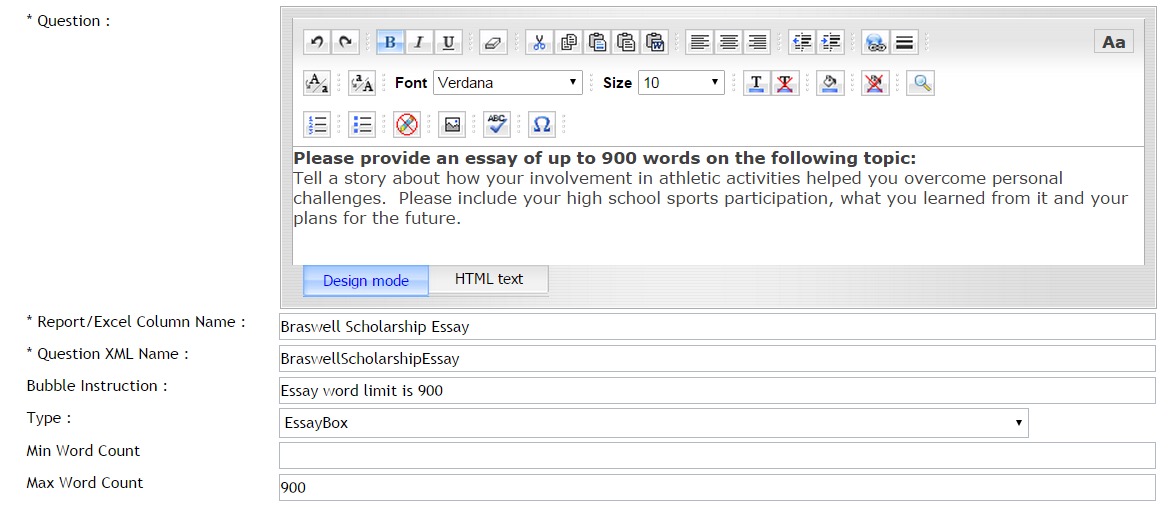
Min Word Count - Enter the minimum number of words you require for a reply to the specific question. If you have a maximum word count but do not require a minimum you can enter “0”.
Note: An applicant will not be able to hit save until the minimum word count is met.
Max Word Count – Enter the maximum number of words you require for a reply to the specific question (i.e. max words = 500 will only allow the applicant to enter 500 words).
A dialogue box will appear on the applicant’s dashboard next to the question, where they can type their reply to the essay question.

2.6.7.10 Adding a File Question
File Question types are used when you require that a document be uploaded and attached to the applicant’s application. (I.e. transcript forms, FAFSA, photos, letters, budgets, etc.). The applicant would see this question and a Browse button next to the question that they can click on and select the document to be uploaded.
Example:

When you select the File Question Type a text box will appear. Provide the list of allowed file extension for the types of documents you will accept for this upload.
Suggested file types: pdf, xls, xlsx, doc, docx, html, jpg, gif, tif, wmv
When listing the file type extensions do not enter a period before the file extension and enter one type per line. When listing them enter one extension per line.
Note: Although the above file types are accepted, if you are using the PDF feature it is recommended that all uploads be formatted in Portrait mode, sized to 8-1/2” x 11”. Only files less than 20mb can be uploaded to the program.
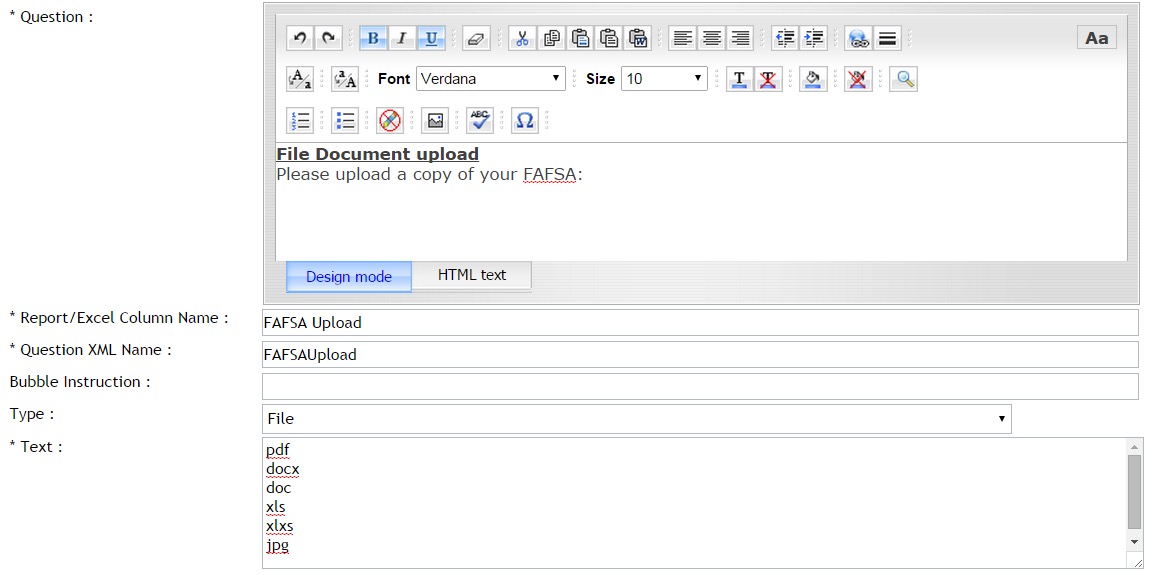
2.6.7.11 Adding the Matching Fund Eligibility Question
The Matching Fund Eligibility question type is used when you have one application, and that one application is used to apply to multiple scholarships. This question must be present in those application forms in order for applicants to see the funding sources they have been matched to.
The Matching Fund Eligibility question shows applicants the funds they are eligible for based on their replies to eligibility questions within the application. Depending on how the applicant answers those questions, they are given a list of Scholarships they can apply to. They then select or unselect the scholarships they want to apply to from that listing.
Note: Before this question can be used you must first assign the funds to this application in the Mange Application Funds setup (or Manage Common Application Grants if using common application process) and set the individual criteria for each fund under the Manage Funds Critieria Information setup. Please refer to those guides for additional setup information.
When creating your question and selecting the Matching Fund Eligibility question type, the List Funds will appear.
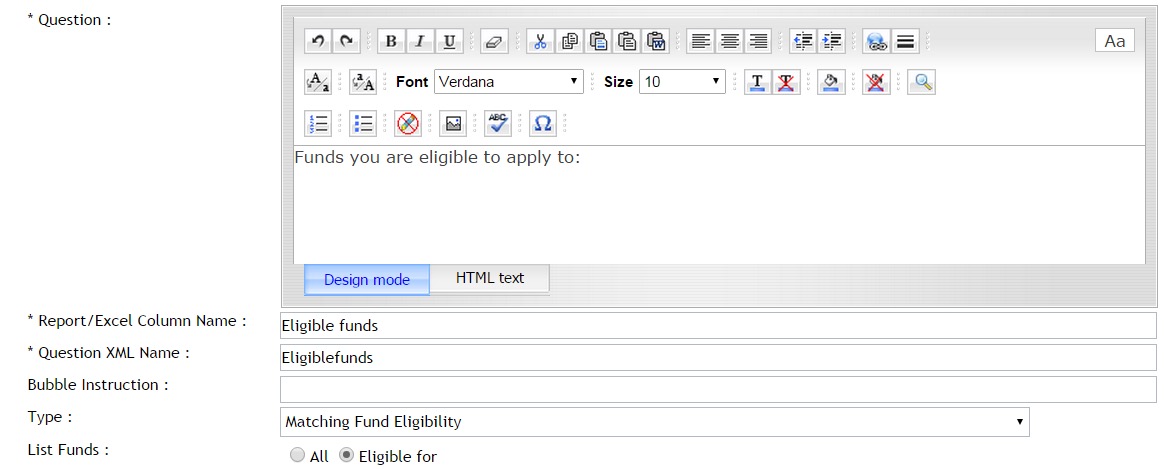
There are two options available for the listing that you can select from:
- All – Shows a listing of all the scholarship funds available for that application and has only the funds selected that the applicant matched to. However, since all the funds appear, they have the option to select additional funds if they want to apply to those as well.
- Eligible for – Shows a listing of “only” the scholarship funds that that applicant has been matched to. The applicant can unselect any funds they do not want to apply to.
Best Practice Tip 1: Make this a separate Eligible Funds Section and the end of all the question sections. Give the applicant clear instructions to complete all prior sections before selecting their funds. If the applicant clicks on this section prior to answering all of the appropriate eligibility questions, they will need to continue clicking back to this section to see additional funds they are approved for. If you choose, you also can set conditional logic to have this section only appear once those specific questions have all been answered, but know this can get quite lengthy if you have multiple question that apply.
Best Practice Tip 2: If using this question type, you also can set conditional logic on questions specific to a fund. If a fund requires additional questions for just that fund, (i.e. Essay Question specific to fund) you can set conditional logic on the additional question, to appear only if the specific fund is selected.
2.6.7.12 Using the Numeric Field and Set Parameters
Numeric fields are used when numeric values are required or you need to run exact calculations on the numeric values entered by the applicant. The only separator characters allowed in numeric question types are decimals.
When using the Numeric question type you have the option to control the length of the reply value as well as the number range that the value falls between.
When you select the Numeric question type the Maximum Length, Min Value, and Max Value fields will appear. If your do not require any of these, you can leave them blank.
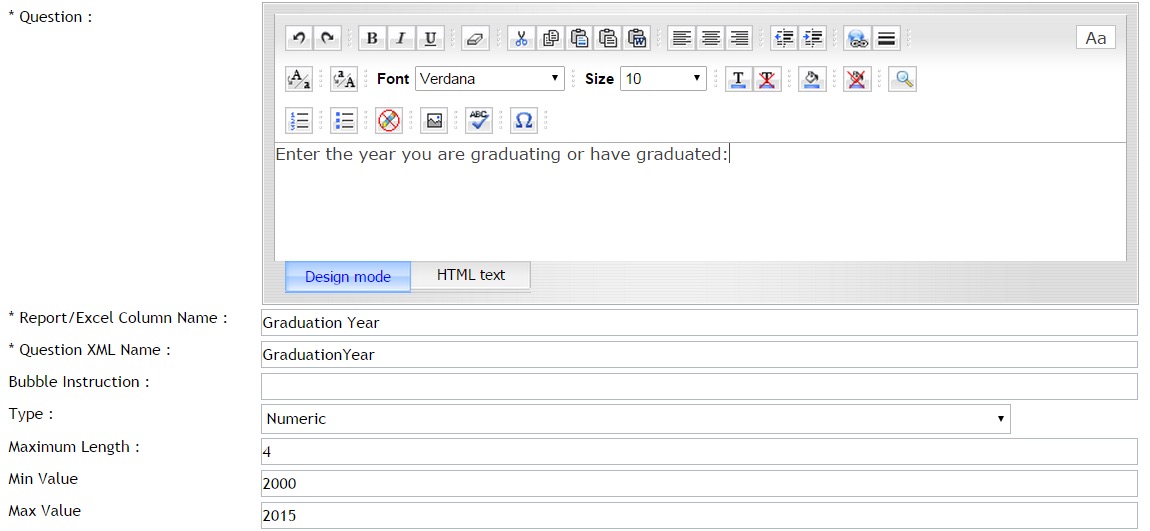
- Maximum Length - Sets the number of numeric characters allowed when replying to this question. (i.e. 4.00 = Max. length of 4 characters. The applicant will not be able to enter a numeric value longer than 4 characters long including the decimal).
- Min Value - Allows you to set the minimum (lowest) numeric range amount that will be allowed when replying to this question (i.e. you require a year between 2000 and 2015. The min value = 2000).
- Max Value - Allows you to set the maximum (highest) numeric range amount that will be allowed when replying to this question (i.e. you require a year between 2000 and 2015. The Max Value = 2015).
2.6.7.13 Adding the Payment Gateway Question
The Payment Gateway question type is used when requiring the applicant to pay a fee for the application form. Integration with your payment software is required to use this question type. If you are not sure if this has been integrated, please see your Global Admin or your account representative to have this functionality added to your system.
Prior to using this question you should already have entered the amount for the application form in the General Information setup for this application, and your Global Admin should have already enabled Application Payments in the Administration>Site Settings/General Settings.
Once integration has been completed with your payment software, this question will appear in your application and should require no further setup by you.
The question that is the Payment Gateway Question will have the Question Type of Payment Gateway. This question will have coding connected to it to direct the applicant to the Payment Software.
This question will give the applicant a button they will click on to be directed to the payment software that has been integrated with your site.

(See: Additional Application Setup Features: Application Payment Form for additional information regarding set up of this functionality)
2.6.7.14 Adding a Phone Number and Force Format
When a required value is a phone number you can use the Phone Number question type to force a specific format to be used when the applicant enters their phone numbers.
When you select the Phone Number question type the Select the format field will open. Select the format you want the applicant’s to use when entering phone numbers.

The following format selections are available:
(XXX) XXX-XXXX
XXX-XXX-XXXX
(XXX)-XXX-XXXX
2.6.7.15 Adding a Text Field and Maximum length
The Text question type is used when a brief text and/or numeric value is required. (I.e. entering a street address such as: 1234 Jones Street, or requesting the applicants last name)
Note: You cannot run numeric calculations on text fields.
When you select the “Text” question Type, the Maximum Length field will appear.
Maximum Length: When using the Text question type you can control the length of the text entered by setting the maximum length of characters allowed. The applicant will not be able to enter any more characters then the maximum length allotted. (I.e. Maximum Length = 15, will only allow the applicant to type 15 characters). If you do not want to limit the length you can leave this blank.
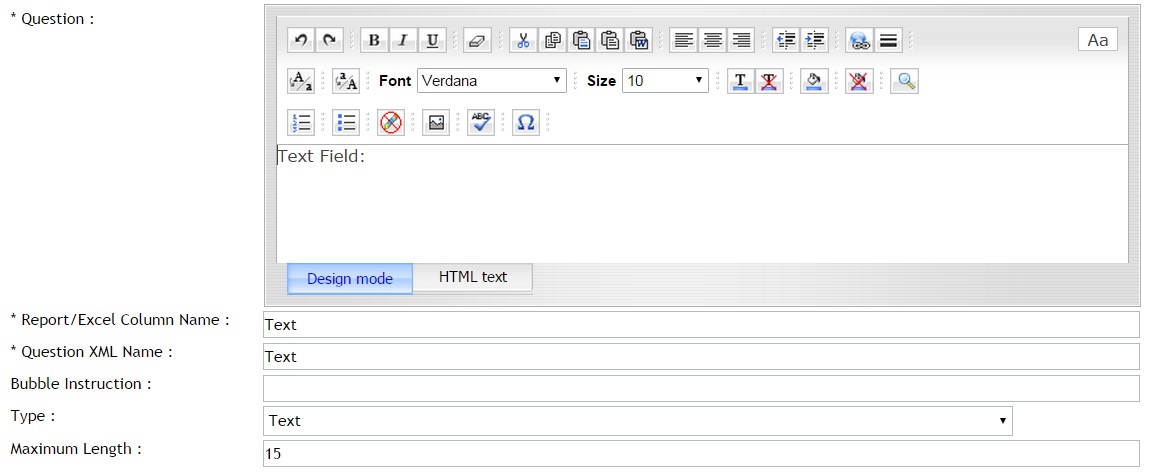
2.6.7.16 Adding the Organization Validation Question
This requires integration to be set up with your internal organization’s database or with GuideStar. If using GuideStar you must already have purchased a subscription requirement through GuideStar and an additional plugin through CommunityForce.
The purpose of this question is to not allow the applicant to type in a selection, but to give them a dropdown listing of preapproved items to select from.
Once you have the integration setup completed, this question will appear in your application and should require no further setup by you.
When this question is created and the Organization Validation question type is selected a field will appear to select what you are using to validate with.
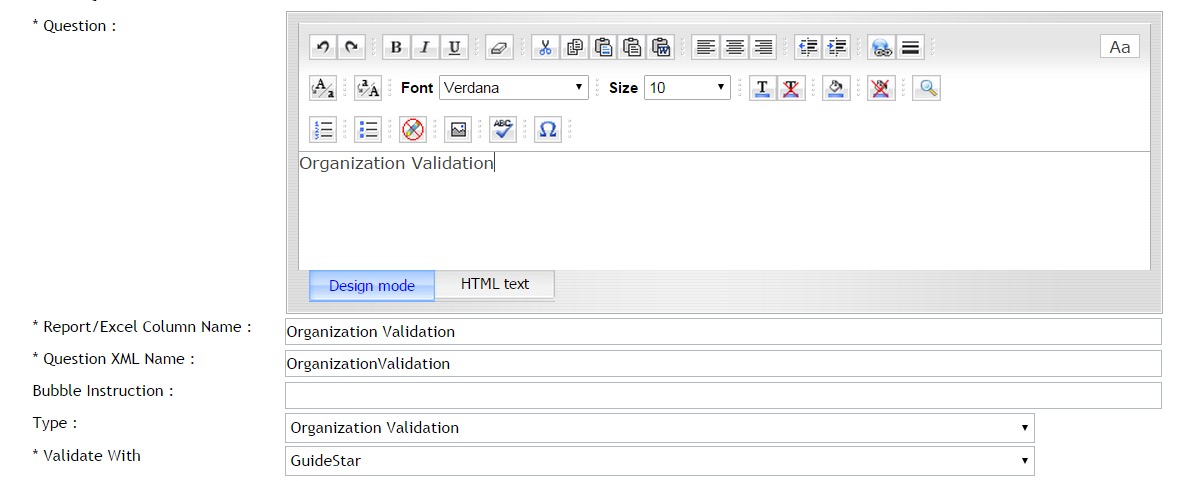
Depending on what was decided on in the integration, this will validate with a field in GuideStar or your organization’s database and create a dropdown question with a prepopulated selection from your database.
Example:
Validate with: Grants Edge (Schools), the question will automatically populate with the approved organization listing of schools from your GE program (schools field) for the applicant to select from that dropdown listing.
Validate with: GuideStar: A validate button will appear next to the text field. The applicant enters their organization name and clicks the validate button. The moment they click on validate it goes to GuideStar and pulls data from GuideStar to populate data fields that have been pre-mapped to GuideStar fields within the application.
![]()
2.6.7.17 Adding the Application Link Question
Creating the Application Link question allows you to create a question where the applicant can click a link to be directed to another application.
Step 1: When creating your question select the Application Link question type:
The Selected Application and the Use Link To fields will appear

Step 2: In the Selected Application field click on the dropdown arrow to see a listing of available applications. Select the application you want the applicant to be directed to.
![]()
Note: the application they are linking to, must have a future begin date in order to show in the listing of available applications.
Step 3: In the Use Link To select the option that you want to occur when the applicant clicks the link.
![]()
- Link: The applicant clicks on the link and a pop up appears giving them the option to apply to the application. If they click the apply button, they are then directed to the dashboard for that new application.
- Apply: The applicant clicks on the link and is automatically directed to the dashboard for the new application, no option to apply is available it is automatic.
- Apply and Import: The applicantclicks on the link and is automatically direct to the dashboard for the new application. Any questions that were in the original application that carry the same xml name that are present in the second linked application, will automatically be pushed down and populated with the replies in the initial application. Applicant will not be required to re-answer those questions.
Once you have selected the application and the option to link to the application the link will appear in the question for the applicant to click on.
Best Practice Tip: Since this is more likely a question that you want to appear after the initial application process, it’s recommended that you create this question in a separate section. Create that section with a Section Type of “Acceptance” and a Status(es) of “Selected for Award”. That way you can control what applicant’s receive this section in their dashboard. Only applicants that you have moved to the status of “Selected for An Award” will see this section in their dashboard and be able to click on it. Set the deadline as either the deadline of the new application or with “No” deadline. Mark the lock after submit as “No” for this section.
2.6.7.18 Adding the Awarded Scholarships Question
If selected this question type will automatically populate the scholarships that were awarded to the applicant in this application process.
Exercise 1
Step 1: When creating the question, select the Awarded Scholarship question type.
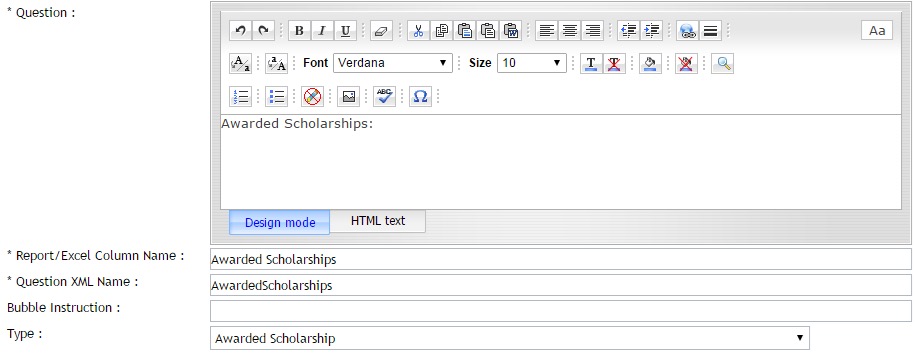
Once this question is created the applicant will see the question in their dashboard as follows:
![]()
If there was more than one award given to the applicant all the names of the awards will appear.
If this question is present, it can also be used to set conditional logic on other sections or questions that can hide or appear if a specific fund was awarded. (i.e., if awarded a specific fund then they need to send a thank you. If the Awarded Scholarship Question shows that specific fund was awarded, then the question to provide an uploaded thank you note will appear)
Best Practice Tip: When using this question type for the applicant to view, it is best to create a separate section for this specific question and any additional award questions that may apply. That way you can control where in the process the applicant will see this section in their applicant dashboard. Create the Section as a section type of “Acceptance” and a Status(es) as either “Selected for Award”. Only when the applicant is moved to a status of “Selected for Award” will the applicant see this section automatically in their dashboard. You will want to set a deadline separate from the application as this section will more than likely be completed after the original application deadline.
Best Practice Tip 2: If you awarding applicants and do not want them to see what they have been awarded prior to an official announcement, you will want to create the section for this question, but DO NOT MARK the Section ACTIVE in the application. Award your applicants first, change their status to the appropriate trigger status, notify the applicants of the award, and let them know in the notification that you will be activating a section for them to complete. Then go in and activate the section by putting a check in the Activate Section column of the Section listing. All applicants at that point that have the specific status that you selected when creating the section will have that section appear in their dashboard, but only when you activated it. So do not activate until you are ready for those applicants to see it.
2.6.7.19 Adding a Calculation Field and How To Set the Formula
Calculation question types are used to create a read only calculation field in which the value of the question equals the calculated sum of other numeric, currency, or float question types within the application. You can create a Calculation Field question type that will return the results of the calculated fields. (I.e. you have multiple question fields that are numeric that you need to add together for a final sum total)
Exercise 1
Step 1: Select the Calculation question type
The Formula field will appear above it.

Step 2: To add a Formula click the Add A Formula.
A box will appear where you will select the fields that are to be calculated together.

Step 3: Click on the Add A Field button to begin selecting the fields to be calculated.
The first line will appear to enter the Section Name and the Field Name of the first field in your calculation.

Step 4: Select the dropdown arrow in the Section Name and locate the section the field is located in and select it.
Step 5: Select the dropdown arrow in the Field Name and locate the field you want to run the calculation on.
As you add fields you will be required to select the appropriate Operator for the calculation you wish to calculate. The available operators are: +, -, *, /
Step 6: Select the dropdown arrow in the Operators and select the operator for the calculation you wish to calculate. This is the operator that controls how you are going to calculate this line with the next line below it.
Once you have completed this calculation line, click on the Add a Field again to add each additional field to be included in this calculation.
Note: The operator will not appear in this second line until you hit the Add A Field button again. The reason this happens is, is because when you only have two fields to calculate it is not necessary to add the operator on the second field. This is also the case for the last line in your calculation you will not have an operator on that line as it is the last line and there are no other items to be calculated in this formula. After completing your last line do not add an operator or hit the Add A Field button again or this will cause an error in your formula.
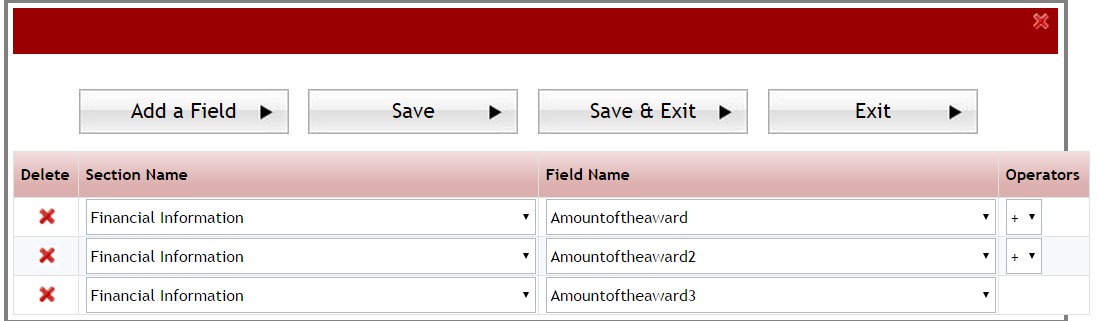
You can delete a row in the calculation by selecting the Red X next to that row.
Note:you cannot create calculation formulas using other calculation questions or mix calculations where you are adding two fields and then subtracting another.
Tip: If you are using calculations, and you click on your preview screen and nothing is showing, check to see if your formula is correct. A bad formula can cause the preview screen not to show.
Step 7: After you have entered all the fields to be calculated, click on the Save or Save & Exit to return to the question’s setup screen.
The Formula field of your question will now be populated with the formula fields you selected.
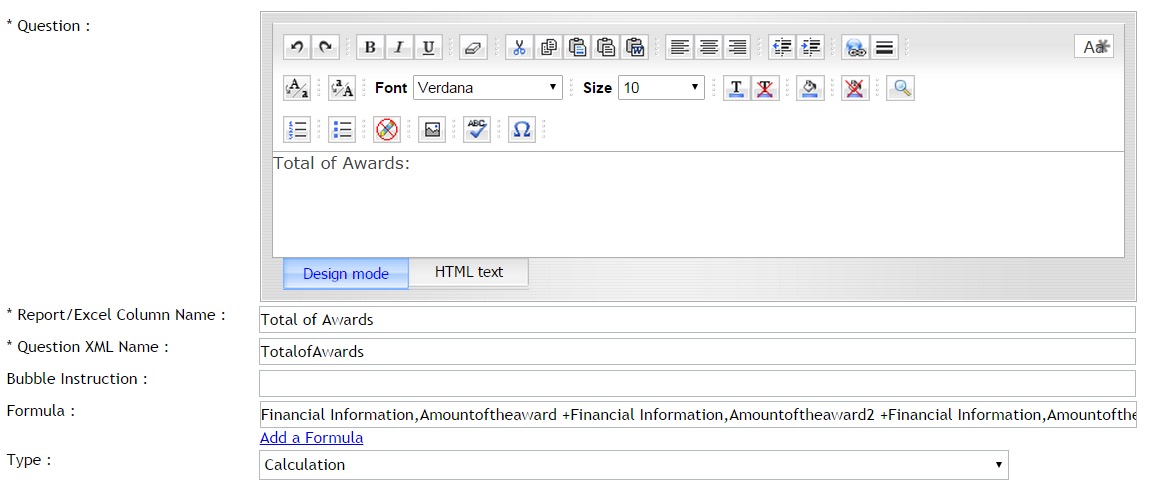
Once the applicant fills in the data and answers all the questions required for the calculation. The applicant will need to click the Calculate button on their dashboard that is present on this question.
![]()
The result of the calculation will then appear to the applicant on their application.
Note: When creating this question it is important to inform the applicant of the fields being calculated so that they can make sure they have answered those prior questions correctly so that the returned result is accurate.
2.6.7.20 Adding a Float Type and Setting Parameters
Float question type values are used in the same manner as numeric but are for more complex scientific equations that require calculations ran on figures containing non-numeric mathematical symbols such as negative positive symbols or fractional dividers as well as figures containing a floating decimal value.
When using a float question type you can set a minimum and maximum value to force the applicant to enter figures within a specific range of numbers.
When you select the Float question type the Min Value and Max Value fields will appear. However, if you do require a min or max value you can leave these fields blank.

- Min Value - Allows you to set the minimum (lowest) numeric range amount that will be allowed when replying to this question
- Max Value - Allows you to set the maximum (highest) numeric range amount that will be allowed when replying to this question
2.6.7.21 Adding a Message Question in Application
Message question types are used to create a message statement to the applicant, instead of creating a question for the applicant to reply to. Message questions are useful in creating a header titles to separate multiple parts of a section.
Example:
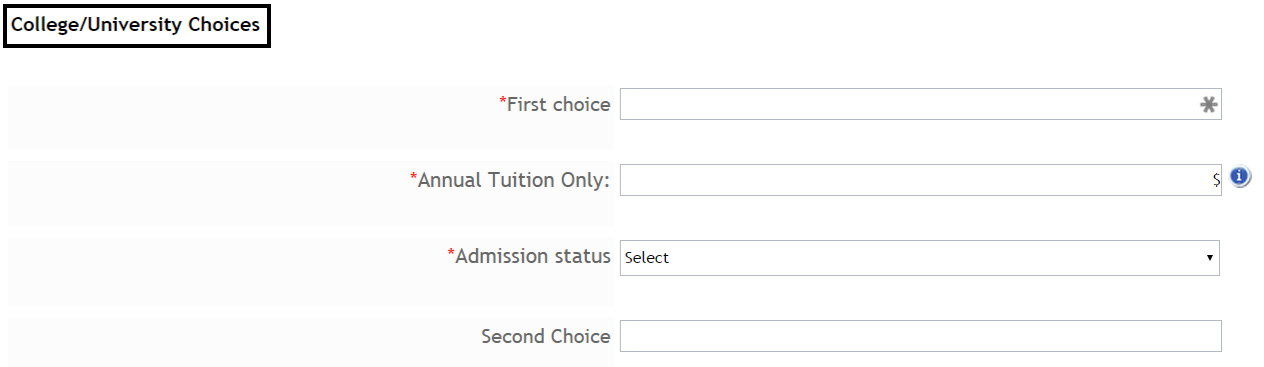
2.6.8 Making a Question Required
In the Question Setup for each individual question there is an option “Required”. If a question on the application is required and must be answered by the applicant, you must mark that question as required and the applicant will not be able to submit their application until the question has been answered.
Important:The section that contains the required question will not show 100% complete in the applicant’s dashboard, until the applicant has answered all the “required” questions within that section. Therefore, each section must contain at least one required question in order for the section percentage to show. If there is not a required question on a section, the section will not show a percentage of completion and the applicant will not be able to submit.
When creating a new question this question will automatically default to No
![]()
Yes: The question is required and the applicant will not be able to submit the application until he/she replies to this question.
No: The question is not required and the applicant can skip this question, and not answer it.
In the question listing for each section, the column “Required” will show as “Yes”, if you selected “Yes” or it will be blank if you selected “No” for each question. You can use this to double check all your questions to make sure you marked them correctly.
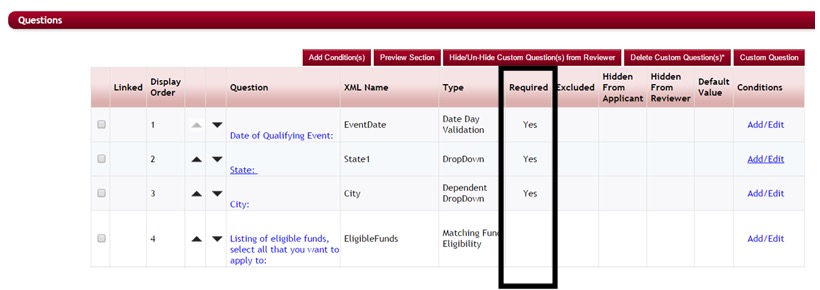
2.6.9 Excluding Questions that you do not want to delete
A question that was previously created in an application may no longer be necessary. Once a question has been included as part of an application and applicants have replied to those questions, the question can no longer be deleted from the application.
Therefore, in order to keep the past data, there is the option to “Exclude” that question from the application.
This will allow the question, along with any data that may be stored on that question, to remain in the database.
Once a question is “excluded”, applicants will no longer see this question and the question will not appear in the application dashboard.
When creating a new question this question will automatically default to No.
![]()
Yes: The question is excluded from the application and no longer visible to the applicants.
No: The question is visible and included as part of the application. All questions that are active in an application should be marked No.
In the question listing for each section, the column “Excluded” will show as “Yes”, if you selected “Yes” or it will be blank if you selected “No” for each question. You can use this to double check all your questions to make sure you marked them correctly.
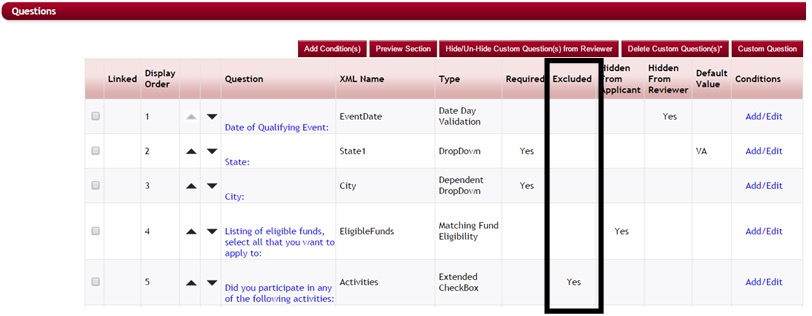
2.6.10 Setting Hide from Reviewer as Active on a Question
There may be questions within the application that you do not want to be visible to the review committee during the review process. (I.e. hiding the applicant’s contact information).
“Hide from Reviewer” allows you to hide the question from the reviewers and they will not be able to see the information when they view the applicant’s application.
When creating a new question this question will automatically default to No.
![]()
Yes: The question is hidden and the reviewers cannot see the replies to this question.
No: The question is viewable to the reviewers and not hidden.
In the question listing for each section, the column “Hidden From Reviewer” will show as “Yes”, if it is hidden and you selected “Yes, or it will be blank if you selected “No” for each question. You can use this to double check all your questions to make sure you marked them correctly.
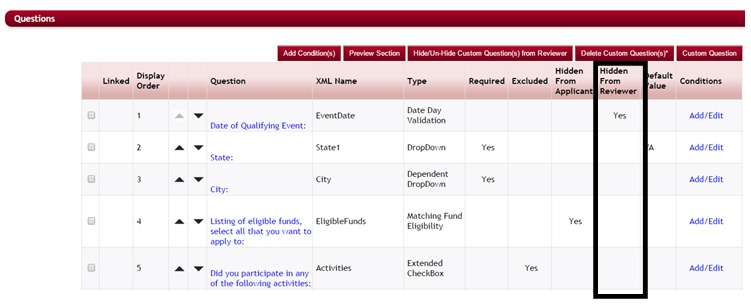
2.6.11 Setting Hidden from Applicant as Active on a Question
There may be questions within the application that you do not want to be visible to the applicant but that can be answered by the Admin and viewable to the reviewers. (I.e. score results, calculated questions, document uploads by the Admin, etc.)
When creating a new question this question will automatically default to No.
![]()
Yes: The question is hidden and the applicant cannot see the question in their dashboard.
No: The question is viewable to the applicant and the applicant can reply to the question.
In the question listing for each section, the column “Hidden From Applicant” will show as “Yes”, if it is hidden and you selected “Yes” or it will be blank if you selected “No” for each question. You can use this to double check all your questions to make sure you marked them correctly.
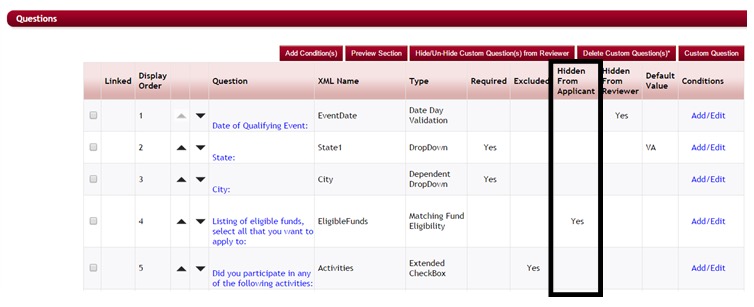
2.6.12 Showing a Question on the Manage Award Screen
When awarding applicants using the Manage Awards (used for awarding multiple scholarships in one application) you can have the replies to specific questions appear from the applicant’s application. (Note: this will only display in the Manage Award Section and will not be viewable if using the Batch Awards to award applicants.)
When creating the question in the Sections and Question setup select “Yes” for the Show on Award Screen in the Add/Edit Question:
Note: When creating new questions in your application the default for this question is No.
![]()
Yes: The question’s values will appear in the Manage Awards
No: The question’s values will not appear in the Manage Awards
To view the question in Manage Awards, you must first select the scholarship you are awarding to view the listing of all eligible applicants for that specific scholarship. The question and its reply will appear when you click in the Award Questions column for each applicant and when you click the Award Applicant to award the applicant.
2.6.13 Setting Read Only as Active on a Question
When a question is marked as “Read Only” the applicant can view the question, but will not be able to enter any data for this question.
Message question types and questions that have been linked to another question in the application are examples of Read Only questions. (These two question types will automatically default as read only therefore you will not need to select them as “read only” when creating them).
When creating a new question this question will automatically default to No.
Note: you would not want to mark a read only question as “required”.
![]()
Yes: The question is a read only question and the applicant does not reply to this question.
No: The question is not read only and the applicant can reply to this question.
2.6.14 Adding a Default Display Value to a Question
“Default Display” allows you to enter a “default” value reply to the question. The question will default to this value, and will not be required by the applicant to answer, however the applicant has the option to change the reply.
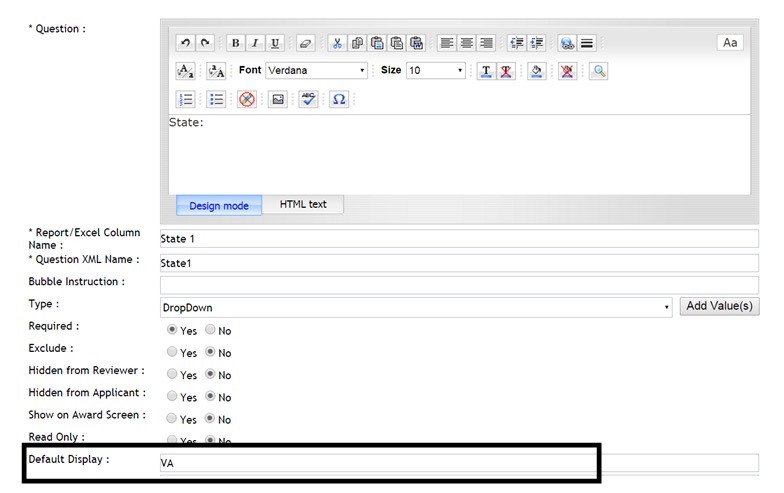
When creating a new question, enter the actual value that is to show as the default answer to this question.
Note: This value must match exactly as the value you entered in the Add Values table to appear correctly to the applicant.
Example:
The majority of your applicants live in the State of Virginia. Therefore, to make it easier on your applicants you create your application question “State” and add a default value of VA. This question will show in the applicant’s dashboard as completed.

In the question listing for each section, the column “Default Value” will show with the default you have entered. If there is no default set, this column will be blank. You can use this to double check all your questions that you want to add a default, to make sure you set them correctly.
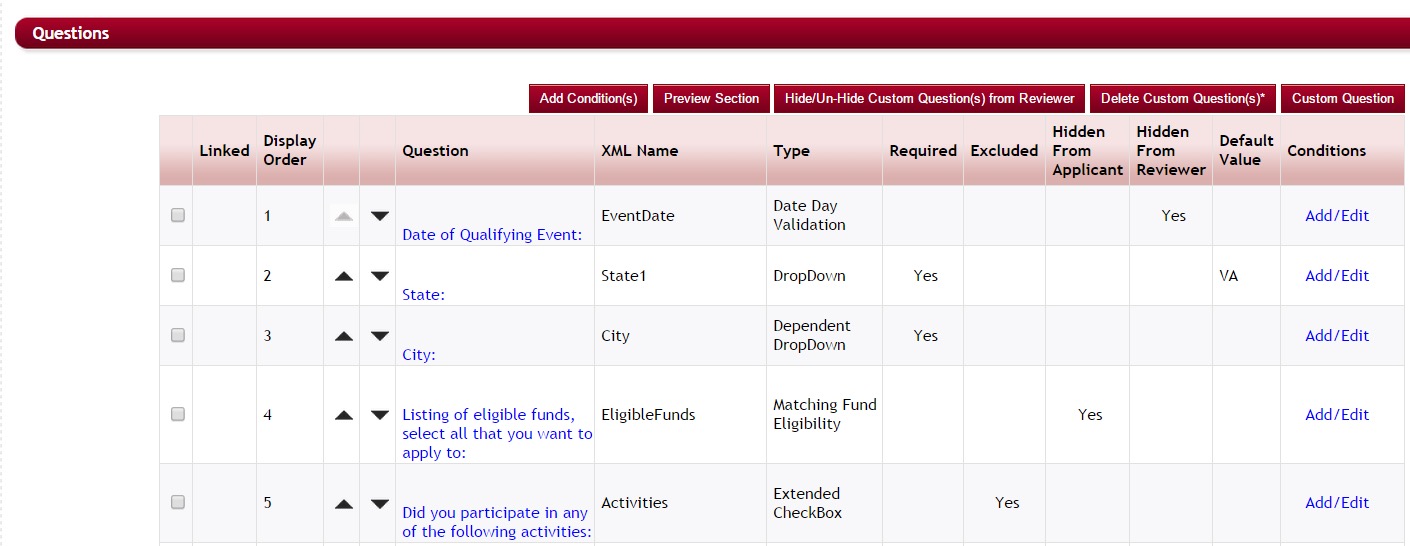
2.6.15 Setting Hide/UnHide from Reviewer on Questions – Batch Action
When you have multiple questions in a section to Hide or Un-Hide from your Review Committee you can do so without having to go in to each separate question.
From the Questions listing for each section you will notice a button at the top called Hide/Un-Hide Custom Questions(s) from Reviewer.
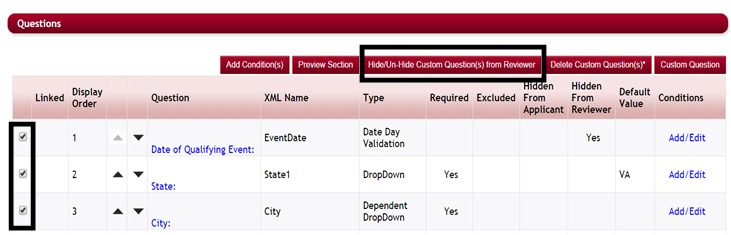
Exercise 1
Step 1: Select all the question that you want to Hide/Un-Hide in the grid by clicking in the checkbox next to the question you want to hide.
Step 2: Click the Hide/Un-hide Custom Question(s) from Reviewer button.
You will receive a confirmation confirming the action you are wanting to perform.
Step 3: Click yes to the confirmation
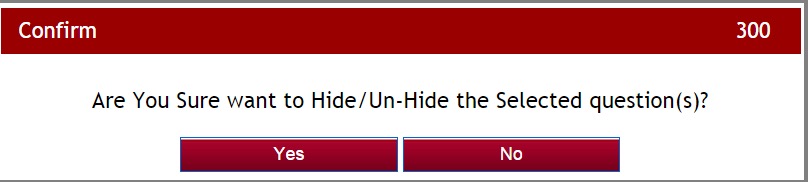
Step 4: Next you will receive a status update, click ok to return to the Question(s) grid.
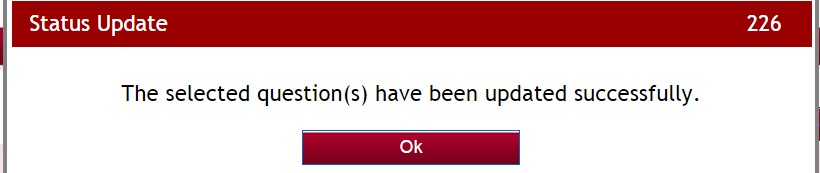
When you return the column marked Hidden from Reviewer will now reflect the selected status.
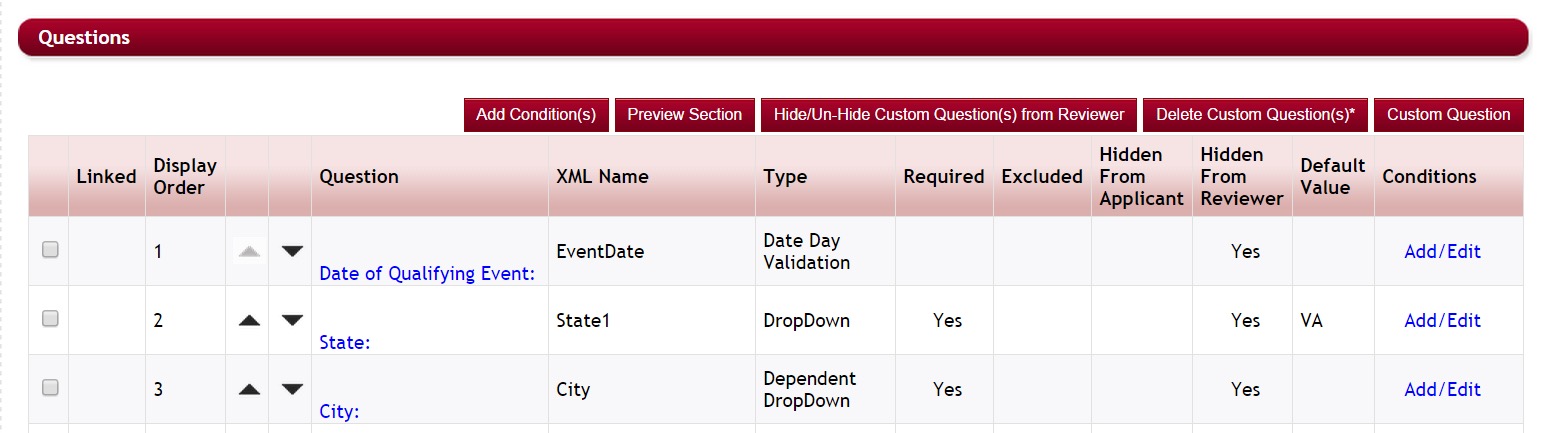
If you selected questions that were blank and not Hidden, they will now show with “yes” in the Hidden from Reviewer Column. However, if you selected question that were marked already as “yes” in the Hidden from Reviewer column, these will now show as blank for not Hidden.
If you want to reverse this option, select the same questions again and repeat. If they were hidden they will then show as blank for not hidden.
2.6.16 Deleting Custom Question(s)
Only questions that have not been responded to by applicants can be deleted.
Once data has been entered on a question it can no longer be deleted from the application or section. Questions that have data entered will have to be marked as excluded.
You can delete a single question or multiple questions in batch.
Exercise 1
Step 1: From the Sections setup Question data grid, select the question(s) you want to delete by clicking in the checkbox next to the question.
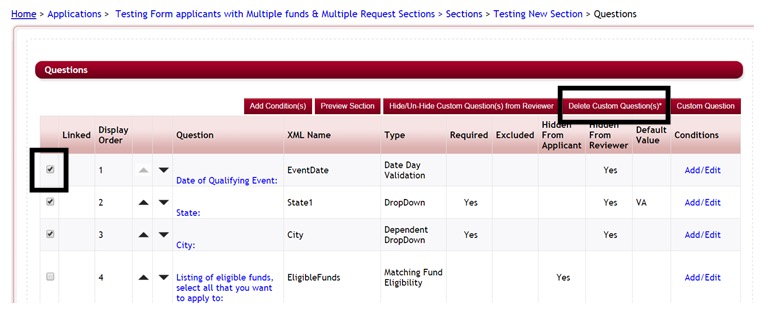
Step 2: Click the Delete Custom Question(s) button
Step 3: You will receive a Delete Confirmation, click “Yes” to continue or “No” if you do not want to delete
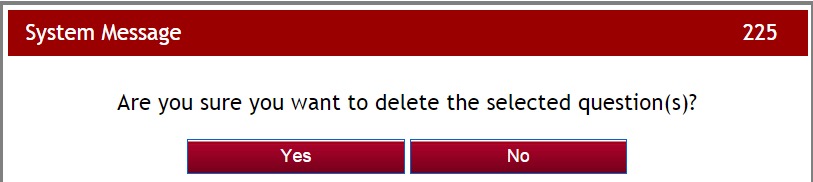
Note: If data has been entered on the question you will receive a System Alert, and the question will not be able to be deleted. Otherwise you will receive a status update letting you know the question has been deleted.
Step 4: Click ok on the Status Update to return to the Question’s data grid.
2.6.17 Setting the Display Order for a Question
“Display Order” is the sort order sequence number of the question as it appears on the page as the applicant is reading the questions. If you enter a number that is already being used by another question in that section, the new question will take that number in the sequence and move the prior question after it the next number in the sequence and all other questions below will be moved down one count. This is a required field when creating questions and cannot be left blank.
When creating your question enter the number that you want the question to fall in sequence on the page as the applicant is filling out the application.
![]()
Once you return to the Question data grid you can also adjust the sort order by clicking on the up and down arrows in the grid:
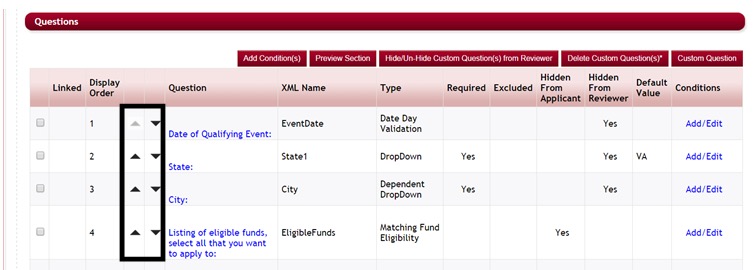
2.6.18 Adding a Document to a Question
If you have a document that may be informational to the applicant in order to answer a specific question, or a template that the applicant can fill out and upload to a question, when creating your question you can attach that document directly to a question. Then when the applicant views that question, they can click on a download link to access it, (i.e. Policy and Procedures. Rules and Regulations, forms to complete, etc.).
Any question but a calculation question, can have a document uploaded to it.
To create a document upload question:
Exercise 1
Step 1: Create your question in the Question Setup and select the question type you want this question to be, (i.e. Message, File, etc.)
Step 2: Select the Upload File: Choose File button at the bottom of the Question setup.

Step 3: Your Windows Explorer folder will appear, select the file you want to upload, and click the open button to add it to the question

Once you have uploaded the file, the name of that file will now show next to the Choose File button.

How to Remove a File
Once you Save and Exit the question and return you can remove the file by clicking on the Remove File that will now appear.

Below are a couple of examples of how you can set this question up for your applicants:
Example 1
If you want the applicant to complete a form, you can have the document directly uploaded from the “File” question type that you created for them to upload it to:

File Setup:
If you want to make this easier on the applicant this can also be separated into two separate questions, a message question where they can access the document, and then a second “file” question where they are to upload it:

Example 2
You have a document you want the applicant to be able to view. (I.e. rules and Regulations for a specific scholarship program) You can create just a single message question type with the document included in the question.

Message Setup:
2.6.19 Save and Cancel Option When Creating Questions
Once you have setup or made edits to a question be sure to “Save” your information prior to exiting the setup screen. The following options are available:
Save - Allows you to save any changes made without exiting the screen
Save and Exit - Saves your changes and exits the screen
Exit without Save - Exit the screen but will not save any changes
Reset Form - Clears all the information entered on the question.
2.6.20 Adding Conditional Logic on Questions
There may be instances that depending on how an applicant answers a specific question other questions may or may not need to be answered by the applicant.
Conditional Logic can be set on a question that will trigger it to appear depending on how the applicant answers questions before it.
Conditions are set on the question that is going to be affected by the conditional logic and hidden when the condition is met.
Exercise 1
Step 1: While in the Question Setup Grid, set conditional logic on one specific question, by clicking on the Add/Edit in the Conditions column for that question
Note: Questions that already have conditions set on them will be have the Add/Edit under the conditions column highlighted in green.
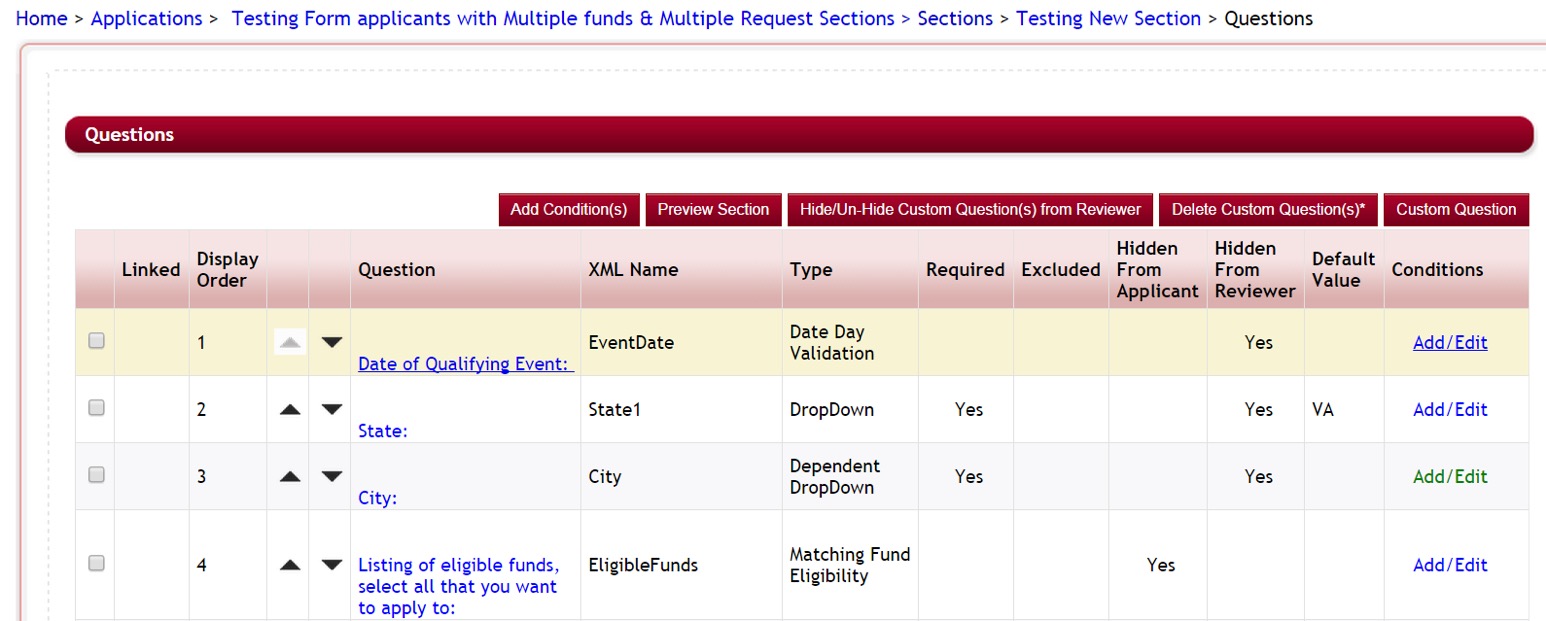
The Conditional pop-up is used to define when a question is hidden to the applicant based on how the applicant answers specific questions within your application. These can be set on a single data value or a combination of data values. When creating conditions you are selecting the values that will allow the selected question to hide in the applicant’s dashboard, if the condition is met. Question that do not have conditions set on them will automatically appear and do not need conditions to be visible.
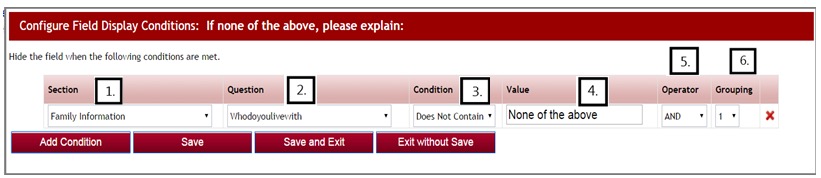
Step 2: Try entering a condition on a question using the following guidelines. Once you enter your first condition, click the Add Condition button to enter additional lines of conditions. The red X will allow you to delete a condition you do not want.
To add a condition to hide a question:
1. Section: What section has the question that will trigger this question to hide? Select that section.
2. Question Name: What question in the selected section, is the trigger for this question to hide? Select that question.
3. Condition Type: What is the condition of the answer/value that has to be met in order for the question to be hidden? Select that condition. Possible conditions are:
- Contains – the answer/value contains this value
- Starts With - the answer/value starts with this value
- Does Not Contain – the answer/value does not contains this value
- Is Not Empty – the answer/value is not empty (applicant has answered this question)
- Is Empty – the answer/value field is empty (applicant has not answered this question)
- Is Exactly – the answer/value must exactly match the value.
- Is Less Than – the answer/value is numeric and is less than the value amount
- Is Equal To – the answer/value is numeric and is equal to the value amount
- Is Greater Than – the answer/value is greater than the value amount
- Is Not Equal To – the answer/value is numeric and is not equal to the amount.
4. Value: What is the answer/value the applicant must answer in order for the question to be hidden? Enter the value. (The value must be entered exactly as it is in the question setup)
5. Operator: Used when entering multiple lines of condition values. And means all of the conditions in the listing need to be met in order to cause a question to hide. Or means either of the conditions can be met. This applies to the row that and/or is on, and the next condition row following. If you have groups of conditions, it applies to each line in the group and then on the last line of the group, how it relates to the next group of condition values.
6. Grouping: This column groups your conditions into sets of conditions. You may have several groups of condition where the first group is executed and then the second group is executed etc. Assign each of the conditions in a group the same number. The first group is 1, the second group is 2, etc.
Examples of entering conditions:
Example 1: You want the question “Please attach your employment resume” to only appear for applicants that have selected “Yes” to the question: “Do you have work experience?” If they selected “No”, or have not answered the question yet, you do not want the question to appear.
You would enter the condition as follows on the question “Please attach your employment resume”:

Example 2: You want the question “Please attach your employment resume” to only appear for applicants that have selected “Yes” to the question: “Are you currently employed?” and on the question “Gender” selected “Male”. You must enter every possible scenario that it should be hidden for, and group each scenario as a separate group.
Use caution when using contains on values that could be included within another word in that question’s values listing, (i.e. Male is part of Female, Other is part of Mother, or brother).
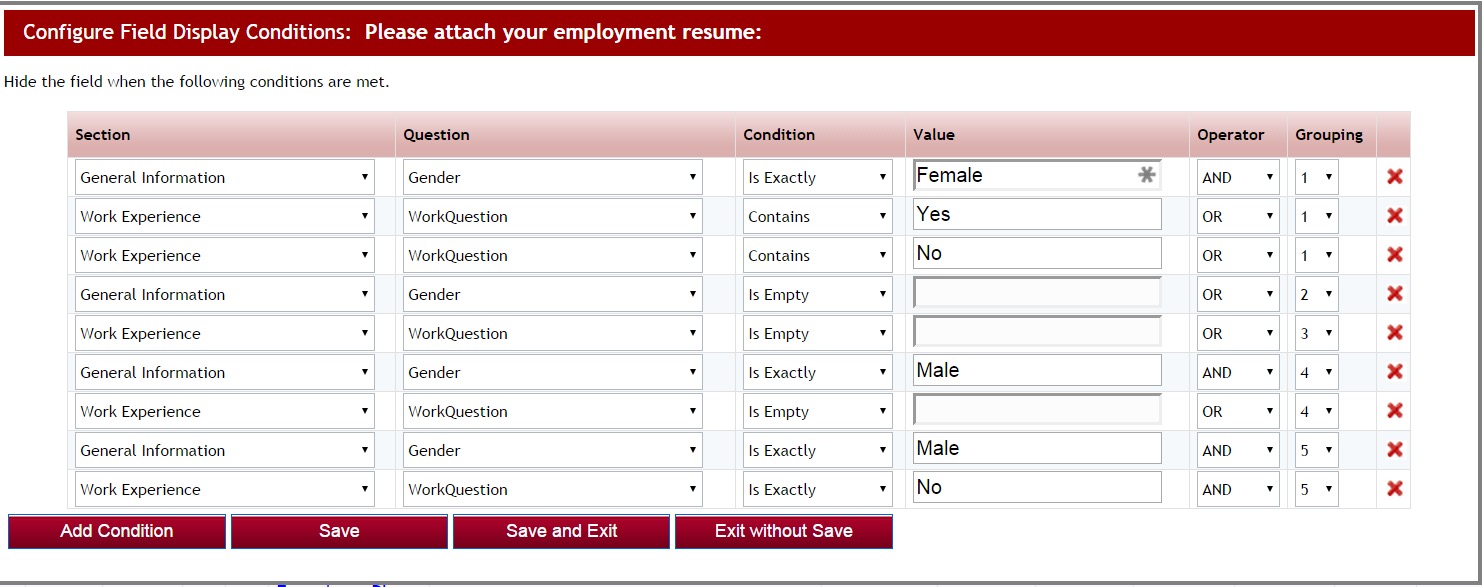
Step 3: after you have entered your conditions information, be sure to select Save to save any conditions you have added.
Step 4: Once you return to the Question data grid listing screen the Add/Edit in Condition column next to your question will now display as green, showing that conditions have been entered on that question. If it is not showing as green, click “Save” on the Question data grid listing to refresh your information.
2.6.20.1 Setting Conditional Logic on Multiple Question
If you have multiple questions in the same section that have the exact same conditional logic, you can set the logic for all the questions at the same time without having to go in on each separate question to set it.
Best Practice Tip: Once a question has logic set on it you will not be able to select it for the multiple selection option. Therefore, when setting logic on multiple questions, set that multiple logic first. Then go back in on the individual questions and add the additional conditions that apply only to that single question.
Step 1: While in the Question Data Grid Listing, select the all the questions you want to enter the logic on, by entering a check mark in the box next to that question.
Step 2: Click the Add Condition(s) button.
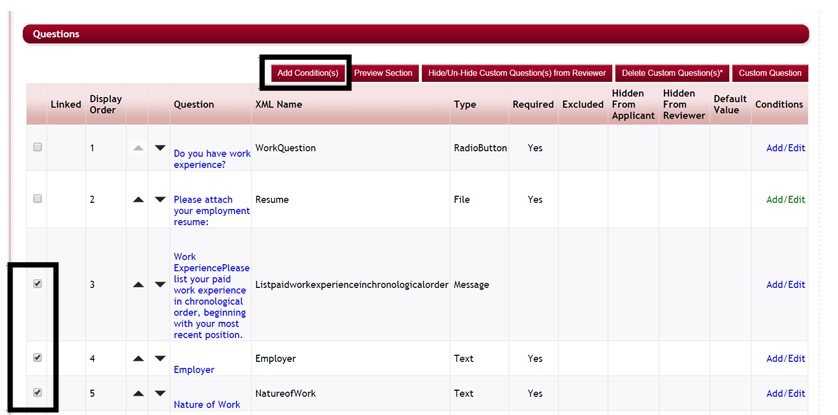
This will open the Add condition box, notice that it list at the top of the box all the questions it will be adding that condition to:

Step 3: Enter the conditions, as you would if it was just for one question, that apply to all the questions and click the Save and Exit to return to the Question Data Grid listing. All the questions will now have the condition set on them.
Note: If you need to add additional conditions on just one of the questions that you just updated in the group, you can click on the Add/Edit next to that question and add the additional conditions that apply only to that question.
2.7 Creating Request (Nomination) Section Instructions to the Applicant
When you have created your application you can add Request Sections to the Application.
Request Sections are used if the applicant needs to have someone else fill out a portion of their application on their behalf. Request Section are not viewable by the applicant. It usually is used for Letters of Recommendation, for a Guidance Counselor to upload transcripts or other school records, or possibly to have a Parent to fill out information.
When you create the actual request section the Editor box in the section set up is used to enter the instructions to the individual requested to complete the section. However you also need to have instructions for the applicant.
You would enter the applicant’s instructions under the Request Instruction icon in the Application’s Setup Dashboard.
These instructions would be clear, detailed instructions to the applicant as to how to use this section and what each request section in the application is requesting, so they know who they are to request to complete that section.
Exercise 1
Step 1: Select from the Home Page – Setup Application Forms
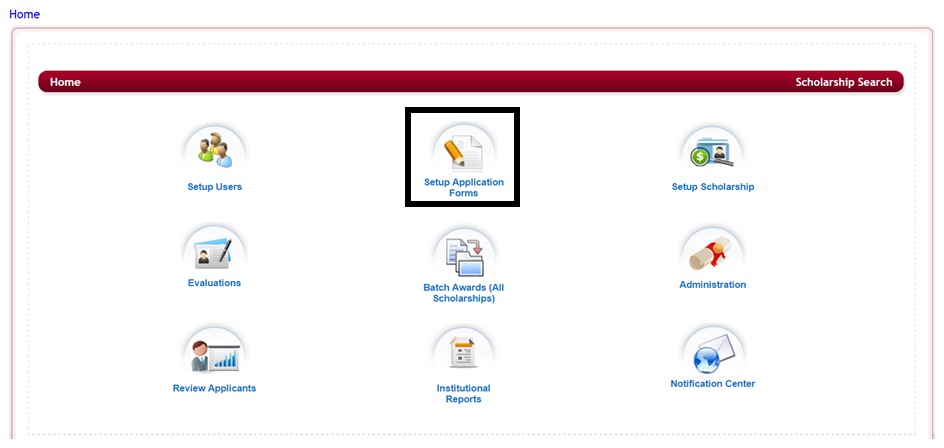
Step 2: Select from the listing of applications the application you want to setup the Request Section Instructions for by clicking on the name in the Application Form column.

This will bring you to the Application’s Dashboard
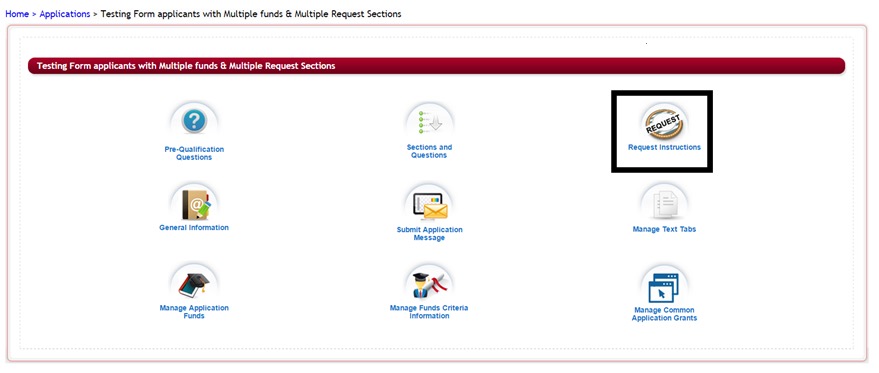
Step 3: From the Application’s Dashboard, click on the Request Instructions icon.

The Request Instructions Editor box will appear:
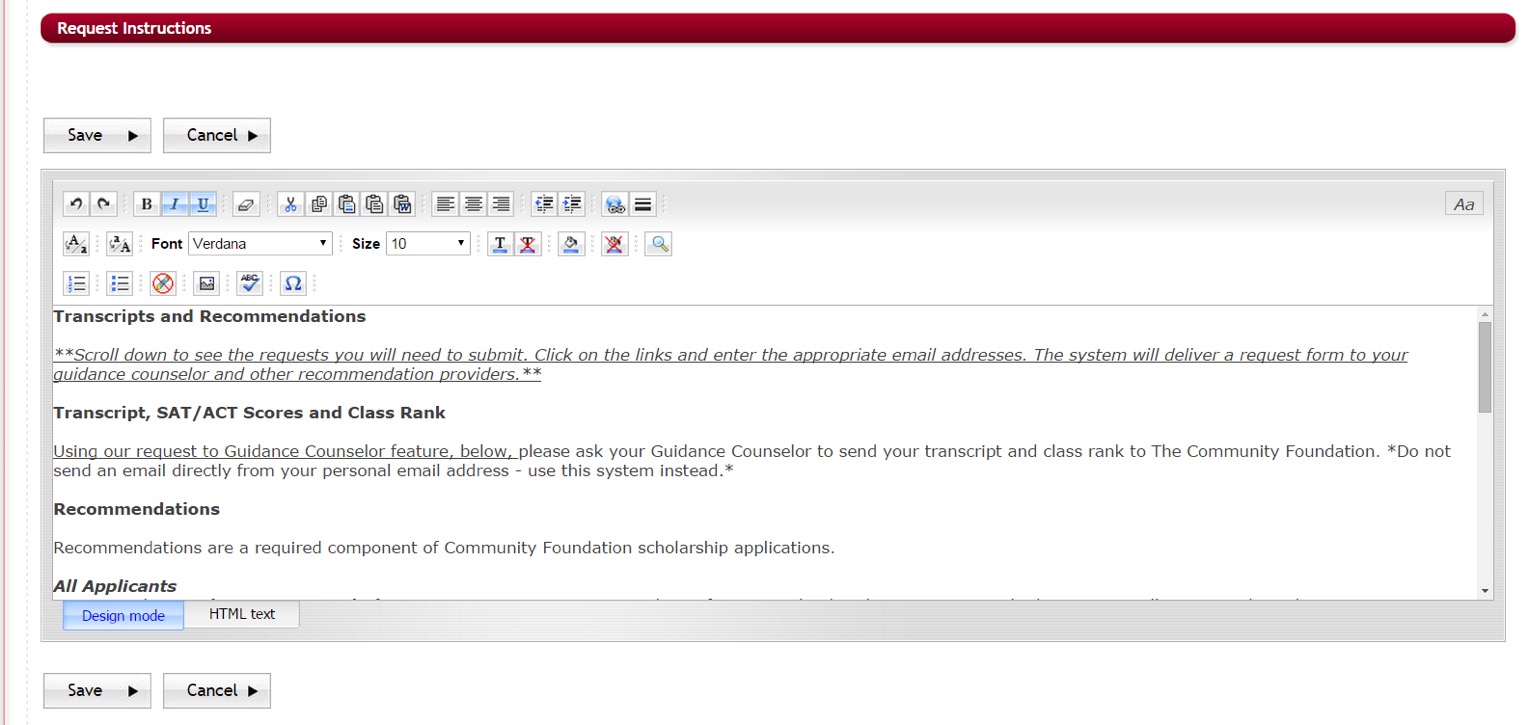
Design Mode: The html editor works exactly the same way as Microsoft Word works. Type the information into the body of the editor as you would be typing and formatting it in a Microsoft Word document. You can also copy and paste the formatted text from other documents.
HTML Text: You can create this page using html tags by clicking on the HTML Text tab present beside the Design Mode tab. Enter the html tags with the content and it will display all the content as formatted.
Step 4: type your instructions in the Editor box formatting them just as if you were typing a word document using the format icons provided at the top of the editor box.
The following is an example of instructions to the applicant:
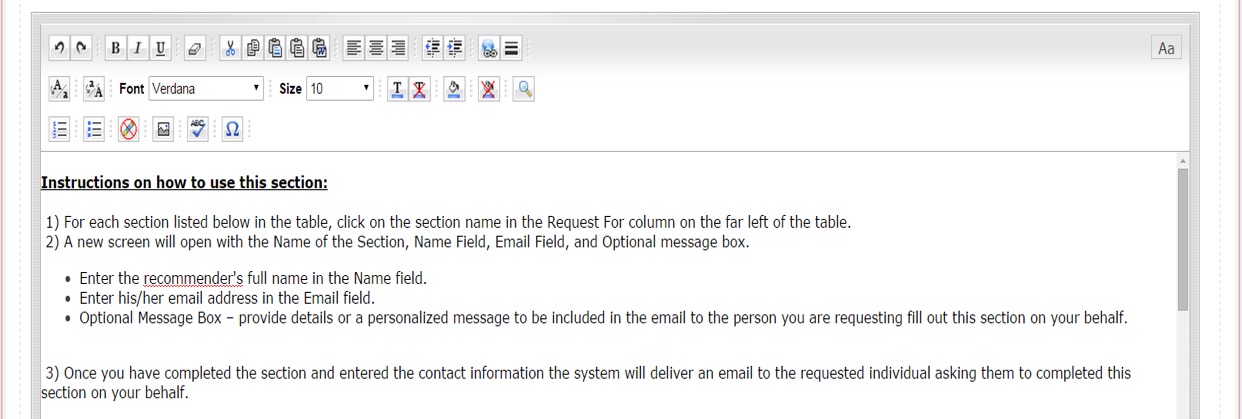
Note: When you have multiple request sections in your application it is important to also explain in your instructions what those section are for and who should be requested to complete:
For Example:
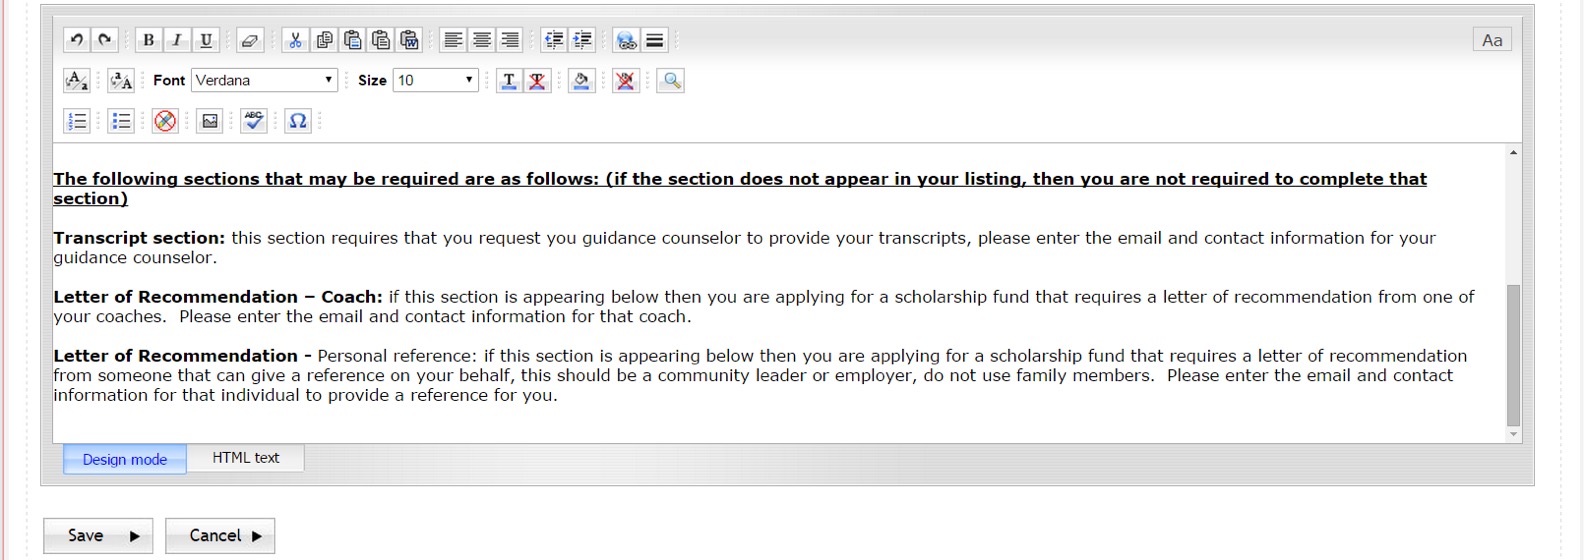
Step 5: Once you have finished entering all your necessary instructions, hit Save to save your changes.
2.8 Manage Text Tabs
There are five sections of text tabs that can be used to add information/instruction pages and tabs for the Application of Form. The text tabs are viewed by the Applicants in the applicant’s dashboard for the application they were activated on.
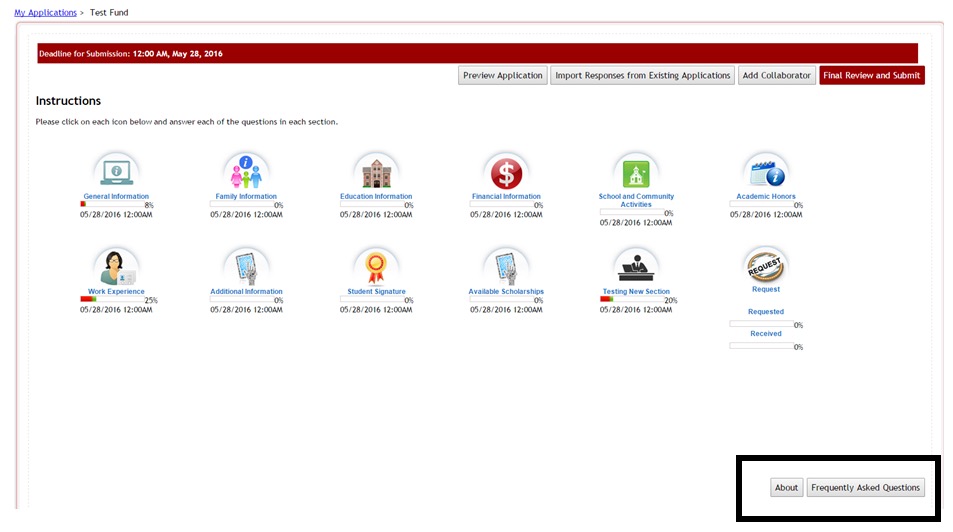
These are customized text pages and the display name can be changed to fit the needs of the application.
Some examples of use are:
Introduction: Introduction page introducing the Applicants to the Fund Source application process and giving a brief overview on how to apply.
Frequently Asked Questions: FAQ page for the Applicants to know about the frequently asked questions for the Fund Source they are applying for.
Contact Information: Contact Information page for the Applicants to know the contact information about the person to contact in case of any questions related with the Fund Source Application.
To add Text tabs to the application form:
Exercise 1
Step 1: Select from the Home Page – Setup Application Forms

Step 2: Select from the listing of applications the application you want to setup the Text Tabs for by clicking on the name in the Application Form column.
This will bring you to the Application’s Dashboard.
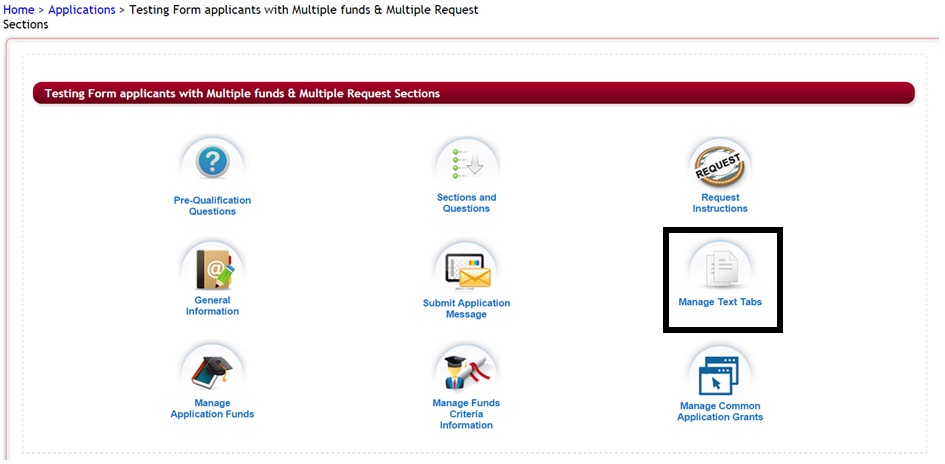
Step 3: Select the Manage Text Tabs icon in the Application’s Dashboard
The following screen will appear and you have the ability to create 5 separate text tabs.
Step 4: Select one of the Text Tab icons. If all selected, the tabs will appear to the applicants in the same order as the tabs are numbered. (Text Tab 1will be first, text tab 2 second, etc.)
The following editor box will appear:
The Admin will enter the text information, check publish to have it display as part of the application and the click on Save to save it to the application.
Step 5: Enter the Display Name:This is the name you want to call this page. This is the name that will be displayed to the applicant and appear on the page button and page header.
Step 6: Enter your text information in the editor box.
Design Mode: The html editor works exactly the same way as Microsoft Word works. Type the information into the body of the editor as you would be typing and formatting it in a Microsoft Word document. You can also copy and paste the formatted text from other documents.
HTML Text: You can create this page using html tags by clicking on the HTML Text tab present beside the Design Mode tab. Enter the html tags with the content and it will display all the content as formatted.
At the bottom of the page you will notice a Published box. In order for the text tab to appear on the applicant’s dashboard this must be checked. If you no longer want a text tab to appear then you can unselect this and it will not publish to the dashboard.
Step 7: Select the Published box at the bottom of the page by putting a check in that box.
Step 8: Click the save button after adding all the content to save the changes and go back to the Manage Text Tabs dashboard.
Repeat these steps for each text tab that you want to publish.
2.9 Setting the Submit Application Message
When an applicant submits their application they receive an online submittal message that will appear on the screen after they have completed the submittal process.
Each application form has its own submittal message and will need to be updated for each.
Exercise 1
Step 1: Select from the Home Page – Setup Application Forms

Step 2: Select from the listing of applications the application you want to setup the Submittal Message for by clicking on the name in the Application Form column.

This will bring you to the Application’s Dashboard.
Step 3: Select the Submit Application Message icon
This will open the Application Submit Message editor box.
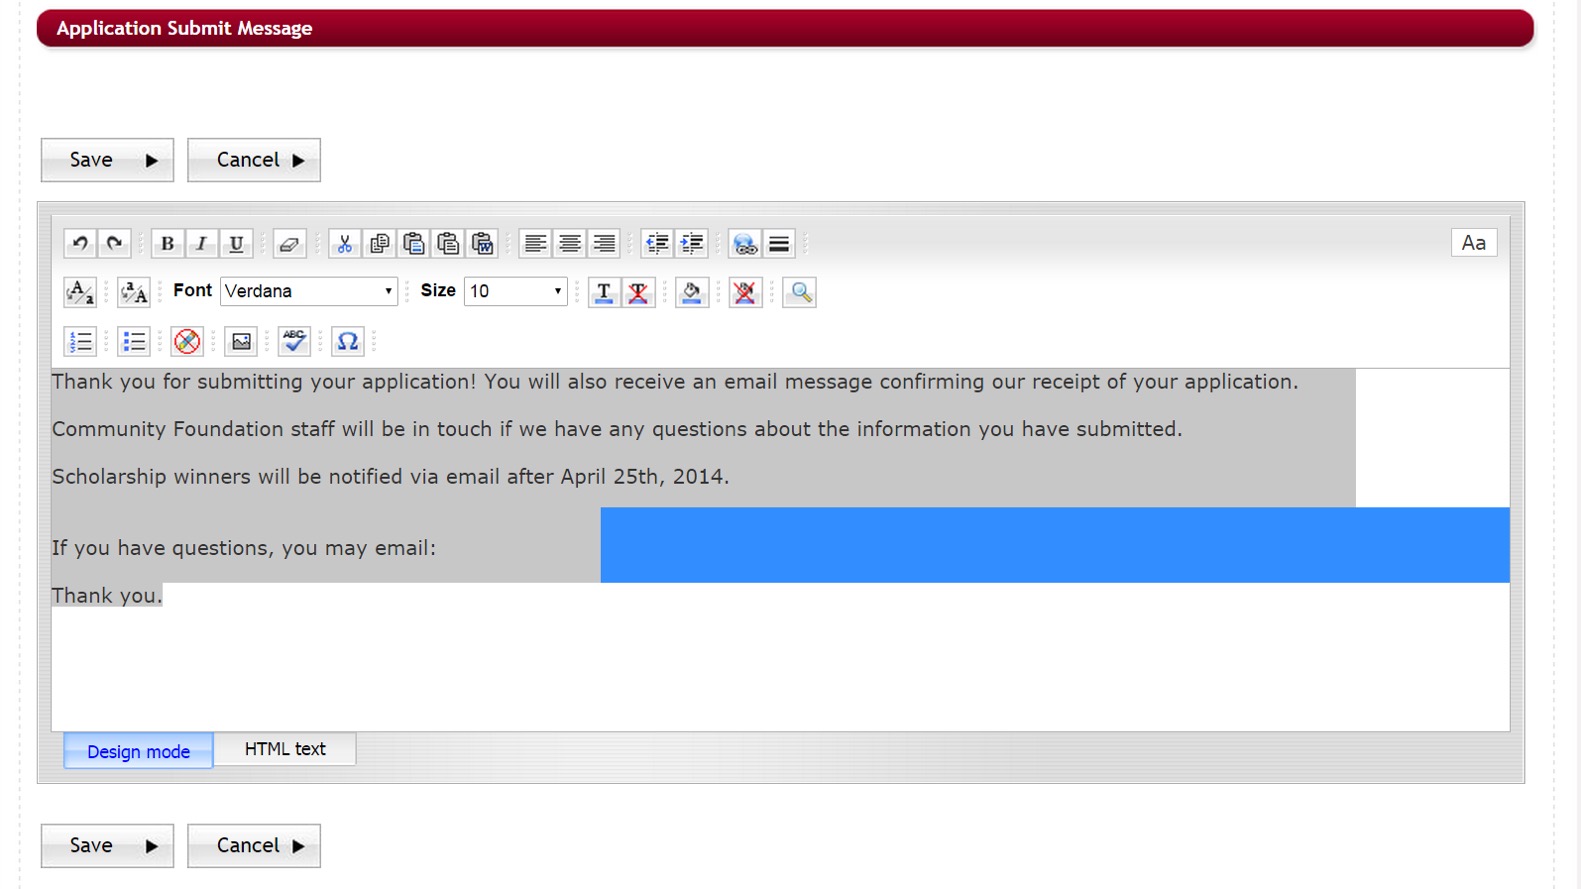
Design Mode: The html editor works exactly the same way as Microsoft Word works. Type the information into the body of the editor as you would be typing and formatting it in a Microsoft Word document. You can also copy and paste the formatted text from other documents.
HTML Text: You can create this page using html tags by clicking on the HTML Text tab present beside the Design Mode tab. Enter the html tags with the content and it will display all the content as formatted.
Step 4: Enter, in the editor box, the online message that you want the applicants to see after they have submitted their application.
Step 5: Click save to save your information and return to the Application’s Dashboard.
Note: This should be a brief “Thank You” message. An email confirmation will also be sent to the applicants where you can include more details about the application process if necessary. The email template is located in the Notification Center for each individual application (Evaluations>Notification Center>Application: Submit Confirmation). Please see the Notification Center Training guides for more detailed information on editing those templates.