The Applicant Status section is a report feature that allows you to monitor your applicant’s activity and their current Status/Status Detail as the applications are being completed. It, also, allows you to view their Status and Status Details as they are moving through the entire application review and awarding process.
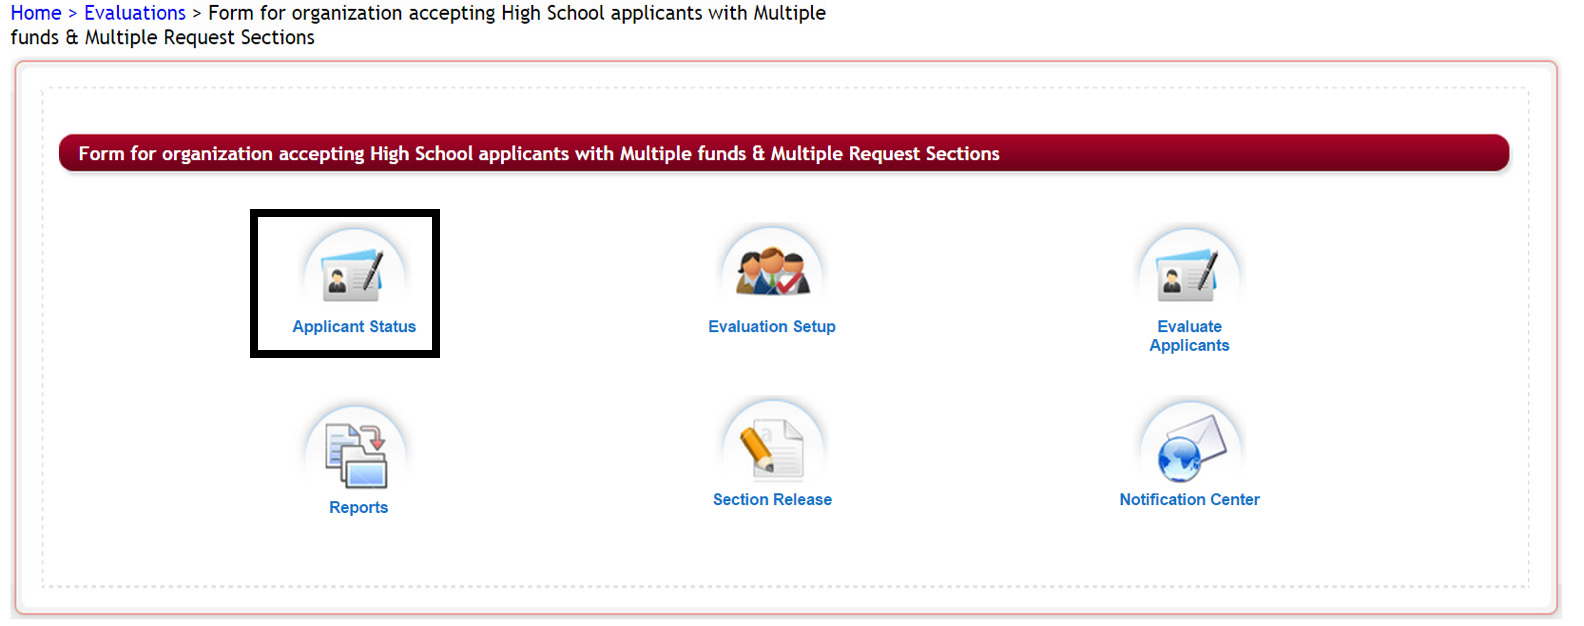
Step 1: To access the Applicant Status report, select the Applicant Status icon from the application’s Evaluation dashboard for the application you want to view.
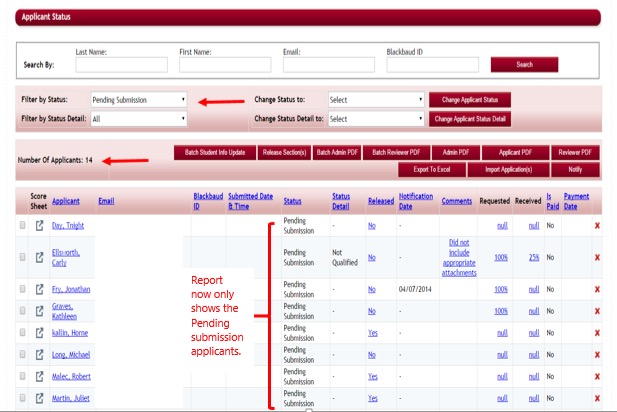
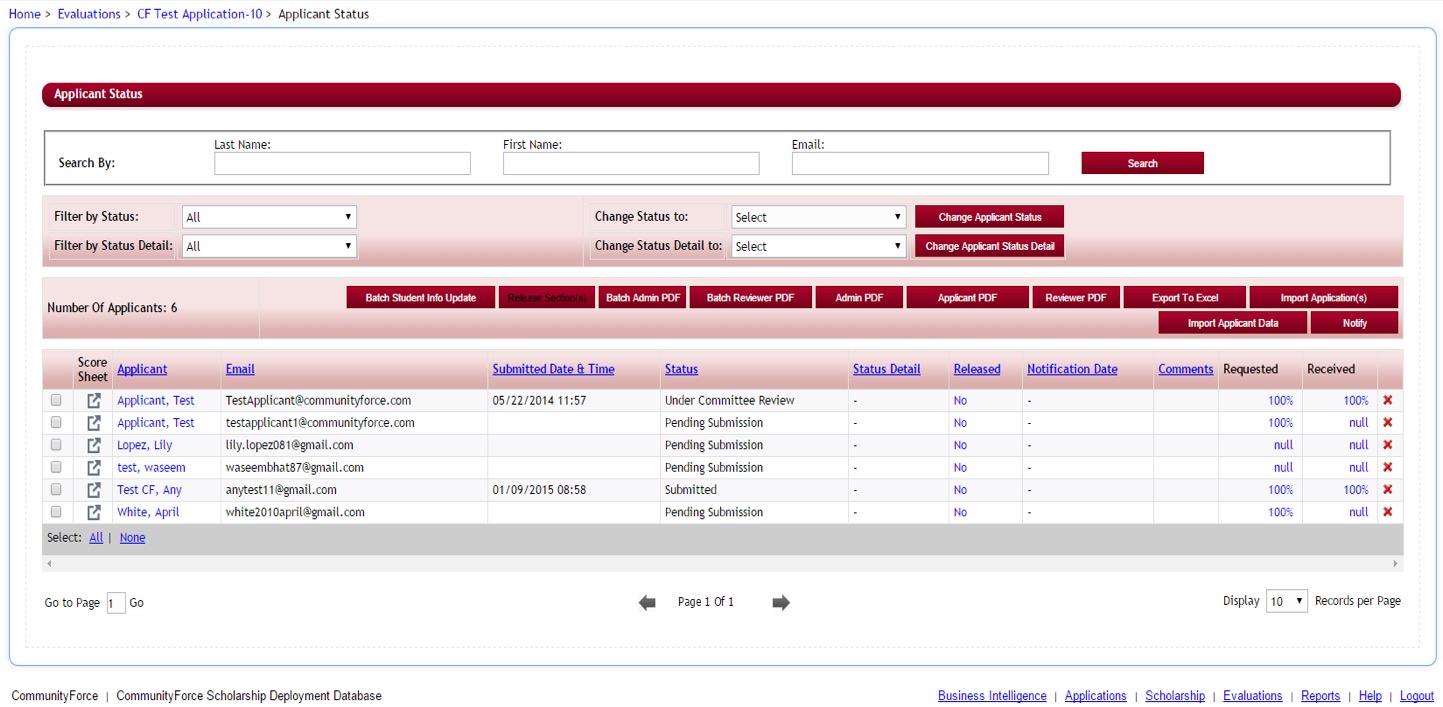
Step 3: The Applicant Status report will open:
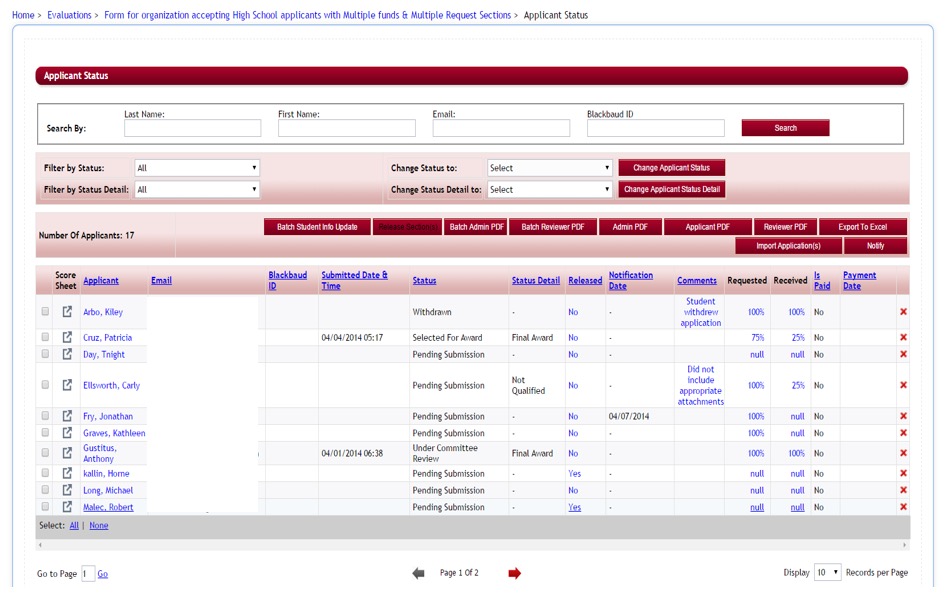
2.1 Applicant Status Report Overview
The following columns are viewable in the Applicant Status Report:
Score Sheet: From the Score Sheet you can see the committee scores, view a table view of the entire applicant’s application, and view attached documents.
Applicant: Applicant’s name as it appears in their user log-in account. This is not the name they enter as part of a question in their application when filling out the actual application.
Email: Applicant’s email as it appears in the user log-in account. Not the email that is entered as part of a question in their application when filling out the actual application.
Net ID: This is an optional field and used to record an ID for your external site. If using integration to an external program this is the identifying ID on that external site. (i.e. Banner, PeopleSoft) Note: this column will not appear if you are not using this function and the Global Admin has not selected “yes” to activate in the Administration>Site Setting: General Settings: Display SSO Id on all screens.
Submitted Date & Time: Once the applicant clicks the submit button on their dashboard and submits their completed application, this column will show the date and time that they submitted.
Status: The current status category of the applicant. Where they are in the application process.
Status Detail: The application status detail (stage) the applicant is currently in. This is a user defined field that may or may not be populated, depending on your process.
Released: Shows if the administrator has released a section back to an applicant for completion. (for more information on how to release a section see the Section Release section in this module)
- Yes - The section has been released and waiting for completion
- No – There are no sections released for completion
Notification Date: When an email is sent using the Notify button the date that the email was sent will appear here.
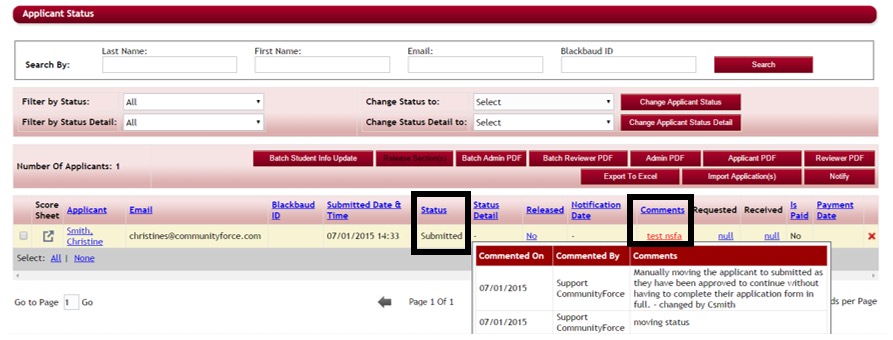
Comments: Displays the comments that were recorded when the status/status detail was adjusted manually. When you hover over the comments that are visible, a box will appear showing the date and who entered the comment.
Requested: When using Request Sections in an application, this column will show if the applicant has requested someone to complete the request section on their behalf, as well as show the percentage “%” of request they have requested.
- Null - Applicant has not assigned an individual to complete any of the request sections. If there are no request sections in the application, then this will show as Null.
- 100% - Applicant has assigned all the request sections out to individuals to complete.
- % number less than 100 % - Applicant has not assigned all their request section to individuals to complete.
Received: When using Request Sections in an application, this column will show if the assigned individual has gone in and completed the request section on behalf of the applicant and clicked the submit on that section only.
- Null - The assigned individual has not completed the request section on behalf of the applicant.
- 100% - All the assigned individuals have completed the request sections and clicked the submit on that section only
- % number less than 100% - Means that not all the assigned individuals have completed the request sections.
Is Paid: This will only display if you have a fee associated with the application form and your Global Admin has activated the payment feature in the Administration>Site Settings: General Settings: Enable application Payments by selecting “yes”. Shows if the applicant has made the required payment for the application form.
Payment Date: This will only display if you have a fee associated with the application form and your Global Admin has activated the payment feature in the Administration>Site Settings: General Settings: Enable application Payments by selecting “yes”. Shows the date the payment was made.
“X“ Delete: Use with Caution. Allows you to delete an applicant’s application form. Once it is deleted it cannot be retrieved.
Export to Excel – allows you to export the Applicant listing report to excel and view an excel version of the Applicant Status Report.
Number of Applicants: ![]() - this is the number of applicants being displayed in the report grid based on the Filter by Status/Status detail selection. If Filter by Status/Status detail is set to All, the Number of applicants will be the total number of applicants that have started the application form.
- this is the number of applicants being displayed in the report grid based on the Filter by Status/Status detail selection. If Filter by Status/Status detail is set to All, the Number of applicants will be the total number of applicants that have started the application form.
2.2 Searching For An Applicant

At the top of the Applicant Status report you can use the Search By: to search for a specific applicant. You can search on one of the items or all, by entering the data in the fields and clicking the Search Button.
- Last Name
- First Name
- Net ID (if applicable)
(Note: These items are looking for the applicant data that was created when the applicant created their log-in account, not the actual information that is entered in question fields within the application.)
2.3 Applicant Status Report – Status/Status Detail Functions
Status and Status Detail
As applicants move through the application process they’re categorized into different stages called Status and Status Detail. Their status and status details is determined by where they are in the process.
In the Applicant Status Report, the applicant’s current status and status detail are shown in the Status and Status Detail columns.
Status and Status Detail Definitions
Status: The Status stage is a system defined status and usually is automatically updated as specific events occur.
- Pending Submission - The applicant has started their application but not yet submitted. (Status is visible on Applicant’s Dashboard)
- Submitted - The applicant has completed their application and clicked the submit button on their dashboard. (Status is visible on Applicant’s Dashboard)
- Additional Info Requested - The administrator has released a section back to an applicant that has already submitted their application, requesting that they complete the section and resubmit their application form. (Status is visible on Applicant’s Dashboard). Once the applicant re-submits the status will move back to Submitted.
- Withdrawn - The applicant decides to withdraw their application by clicking the withdraw application option on their personal dashboard. (Status is visible on Applicant’s Dashboard)
- Under Committee Review - Applicant has been assigned to a committee member for review. (Status “not” shown on Applicant Dashboard. Applicant will continue to see Submitted.)
- Not Selected for Award (not an automatic field) – Administrator must change manually when not selected for an award. (Status not shown on Applicant Dashboard. Applicant will continue to see Submitted).
- Selected for Award – When an applicant is awarded a Final Award Amount in the Batch Awards or Manage Awards section, the Status is automatically moved to Selected for Award. (This status is not shown on the Applicant Dashboard. Applicant will continue to see Submitted, however their dashboard will now show Decline and Accept buttons as soon as they have moved or been moved to this status.)

- Award Accepted – As soon as your applicant is moved to the status of “Selected for Award” their dashboard will automatically show the Decline and Accept buttons. When the applicant clicks on the Accept button they are moved automatically to the Award Accepted status. See note below
- Award Declined - As soon as your applicant is moved to the status of “Selected for Award” their dashboard will automatically show the Decline and Accept buttons. When the applicant clicks on the Decline button they are moved automatically to the Award Declined status. See note below
Note: Many times clients will also add an additional section that has been created with a status setting in the section setup Status(es) of Selected for Award. Once the applicant is moved to the status of Selected for Award, that section will appear in their dashboard, showing them the award they received as well as additional instructions on how to accept the award they have been awarded. They can then click the Accept or Decline button, and their status will change, notifying you that they have completed the section and clicked the Accept or Decline button in their dashboard.
- Request Pending – The applicant has submitted their application, and they have assigned all their request sections to be completed, but the individual(s) they requested to complete the section for them has not completed the request section. They can submit the application but the status will show as request pending until all the request sections have been completed (Status is visible on Applicant Dashboard)
Status Details: These are custom stages and applicants are only moved to a Status Detail manually, this is not automatic. (Status Details must be created by the Global Admin in the Administration dashboard, please see your Global Admin if there is a status detail you would like to have added for your process)
2.3.1 Filter By Status/Status Detail:

When you first open the Evaluations> Applicant Status report “All” the applicants that have applied to the application will show in the report listing.
You can use the Filter By Status or Filter by Status Detail to search for a group of applicants based on a specific status or status detail and see only those applicants in that status/status detail.
You can select on both of the filters, or just one, depending on what group of applicants you want to view.
To filter by a specific Status/Status Detail:
- Open the drop down menu next to the Status/Status Detail you want to filter on.
- Now select the Status item in the drop down menu
- Once you select status, the item system will automatically run the report to show only those applicants that meet that Status/Status Detail.
Note: When filtering by Status there is the additional filter option to filter by both the Submitted and Request Pending together by selecting the filter of Submitted/Request Pending. This allows you to see all the applicants that have submitted their applications, including those that have submitted but are still waiting on their request section to be completed by the recommended individuals.
As you filter on the status the Number of Applicants, will also change to the number of applicants that are in the status/status detail you have filtered on.
2.3.2 Change Status/Status Detail To:

In the Evaluations>Applicant Status report, you can use the Change Status to/Status Detail, to select an applicant(s) to manually change the current status of an applicant or group of applicants to another Status/Status Detail in the process.
The following will show how to move an applicant manually from Pending Submission to Submitted.
Note: this is for illustrative purpose and not something you would normally have to do, as the system will automatically move them to submitted once they have clicked the submit button in their application form and all request sections have been completed by the individual requested to complete. However, there are times when you may allow an applicant to be moved to submitted without having completed the application form, in that case you would have to manually submit their application by changing their status from Pending Submission to Submitted.
Step 1: To change the status from one status to another you must first Filter the Status/Status Detail that the applicant is currently in by using the Filter by Status/Status Detail.

Step 2: Select the applicant(s) you want to move, by putting a check in the box next to that applicant(s) name.

Step 3: Once you have selected the applicant(s), click the drop down arrow in either the Change Status To or Change Status Detail to fields and select the new status/status detail you want to move the applicant to.

Step 4: Once you have selected the change status or status detail, click on the button next to that field, Change Applicant Status or Change Applicant Status Detail, depending on which one you’re wanting to change.
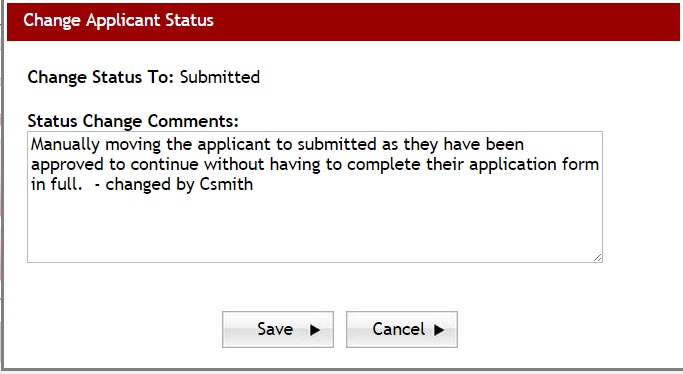
Step 5:A Change Applicant Status box will appear for you to enter the reason for the Status/Status Detail Change. Enter your comment and click Save to save the change or Cancel to cancel the Status/Status Detail Change. If you do not want to enter a comment, you will still need to click save to save the change.
Step 6: Once you return to the Applicant Status report the status or status detail of the applicant will now be updated to the new status/status detail. If you entered a comment in the comment box that comment will now display in the comment column for that applicant, you can view all the comments by hovering over the comment that is currently showing in the comment column.
2.4 Applicant Status Report – Viewing Applicant’s Dashboard/Staff Sections
There are occasions when it is necessary to view the applicant’s dashboard from their perspective and to be able to edit or complete questions within the sections.
For example:
1) You have created Staff Sections to be completed by Staff.
2) The applicant needs assistance uploading a document to their application or answering a specific question.
2) You need to see the documents that have been uploaded.
3) You need to see who they have recommended for a request section.
3) You need to see if the recommender accepted or declined the request from the applicant.
Note: In order for you to edit an application or section after the deadline or the applicant has submitted their application, you will need to make sure that your Global Admin has set the setting in the Administration Dashboard>Site Settings: General Settings: Disable Section Locks for Admin: to “Yes”. (The only exception to this is Staff Sections, which can be edited after the deadline, even if not disabled if you have set the setting on that specific section to allow edits after submittal.)
To view the Applicant’s Dashboard:
Step 1: Locate the applicant in the Applicant Status Report grid.
Step 2: Under the column “Applicant” click on the applicant’s name

Step 3: The applicant’s dashboard will open showing all the icons that are available in the application. Only the sections that the applicant is required to answer will appear. The applicant’s name should be in the header at the top of this dashboard

Step 4: Click on any of the Section Icons to update or view that section. Be cautious in making changes as any change you make is changing their replies in their application. Remember to click Save or Save & Return to Dashboard to save any changes you want to keep prior to leaving the section. If you do not want to save any changes click the Discard changes and return.
Step 5: If you have a Staff Section open that section and complete it from this dashboard.
Step 6: To view the Request Sections, and see who the applicant has recommended to complete, click the Request Sections Button located on the dashboard.
Step 7: This will show any recommendations the applicant has made and the current status of this request. Click the “Return to Dashboard” to go back to the applicant’s dashboard.

Step 8: Viewing attached documents – While in the applicant’s dashboard you can view all the attached documents by clicking on the Preview Application button.
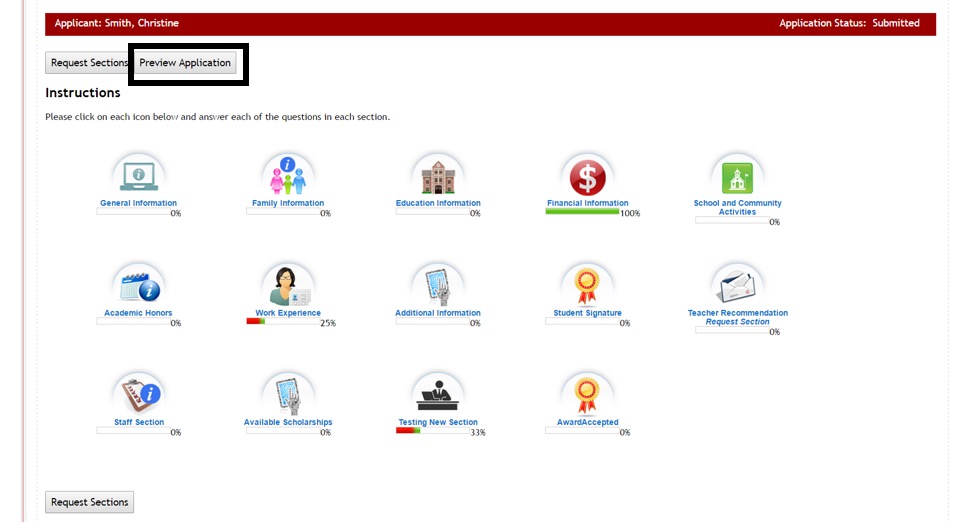
Step 9: This will open a new window in your browser displaying a printable summary of the application. You can view the document by scrolling to the actual question where the upload was received,

Or by scrolling to the end of the application form and viewing all the attached documents.

Step 10: You will need to then click on the attached document to view it.
Step 11: close this window to return to the applicant’s dashboard.
Step 12: While in the applicant’s dashboard, you can click on the Applicant Status at the top of the page in the breadcrumb navigation, and return to the Applicant Status report to view another applicant.

2.5 Viewing the Score Sheet
From the Evaluation>Applicant Status report you can see how the applicant has scored for the specific tasks that have been created during the evaluation process.
Step 1: Click on the Score Sheet next to the applicant’s name in the Applicant Status report grid.
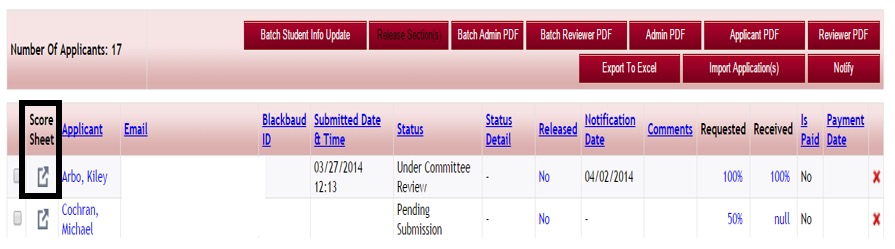
Step 2: This will open the Applicant Score Card, showing all the Tasks the applicant has been assigned to, the Reviewer assigned, the percentage of completion, the total score by that reviewer, and any comments that were included by the reviewer.
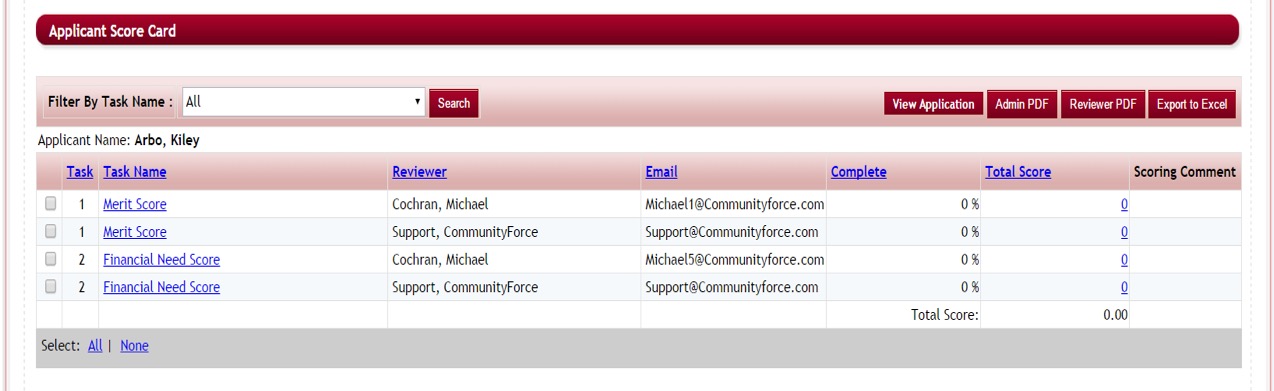
This report listing can be viewed online or exported and viewed in excel by clicking on the Export to Excel button.
Note: If you have not created scoring tasks the score card will appear as blank.
Step 3: If you want to see how a specific reviewer scored the applicant you can click on the Task Name for the listing that has that reviewers name listed in the Reviewer column or on the actual score in the Total Score column.
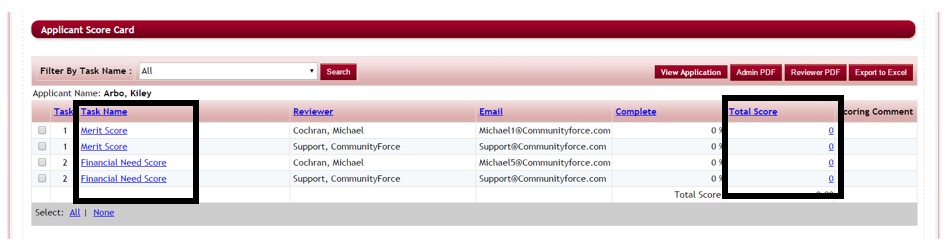
Step 4: To view a specific task,click on thedropdown for Filter by Task name and select the task you want to view and click Search.
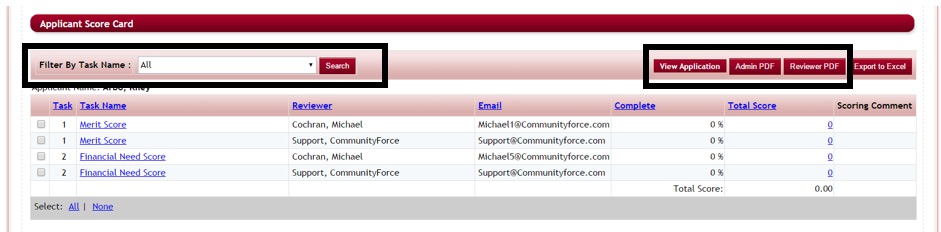
Step 5: You can also click on the View Application button in this section to see a printable table view of the applicant’s application form or you can click the Admin Pdf or Reviewer Pdf to get a pdf version of the application.
2.6 Creating a PDF of the Applicant’s Application
There are occasion when you will need to create a PDF copy of the applicant’s application form.
While in the Evaluations>Applicant Status report you will notice five separate buttons for creating PDFs of the applicant’s application.
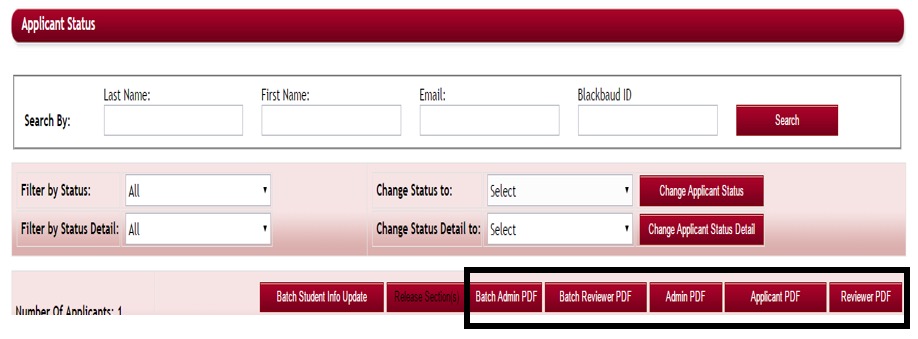
To create a PDF of an applicant’s application you will need to select the applicant(s) you want the pdf for by checking the box next to the name of the applicant and then selecting the appropriate button for the PDF type you are wanting to create.

Important Note: If you application form is still live when creating PDF’s there is a one minute delay from the applicants entering data on a live application, before uploads will appear in the PDF Document.
Admin PDF: Creates a combined PDF of the applicant’s entire application and all uploaded attachments. This PDF will shows all the questions and sections in the application form. All hidden questions will be included with the exception of encryptedfield question type.
Note: If you application has encryptedfield questions, only the Global Admin can run a Admin PDF that includes those question. All other role types that have access to areas that have the Admin PDF option, will get all the questions except the encryptedfield questions.
Applicant PDF: Creates a combined PDF of the applicant’s application and uploaded attachments. All questions and sections marked “hidden from applicant” will not be viewable. It also, will not show any questions triggered by conditions that they did not answer, replies to request sections, and entries for staff sections.
Reviewer PDF: Creates a combined PDF of the applicant’s application and uploaded attachments. It will not show any question from staff sections or any question marked as hide from reviewer.
2.6.1 Batch PDF’s
![]()
Batch PDF’s allow you to select multiple applicants, to create a batch folder of the PDF documents. The batch PDF will download a folder that you can save to your own computer with a separate PDF document for each applicant you selected.

To create a batch pdf, select all the applicant’s you want to include in the batch folder by checking the box next to each applicants name. Then click either the Batch Admin PDF or Batch Reviewer PDF button.
Batch Admin PDF – creates a batch PDF of the Applicant’s application showing only the items viewable to the Administrators.
Batch Reviewer PDF – creates a batch PDF of the Applicant’s application showing only the items viewable by the Reviewers. Questions marked as “Hidden from Reviewer” will not be included.
2.7 Applicant Status–Email Notifications
While in the Evaluations>Applicant Status report you can send notification emails to your applicants, instead of doing so in the Notification center.
Step 1: While in the Applicant Status report, select the applicant(s) you want to send the notification to, and then click the Notify button.
Note: if you select All at the bottom of a page, it will only select the applicants on that page. If you have multiple pages of applicants, you will need to notify the applicants separately on each individual page. If you want to do all your applicants, it is best to change the Display Records per Page to ALL, then select the All in the selection, to get all your applicants at one time.
![]()

Step 2: The Notification email box will open where you can create the email you want to send:
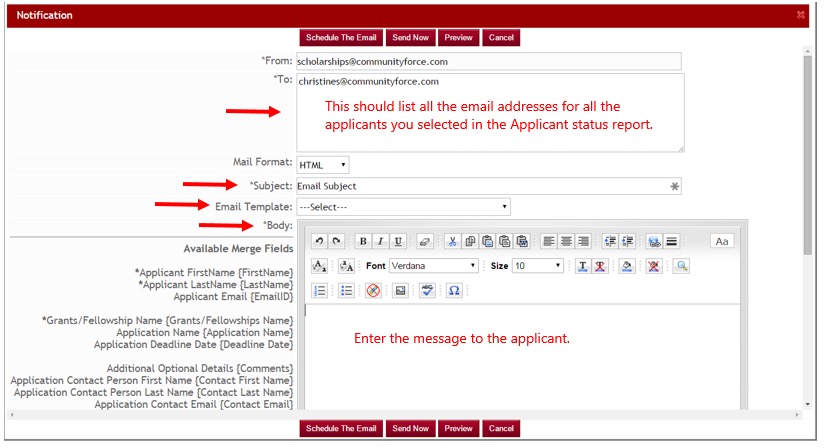
Step 3: Subject: enter the subject line that you want the applicant to see in the mailbox.
Step 4: Email Template: You can select from one of your existing email template, or leave this as select and create a new email just for this mailing.
Step 5: Body: Enter your message into the editor box.
Available Merge Fields for Custom generated templates:
To the left of the editor’s box are Available Merge Fields that you can copy and paste into your email. When you send an email, these fields will automatically be populated with the desired data. For example, if you choose {First Name}, it will automatically change to the applicant’s actual First Name, while sending a mail.
Simply highlight the merge field, right click, copy and paste into the body of your email.
Be sure to select the brackets {} as part of the field, that are in the beginning and end of the field.
Note:Use caution not to add extra spaces or delete any of the field when copying it. Each template has certain Merge fields available if the field you are looking for is not listed in the column to the left, then it is not available for this specific template.
Step 6: You can schedule the email to go out at a later date by selecting the Schedule The Email button, or you can send it immediately by clicking on the Send Now button.
Step 7: Once you return to the Applicant Status report, the Notification Date column will now display the date of the last email notification sent to that applicant.

2.8 Import Applications
Import Applications allows you to import a batch of applications from an Excel document into the appropriate application process.
Step 1: While in the Evaluations>Applicant Status report for the application you want to import the applications to, select the Import Applications, button.
![]()
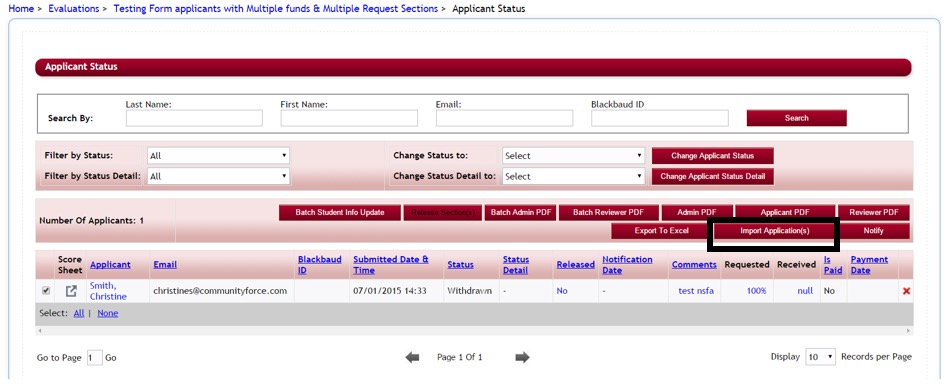
Step 2:A box will appear where you can upload your Excel File.

Step 3: Click the “Click here to download Application(s)” to download a pre-formatted Excel document that contains all the current applicant data showing all the applicants that have applied already and fields that have been created in your online application. (This downloaded document can also be used to upload information to your external program, i.e. FIMS)

It is advisable to first create a copy of this document before making any changes so that you have a backup copy you can convert back to, if needed, as this will overwrite any existing data already in the applicant’s applications.
Note:when completing this form, if any of the fields are multiple choice selection fields (i.e. Dropdowns, checkboxes, radio buttons), be sure to input the data exactly how it appears as a selection in the multiple choice question of the application. Any existing data that you change on existing applicants will overwrite their data in their original application, when this document is uploaded back to the system.
This form can also be used to complete a batch of questions that the administrator may have to input, (i.e. questions in a staff section). You can enter the replies into this form under the column for that question and then re-upload the document to have the replies automatically input into that question on the online application. Use caution when using this function as you do not want to accidentally change an applicant’s reply.
Step 4: Once you have populated that Excel document with the applications you want to import, you can then upload that document by clicking on the Upload Excel File. This will then enter the information back into the application and add any new applicant(s) that had been input onto the Excel Document.
2.9 Import Applicant Data
This is a special feature that will require CommunityForce to activate.
Import Applicant Data allows the functionality to be able to copy all the applicant data from one application to another application.
This is useful if you open an application multiple times within an academic year and want to include the applicants that applied in one period into the next application period without having to reapply.
This is feature is located in the Evaluations > Applicant Status.
Step 1: To import this data, select the new application that you want to import the data into under Evaluationsand then select the Applicant Status icon in that dashboard.
Step 2: There are two ways to import data:
- Applicant has already applied to the new application and you want to only push the data down for those applicant’s that have applied.
- In the new application, select the applicant’s first by putting a check in the box next to the name of the applicant.
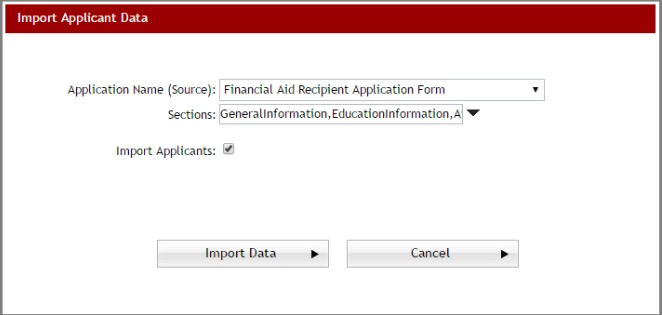
- Click the Import Applicant Data button. A new box will appear.
- Select the Source Application (the application that you want to push the data down from).
- Select all the sections from the source application you want to push down.
Note: the XML names must match exactly, therefore only the Section and Field XML names in the Source application that are the same in the Destination application will be pushed down. - Do Not check the box Import Applicants.
- Click the Import Data button (all the data from the source application will now be pushed down to the new application for only the applicants selected
- Note: You can also use this to push data down for just a specific section. (i.e., staff section data from one application to another. The applicant has already applied in the destination application and you want to push the data from the source application’s staff section down to the new application to keep history intact)
- The applicants have not yet applied and you want to push all the applicants from the first application into the new application.
- Open the new application and click on the Import Applicant Data button. A new box will open.
- Select the Source Application (the application that you want to push the data down from)
- Select all the sections from the source application you want to push down.
- Note: the XML names must match exactly, therefore only the Section and Field XML names in the Source application that are the same in the Destination application will be pushed down.
- Check the box Import Applicants.
- The Status and Status Detail fields will appear. If you want to only import applicants from the source application that are a specific status or status detail, click the dropdown arrow in the field and select the appropriate status or status detail. Click ok in the dropdown listing to save that selection. If you do not want a specific status or status detail, do not select any items and go to the next step.
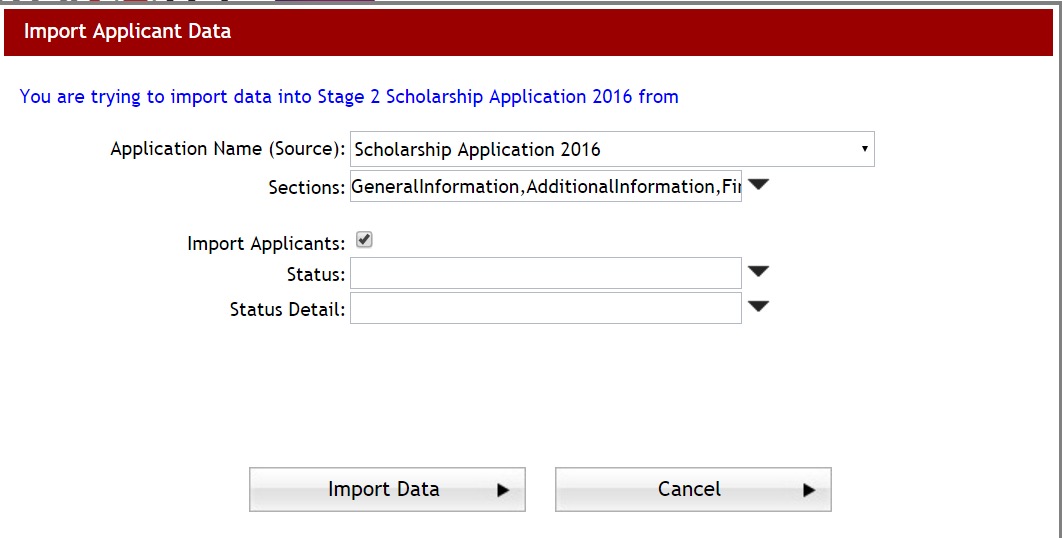
- Click the Import Data button (all the applicants and the data from the source application will now be pushed down to the new application for only the applicants selected.
- All the applicants that have been pushed down will show a status of “Pending Submission.
- The applicant will now have this new application in their My Applications Dashboard. (this will automatically start the application for the applicants but will not submit their application) The applicant will need to go in and complete any additional questions in the new application and click submit on the new application.
- Open the new application and click on the Import Applicant Data button. A new box will open.
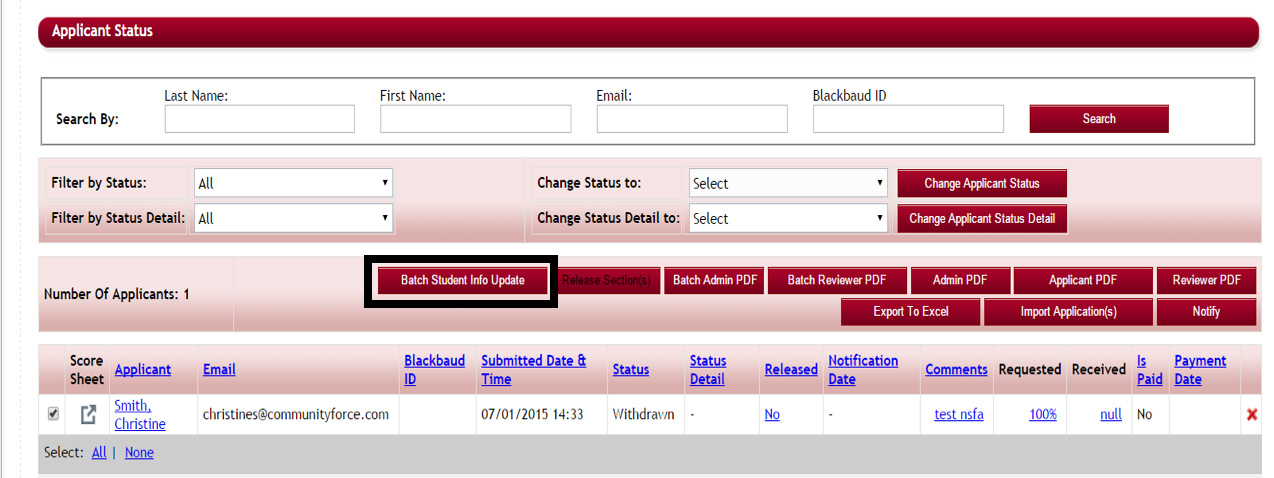
2.10 Batch Student Info Update
Used when integrating with an external system, i.e. Banner, PeopleSoft.
The Batch student Info Update will only be available on those sites that have integration with their external database.
When you click the button it will update all the student application data with data from the external site. This data is not automatically updated and therefore you will need to click this button to update.
While in the Evaluations>Applicant Status Report, select the applicant(s) that you want to update and click on the Batch Student Info Update button.