This function will allow the administrator to create users and manage their accounts. To maintain the security of your site, it is recommended that User accounts only be created or edited by the Global Administrator(s) or if necessary another role type with a high level of administrator authority.
2.1 Accessing Setup Users
Exercise 1
Step 1: From the Home Dashboard select the Setup Users Icon.
 |
Note: If the Setup Users icon is not available on your Home dashboard, your role type does not grant you access. If this is a function that you need to be able to perform, please see your Global Administrator to allow you access to this functionality. |
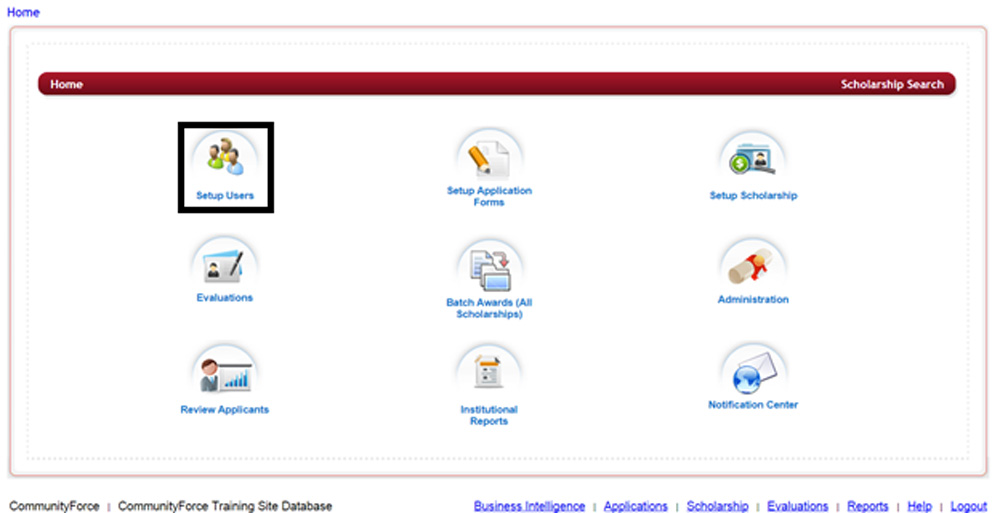
The following screen will open:
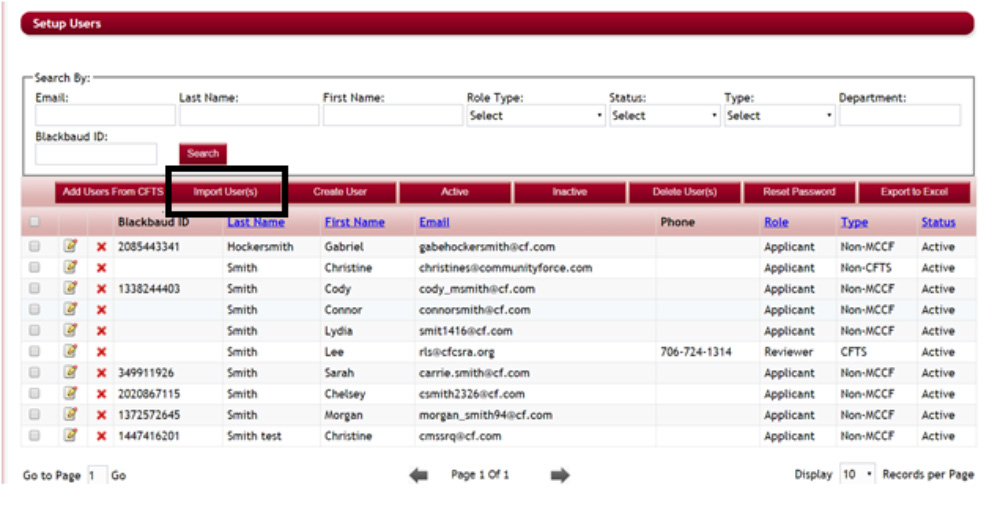
Note: for illustrative purposes this screen shows all the items available on the Setup Users screen. However, if you have not purchased integration with an external program you will not see the Add Users from…. button or the ID column on your Setup Users page.
2.2 Searching for Existing Users
Exercise 1
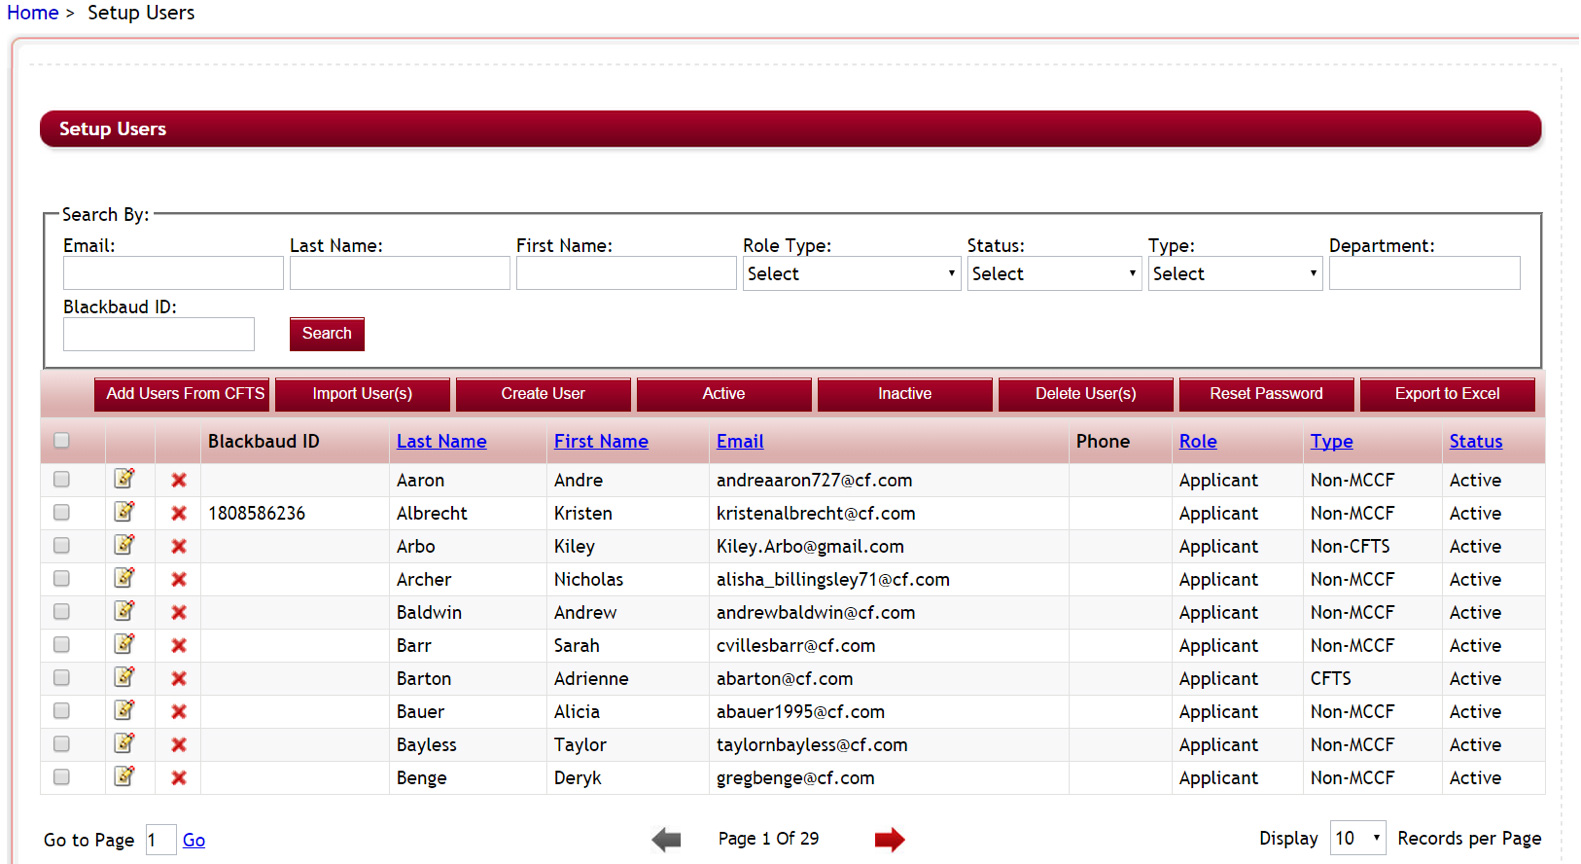
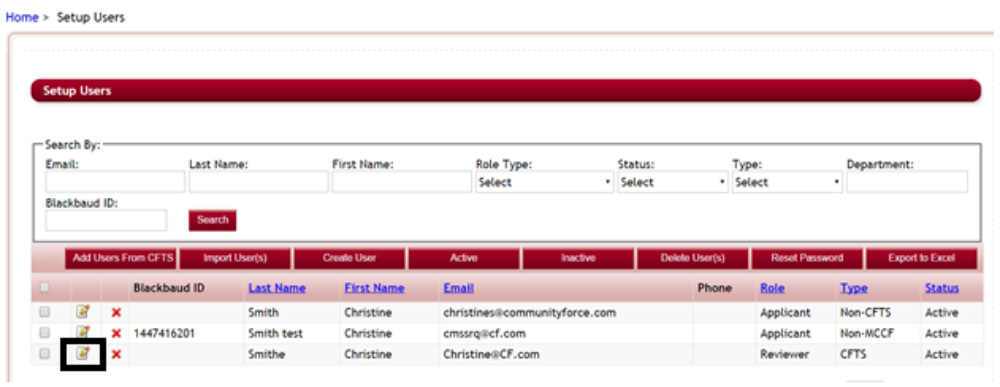
The top section of the Setup Users page is the Search By: section where you can search for an existing user. You can search by the users Email, Last Name, First Name, Role Type, Status, Type, and by Department.
To search for a user, enter one or more search criteria.

Step 1: Enter your Last Name in the Last Name Field.
Step 2: click the Search button to search for your user account
All the users matching your search criteria will appear below in the Users table.

2.3 How to Create a New User
There are three different ways to create user profiles using the Setup User function.
- Create individual User Profiles manually– allows you to manually create individual profiles by completing the create user form for each individual user you want to created.
- Creating User Profiles from Excel File – Useful if you have multiple user accounts to add to the CommunityForce site. Allows you to input multiple user data into an Excel spreadsheet and upload the Excel file to create multiple User Profiles.
- Create individual User Profiles from an external site – used if you have purchased integration and allow profiles to be created from the CommunityForce site.
2.3.1 Creating Individual User Profiles Manually
Exercise 1
Step 1: From the Setup Users page select the Create User button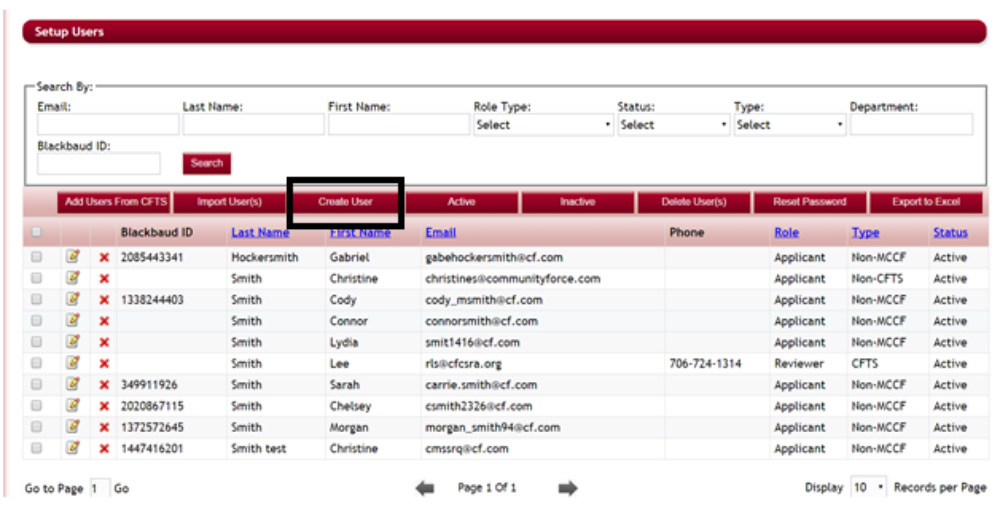
The following page will open:
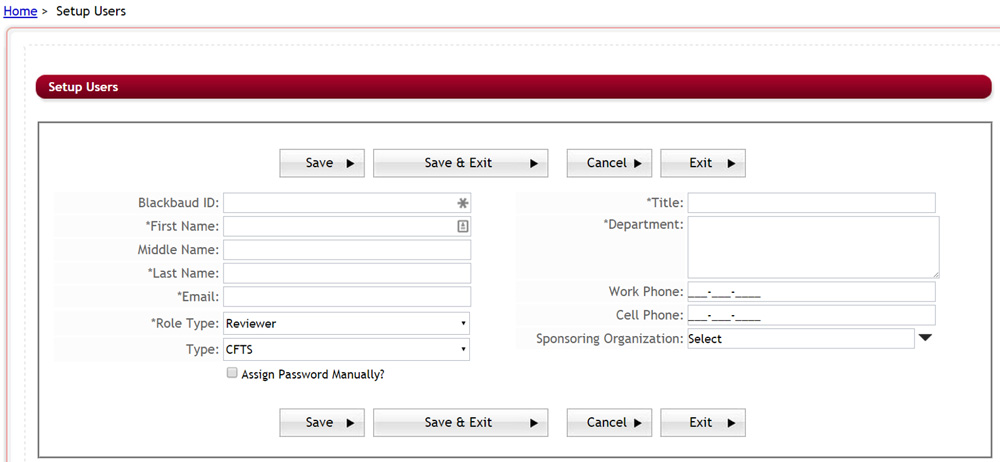
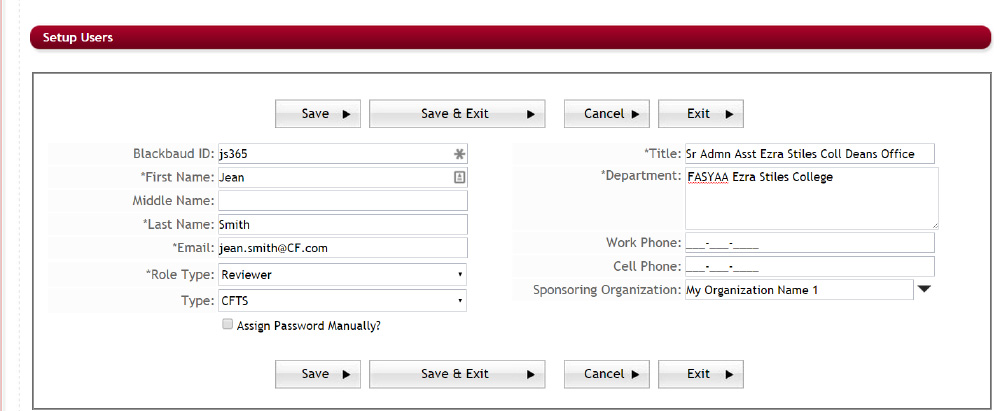
Step 2: Review the fields below to get acquanted with the options available before setting up a user account.
Fields marked with an * are required fields and must be populated.
- *** ID (External System ID code) – This is needed if integrating with an external system. This is the number that is assigned by the external system to identify this user’s profile in that external system. (If you’re not integrating with an external system this field will not be present.)
- First Name (*required field) – Enter the User’s First Name
- Middle Name – Enter the User’s middle name or middle initial
- Last Name – (*required field) – Enter the User’s Last Name
- Email Id (*required field) – This is the user’s email address. This will be their login ID.
- Role Type (*required field) – Select the user’s Role Type. Role Types are client defined Roles that allow the User to have access to specific areas of the site depending on the role type selected. The system comes standard with three pre-created role types. For a definition of your additional Role Types please see your Global Administrator. The three standard are as follows:
- Global Admin – Has full administrative rights within the CommunityForce application program to view, make changes, and delete items. You are only allowed to have Global Admin accounts for the number of licensed you have purchased. Therefore, when creating users you cannot create additional Global Admin accounts unless additional licensing has been purchased.
- Reviewer – This is a committee member that would be reviewing an applicant in the evaluation and scoring process. The Reviewer has access to Review applicants using the Review Applicants Icon on their Home Dashboard. They can only view applicants that have been assigned to them in the Evaluation Assignment Process.
- Applicant – Applicant profile has access to the Applicant’s Dashboard only.
- Type – Organization Code created in the Administration Dashboard/Site Settings. Used when creating profiles for external site integration and to identify profiles as members of that external site or non-members of that site. If not using integration the default will always be the type that is your organization’s abbreviated acronym and not the NON-***.
- Title (*required field) – Enter the user’s professional title, if applicable.
- Department (*required field) – Enter the company that they work for or the Department within your organization that their profile is to be associated with. If unknown then enter N/A.
- Work Phone – Enter the User’s contact phone number
- Cell Phone – Enter the User’s cell phone number
- Sponsoring Organization – If your organization has separate sponsoring organizations that they maintain applications and funding sources for, choose the sponsoring organization that the user profile needs to be identified with. When creating applications/funding sources that are connected only to those specific organizations, that user will only have access to those connected items. This will limit their access to other organizations application/fund information, only allowing access to their specific sponsoring organization.
- Assign Password Manually? – Select this box if you are going to create a password manually for the user.
- If not checked the system will generate a temporary password for the user and automatically send them an email notifying them that an account was created and give them their login credentials. To view the email that is sent to them See Notification Center – Email Template: Password: New Account Confirmation, **It is important to edit this template before setting up your Users**
- If checked a field will open up to enter their Password. Type their password there. This will not send them an email. Therefore, you will be responsible for remembering what you entered as their password, and notifying the user separately regarding their login credentials.
- Note: Once passwords are created, you will not be able to see this password or have access to any of the passwords listed in the data grid.
Step 3: Now after reviewing the fields you are ready to create a user account. Fill in each section with information regarding the User profile you are creating. Items marked with an * are required fields and must be filled in. (do not click the Assign Password Manually yet)
Step 4: Determine if you want to have the system generate the password for them and send them an automatic email or if you want to Assign it Manually and let them know in a separate email what those credentials are.
- Have system automatically generate – If you choose this option do not select the Assign Password Manually item. However, before creating the user account it is suggested that you notify the user that you are creating accounts for them, so that they are not alarmed when they receive the email with the login information. As soon as you hit the Save to save the user, the email will go out.
- You want to Assign it Manually – If you choose this option put a check in the Assign Password Manually box. A new box will open where you will enter there password information. It is important that you remember what you enter for their password as you will not be able to retrieve it or review later.

Step 5: Once you have entered all the required information. If you have more user accounts to create, Click Save and Exit to save the user account and return to the Setup Users Listing.
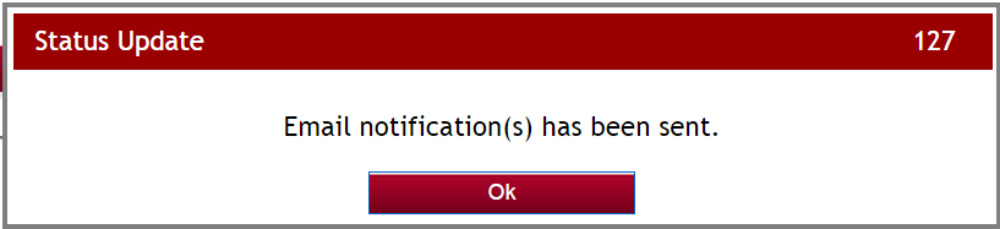
Step 6: If you did not select the Assign Password Manually the following Status Update will appear notifying you that the email notification has been sent. Click OK.
2.3.2 Creating User Profiles from an Import File
Exercise 1
Step 1: While in Setup Users select the Import Users(s) button.
The following Import User(s) page will open.
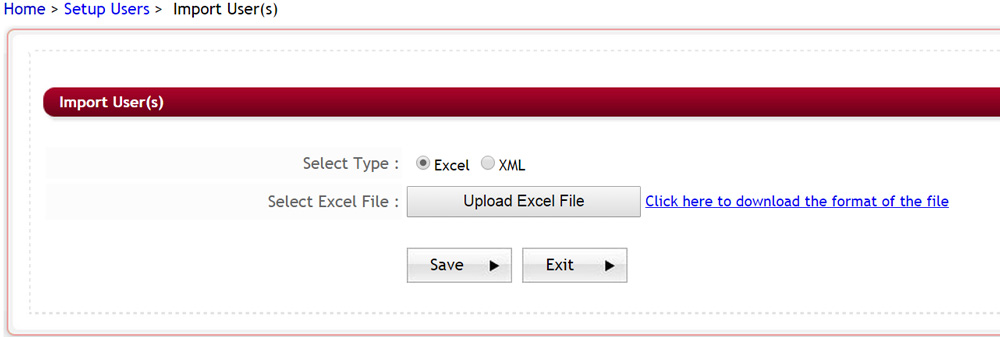
Step 2: Select the format Type of the download file. Excel or XML. Select the Excel option.
Note: If you don’t have a properly pre-formatted document with the correct mapped fields it is suggested that you select the Excel option and then click on the Click here to download the format of the file.
Step 3: (If you already have a completed Excel or XML document skip to Step 7) Click on the Click here to download the Format of the File – this will give you a pre-formatted excel document that contains all the required mapped fields to create the User accounts.

This will download a pre-formatted Excel File on your computer
Step 4: click the download file to open it in Excel.
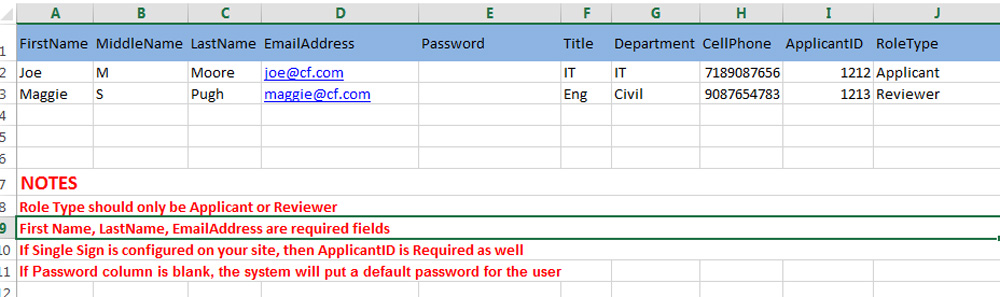
Step 5: Complete the downloaded document adding each separate user account and completed all the required field columns. Before saving your copy delete the “Notes” section in red at the bottom of the documet. Save a copy of this document to your computer as an excel document (xlsx).
Step 6: Upload the saved Excel file by clicking on the Upload Excel Button in the Import User(s) and selecting the newly created document to upload.
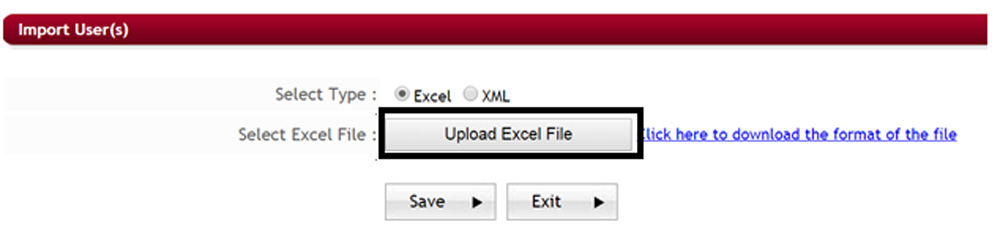
The uploaded file will then appear above the Upload Excel File button. Make sure you have selected the correct document. If you uploaded the wrong file you can click the Remove button and upload the correct file.

Step 7: Click Save to start the Import. Once the import is complete the new Users will now show in the Setup Users table.
2.3.3 Creating User Profiles from an External site Directory (w/Integration)
This is used only if you have purchased integration and allow the User account to be created from the CommunityForce site. Before using this feature the integration mapping must be completed by the development team.
This feature will search for the name you enter in the directory of the External program. Once it is found it will automatically create the profile in Setup Users.
Exercise 1
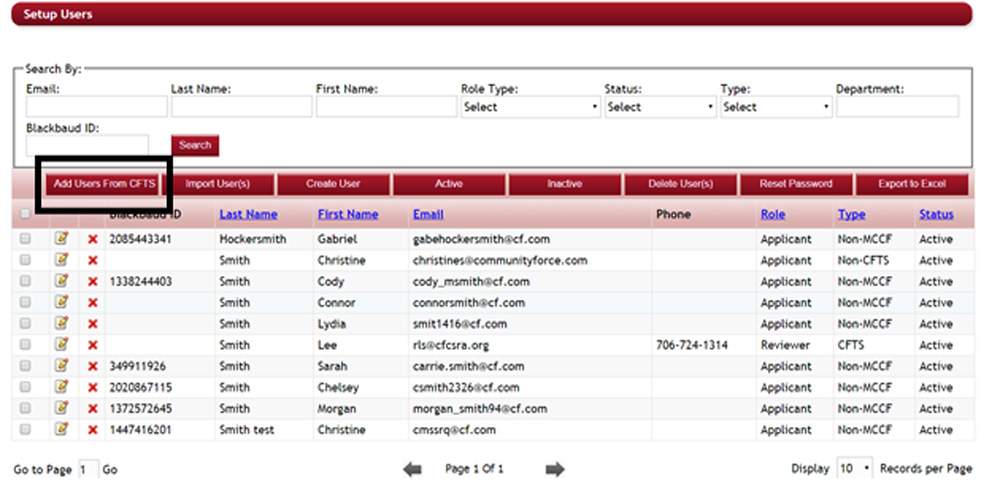
Step 1: While in Setup Users select the Add Users From *** button.
The following screen will open
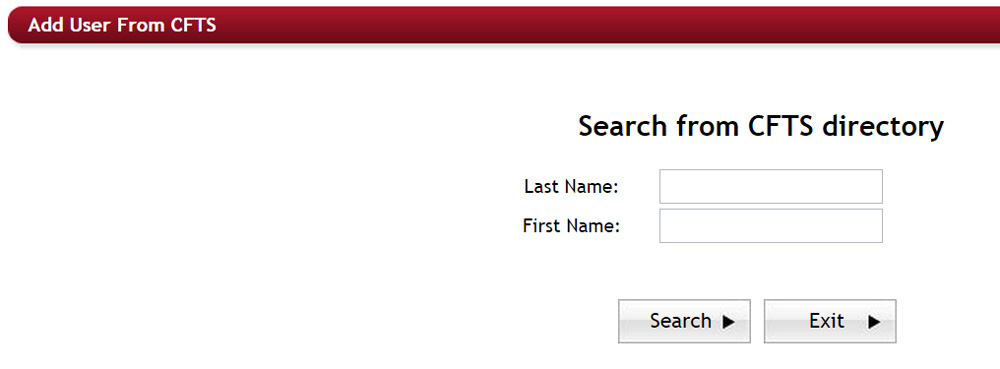
Step 2: Enter the Last Name and the First Name of the user you want to search the external directory for.
Step 3: Click Search to search that directory for the user.
The directory will return the matching results:

Step 4: Click the Add button next to the individual you want to add.
Once the user is located an account will be created using the data from the external directory.
Step 5: Fill in any of the missing information, assign a role type, and select one or more sponsoring organization if necessary.
Step 6: Click on Save or Save and Exit to create the new user.
2.4 How to Edit a User
Exercise 1
Step 1: While in the Setup Users Section search for the User that you want to edit and click the edit icon ![]() next to their account.
next to their account.
This will open up the Setup User for that individual account.
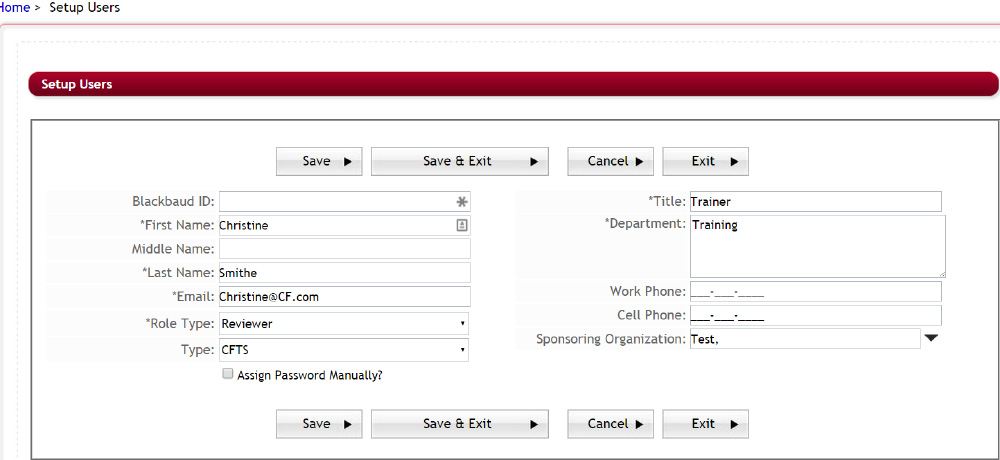
Step 3: Make the necessary edits to the account and click Save or Save & Exit to return to the User Setup table.
Note if making an edit to a user role type use extreme caution as you may lose data if their new role type gives them less access then previously. In this instance it is better to make a user account Inactive and create a whole new account with the new role type.
Important: If you have a user with a Global Admin, Reviewer, or Applicant account you will never want to change their role types, always in this instance Inactivate the account and create a whole new account for them.
Step 4: After you click save you will get the System Alert that the record has been updated click Ok to continue.
2.5 How to Inactivate or Activate a User
If a User leaves your organization or their role type has changed it is best to make their previous account inactive. If an inactive user returns you can then make the account active again, keeping all their prior data available.
Exercise 1
Step 1: While in the Setup Users Section search for the User that you want to make Inactive or Active and check the box next to their account.

Step 3: Click either the Inactive button to make the account inactive or the Active button to make them Active again.
![]()
Depending on what you chose, their Status will now show as Active or Inactive.

2.6 To Reset a User password
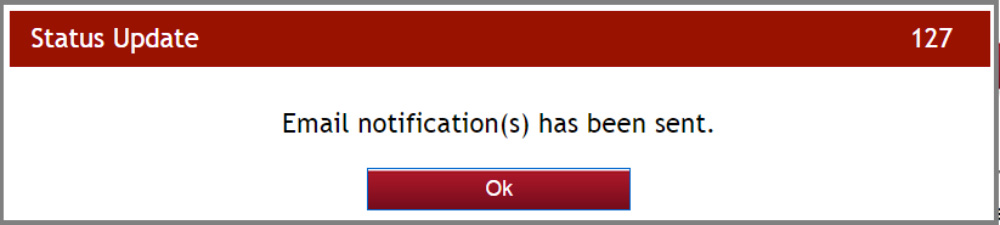
When resetting a User’s password an email will automatically be sent to them notifying them that the password has been reset and give them a new password that they can use to login with.
Exercise 1
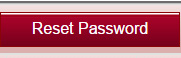
Step 1: While in the Setup Users Section search for the User that you want to Reset the password for and put a check in the box next to their account.

Step 3: Click the Reset Password button
Step 4: Click Ok when the Status Update appears notifying you that the email has been sent.
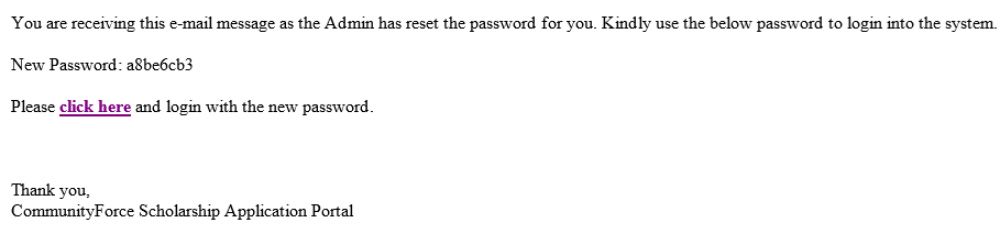
The following email message is sent to the user with a new password they can use to login to their account.
2.7 How to Delete a User
***Caution: Deleting a user removes the user and any data associated with their account. Therefore, use extreme caution when deleting accounts. It is recommended to delete an account only if it has never been used to login with. If the account has activity it is best to make it inactive instead of deleting.
Exercise 1
Step 1: While in the Setup Users Section search for the User that you want to Delete

Step 3: Click the red ![]() before the user you want to delete.
before the user you want to delete.
A confirm message will display to make sure you want to delete the user.
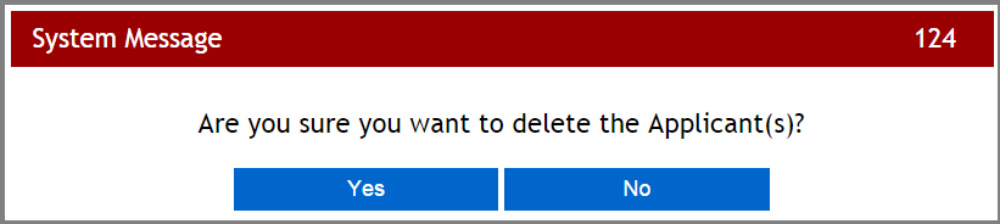
Step 4: Click Yes on the message to delete the user or click on No to return you back to the search results screen.