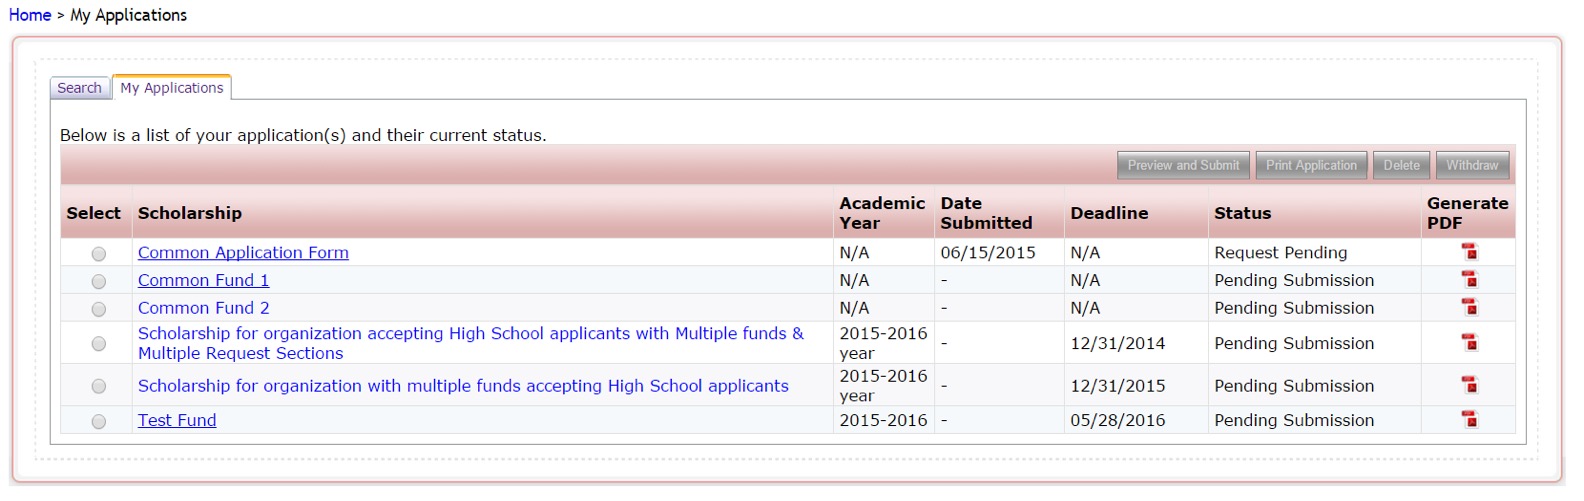
4.1 Multiple Submission
This allows an applicant to apply multiple times to the same application without having to create two accounts.
If you are going to allow your applicants to be able to apply multiple times to the same application form, you must enable the Multiple Submission feature by selecting “yes” to Enable Multiple Submission in the General Information setup for the application(s) you are allowing this on. This is done on an application basis, so you can have other applications that you may not allow this on, as well.
4.1.1 How does an applicant apply using Multiple Submission?
Once you have enabled the multiple submission on the application’s General Information setup, when the applicant logs in and clicks the Apply for the first time on that application the following box will appear:
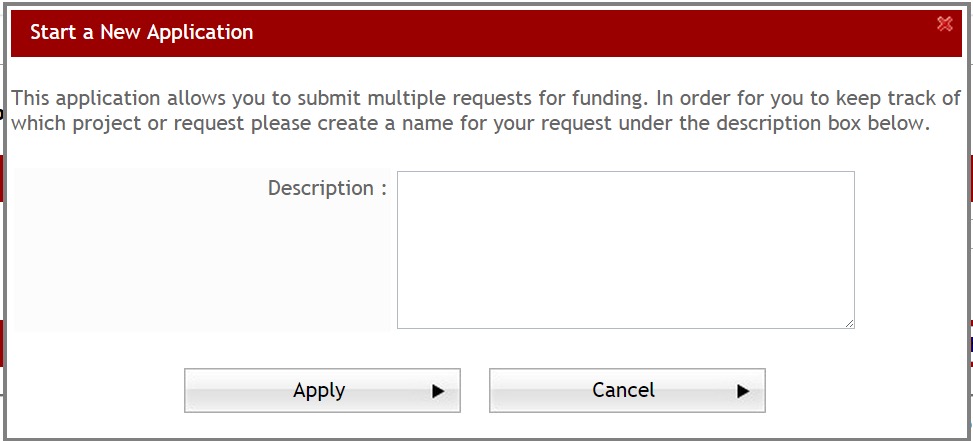
The applicant will need to give a description to each separate submission by entering an identifying description in the Description field.
This description will help them keep track of which submission is which in their My Applications Tab, so that when they return they know which one to click on.
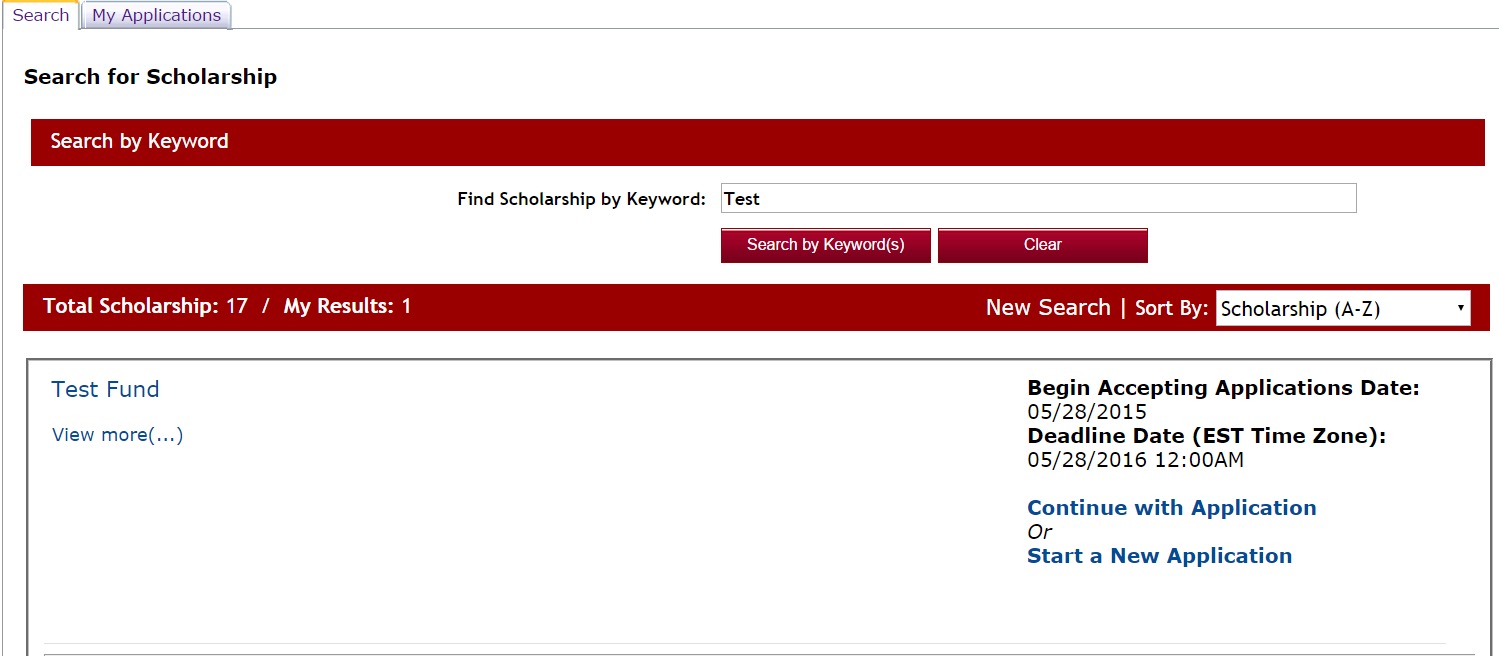
Each time they want to start and additional submission, they will need to search for the application again in their search tab, and select the Start a New Application.
Each time the applicant clicks the Start a New Application on the same application, the Request Description will appear for them to enter a new description for each submission.
When they want to continue with the same application they would click the Continue with Application and a box would appear for them to select which application they want to continue with:

4.2 Proxy
The Proxy feature allows an applicant to apply on behalf of someone else. If the user they are applying on “behalf of” already has a user account they can proceed with completing the application for them. If they do not have an account, then they can create a new account for them. An email will go out to that individual notifying them that an account has been created.
Important Note: If you have login integration with your organization’s software, and the Global Admin has set the Enable user Creation using CF to “no” in the Administration>Site Settings: General Settings, you will not be able to create the user account. Only accounts that have already been created will be able to be selected.
To activate this functionality, when creating the application in the General Information setup you must first select “yes” for the Enable Multiple Submissions, then the Enable Proxy will appear below that, and thenselect “yes” to enable the proxy.
4.2.1 How does an applicant use the Proxy feature?
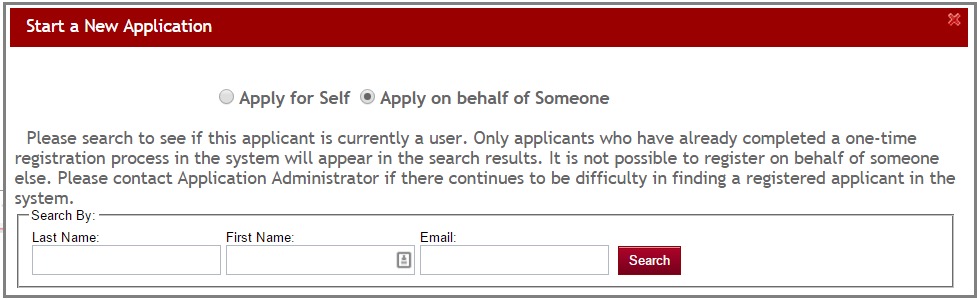
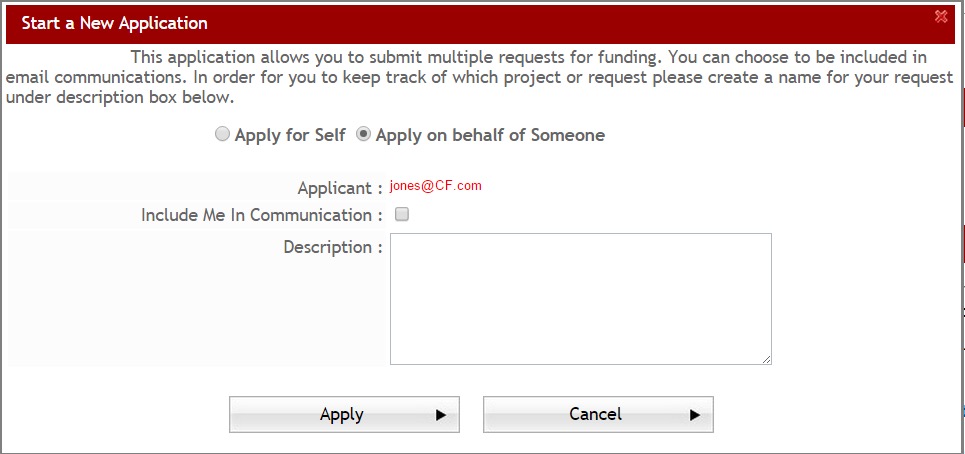
Step 1: When an applicant logs in and selects and application to apply to, if the Proxy feature is activated the following box will appear on their screen:

Step 2 a: If they select the Apply for Self: The submission description box will appear just like it does if using the multiple submission. They will need to enter a description in the box and click Apply to proceed with the application.
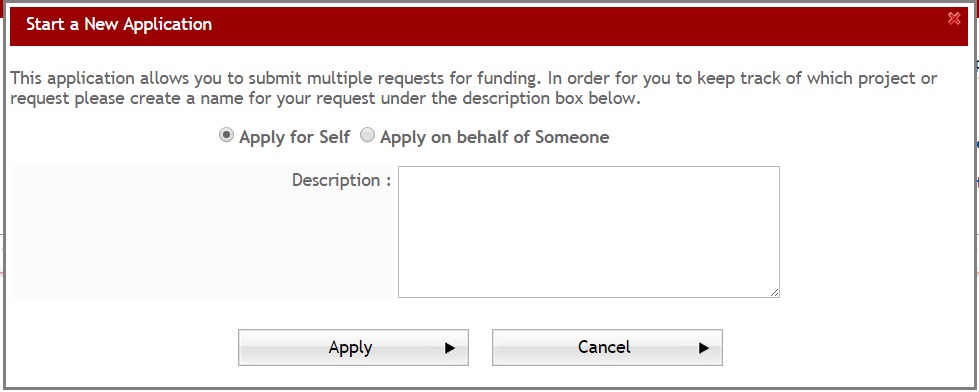
Step 2 b: If they select Apply on behalf of Someone: A box will appear, where they will search to see if the applicant they are applying on behalf of currently has a user account.
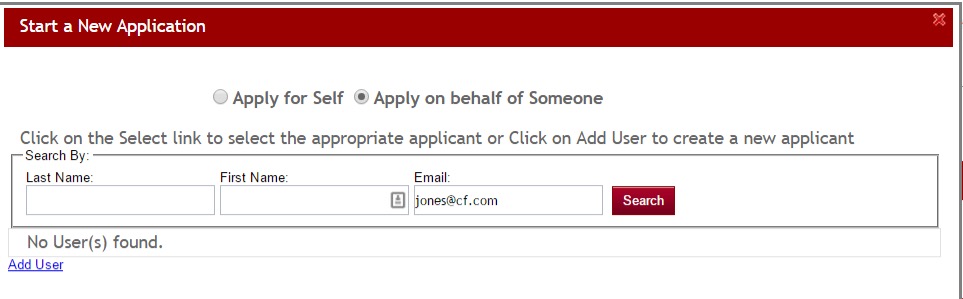
Step 3: The proxy applicant will then search for the individual they are applying for. The Search result screen will appear:
Step 4 a: If there is an account for the individual they will see the name listed in the box below, and will click the Select next to that user’s name: (Skip the following steps and proceed to Step 7)
Important Note: If you have login integration with your organization’s software, and the Global Admin has set the Enable user Creation using CF to “no” in the Administration>Site Settings: General Settings, you will not be able to create a new user account. Only accounts that have already been created will be able to be selected. You will not be able to add this user at this time.
Step 4 b: If there is not an account for the individual they will see an Add User line that they can click on to create a user account for the individual.
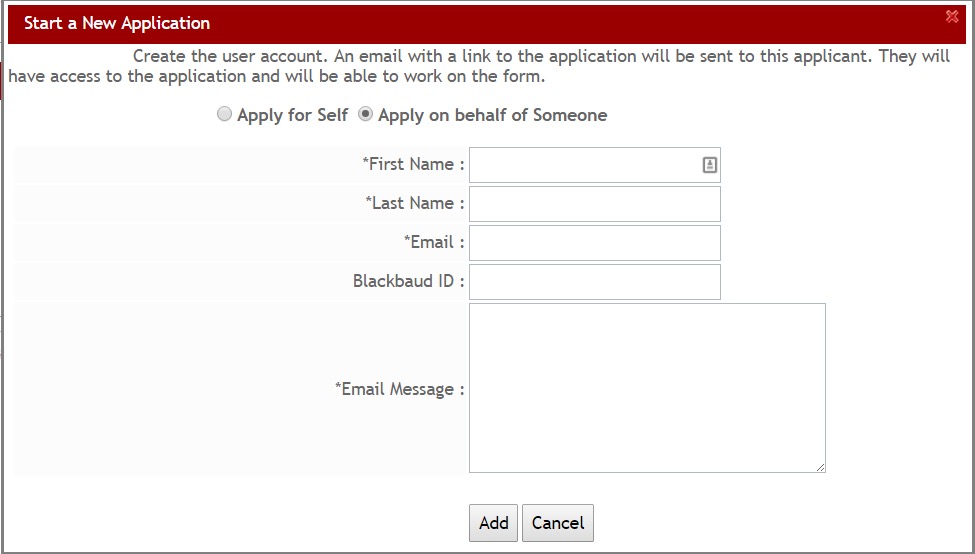
Step 5: Once they click the Add User the following box will appear where they will enter the information for the person they are “applying on behalf of” and click the Add button. They can use the email message box to enter a personalized message to that individual.
This will create the login account for that individual they are applying on behalf of.
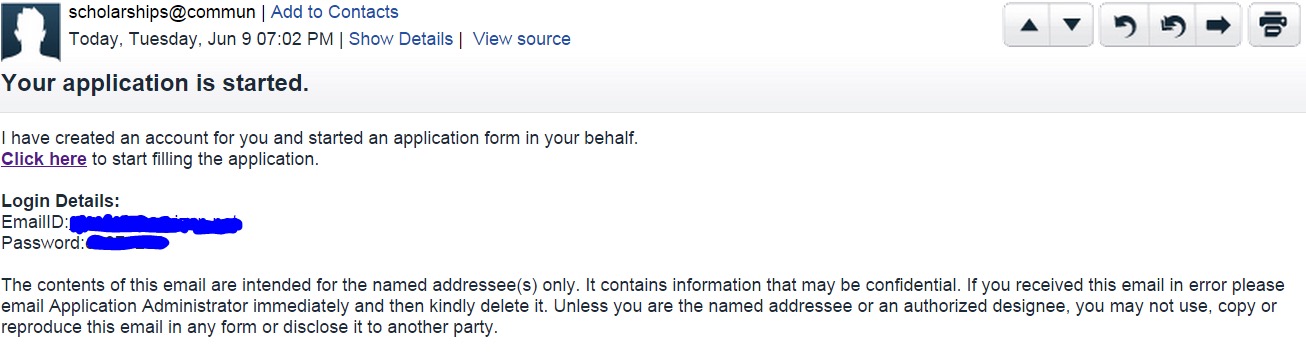
Step 6: Once they click the Add, an email will go out to the email address that was entered, notifying the individual that an application has been started on their behalf and login information so that they can access the application, as well.
Step 7: The following box will appear next. The proxy will need to assign a description to this submission.
Step 8: The proxy then can proceed with applying for the application on behalf of that individual.
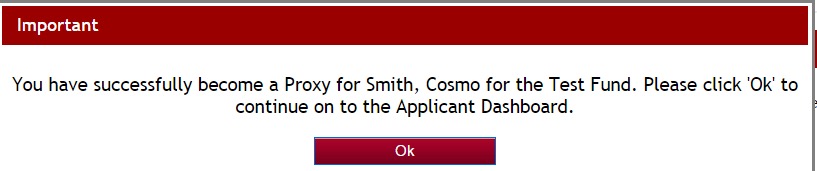
Step 9: Once they start the application they will receive the following message that they can click OK on to proceed.
Step 10: Once the proxy has started the application they can access it going forward, by logging in as theirself and clicking the My Proxy Applications tab in their dashboard:
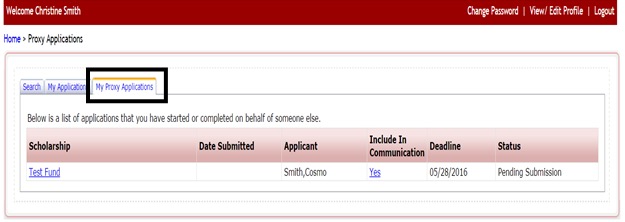
When the actual applicant logs in they will see the started application in their My Applications tab. Just like as if they had started the application. Any of the application’s section that were started by the proxy will show completed in the actual applicant’s dashboard as if they completed it themselves.
4.3 Collaboration
Collaboration allows an applicant to collaborate with other individuals to help complete specific sections of their application. The collaborator must have a user account in the system in order to be used as a collaborator on an application. If the collaborator does not have an account the applicant can create an account for them, prior to adding them as the collaborator on their application. An email will go out to that individual notifying them that an account has been created.
Important Note: If you have login integration with your organization’s software, and the Global Admin has set the Enable user Creation using CF to “no” in the Administration>Site Settings: General Settings, you will not be able to create the user account. Only accounts that have already been created will be able to be selected.
Any section completed by the collaborator will be viewable by the applicant.
To activate this functionality, when creating the application in the General Information setup you must first select “yes” for the Enable Collaborators. Once this has been enable the Add Collaborators button will display in the top right corner of their dashboard.
4.3.1 How does an applicant use the Collaboration Feature?
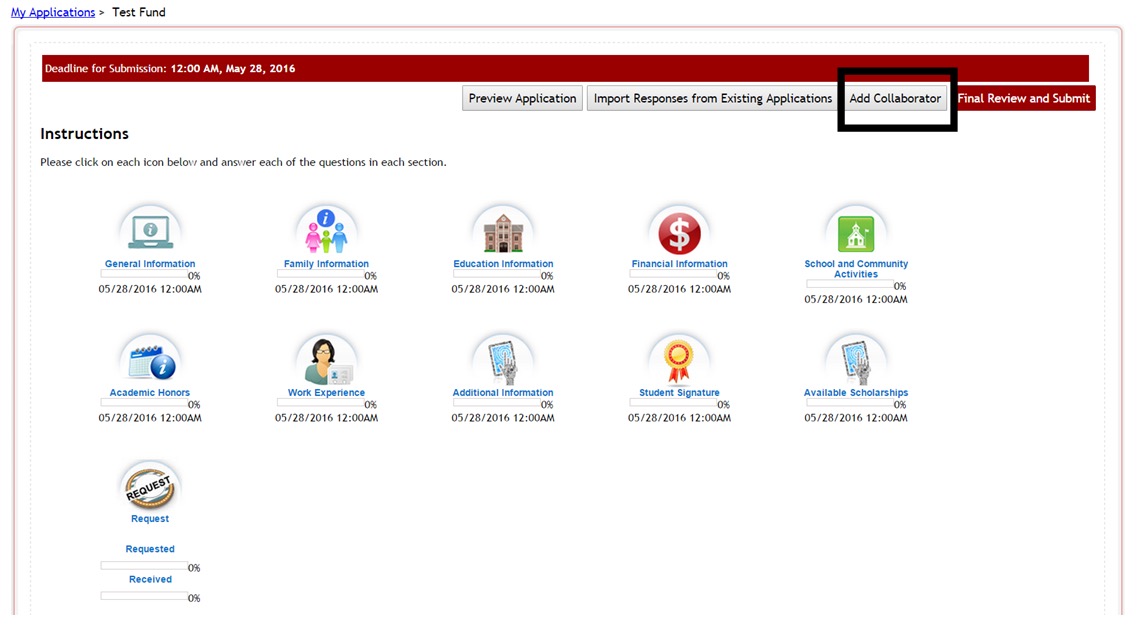
Step 1: When an applicant logs in and selects and application to apply to, once they are on the dashboard for that application they will click the Add Collaborators button that is located in the top right corner of that dashboard.
![]()
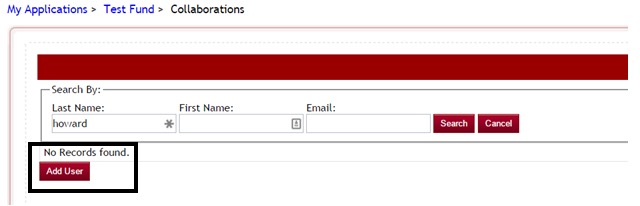
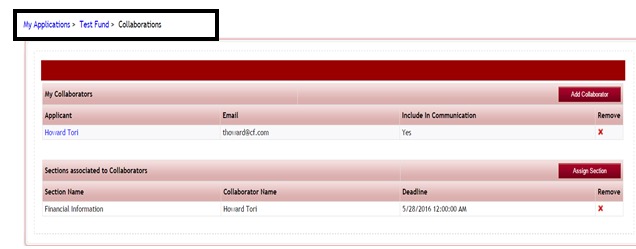
Step 2: Once they click on that button, the “My Collaborators” screen will appear. If they have not added any collaborators the listing should be blank.
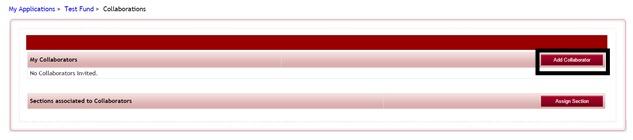
Step 3: They will first need to add the collaborators by clicking on the Add Collaborator button.
![]()
Step 4: A search box will appear where they will need to search to see if the collaborator already has a user account.
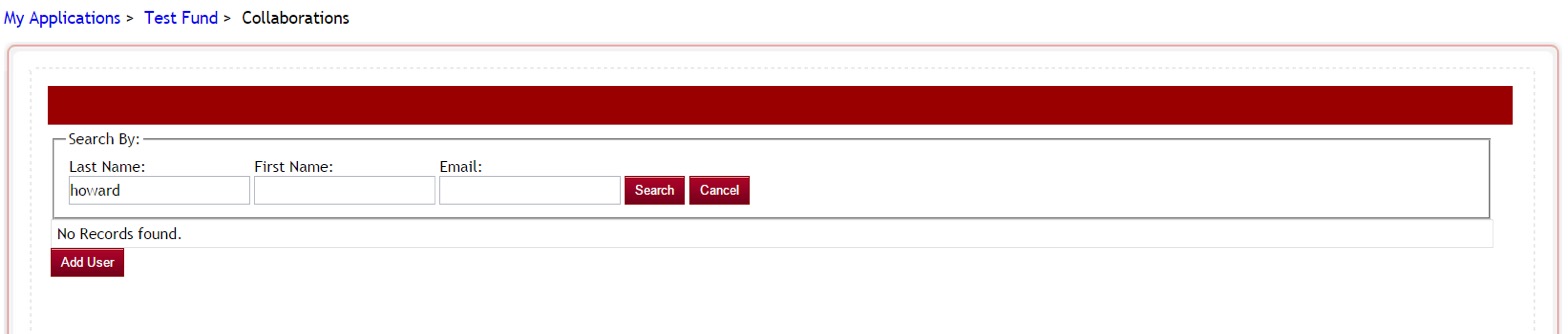
Step 5: They will enter the collaborators information and click enter. They can search on all fields or just one.
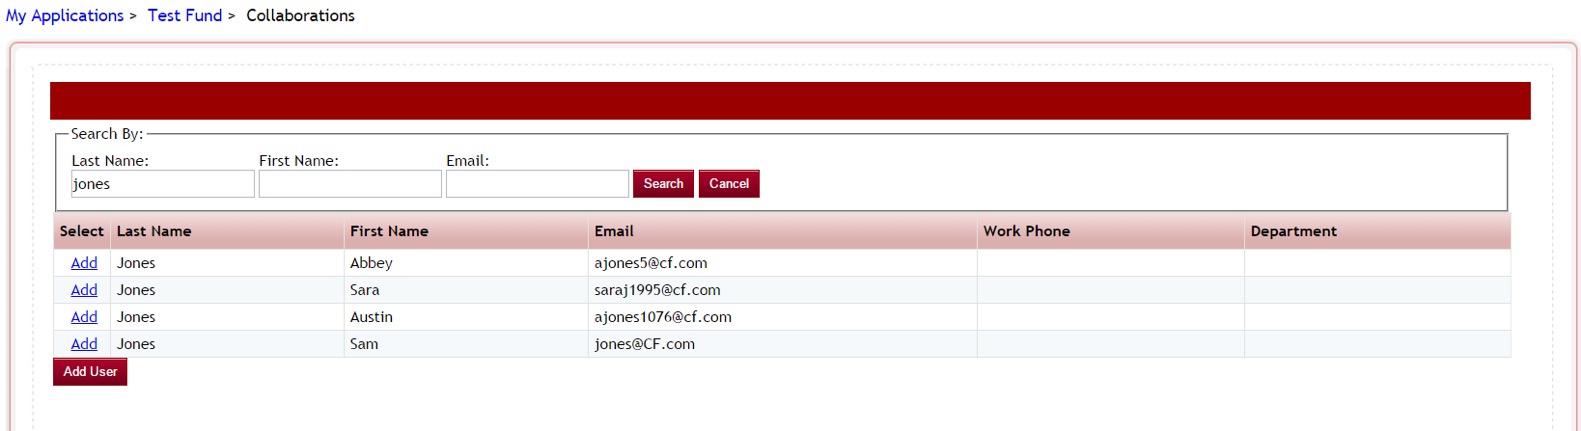
Step 6 a: If there is an account for the individual they will see the name listed in the box below, and will click the Add next to that user’s name: (Skip the following steps and proceed to Step 8)
Important Note: If you have login integration with your organization’s software, and the Global Admin has set the Enable user Creation using CF to “no” in the Administration>Site Settings: General Settings, you will not be able to create the new user account. Only accounts that have already been created will be able to be selected. You will not be able to add this user at this time.
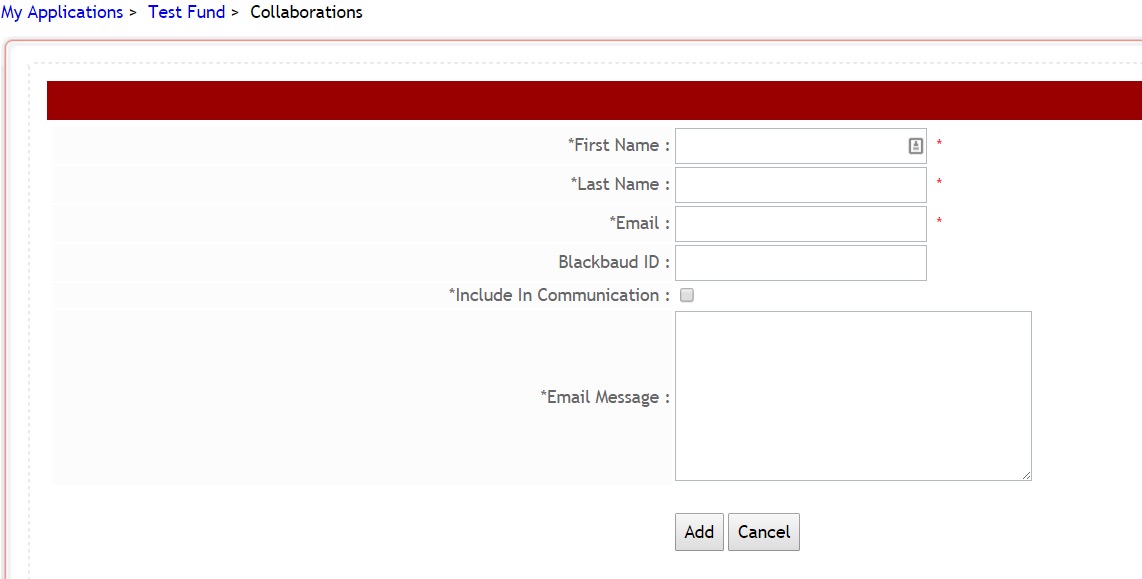
Step 6 b: If there is not an account for the individual they will see an Add User button that they can click on to create a user account for the individual.
Step 7: Once they click the Add User the following box will appear will they will enter the information for the person they are needing to add as the collaborator and click the Add button. They can use the email message box to enter a personalized message to that individual notifying them why they create the account for them.
This will create the collaborators login account for them.
Step 8: Once the applicant clicks the Add, they will receive a message notifying them that the invitation was sent. Click OK.

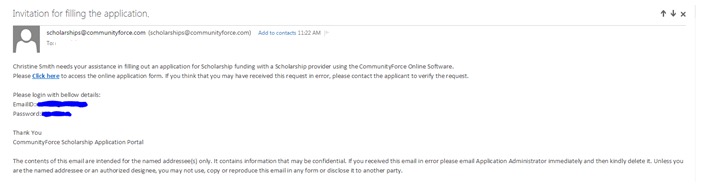
Step 9: An email will go out to the email address that was entered, notifying the individual that they have been invited by the applicant to assist in filling out the application and the link to click on to access it. Once they click the link they will need to log in using their own log in information. (If they applicant created the account for them their login information will be included in the email, as well. This will not be included in the email, if the collaborator already had an account, because they should already know their login information.)
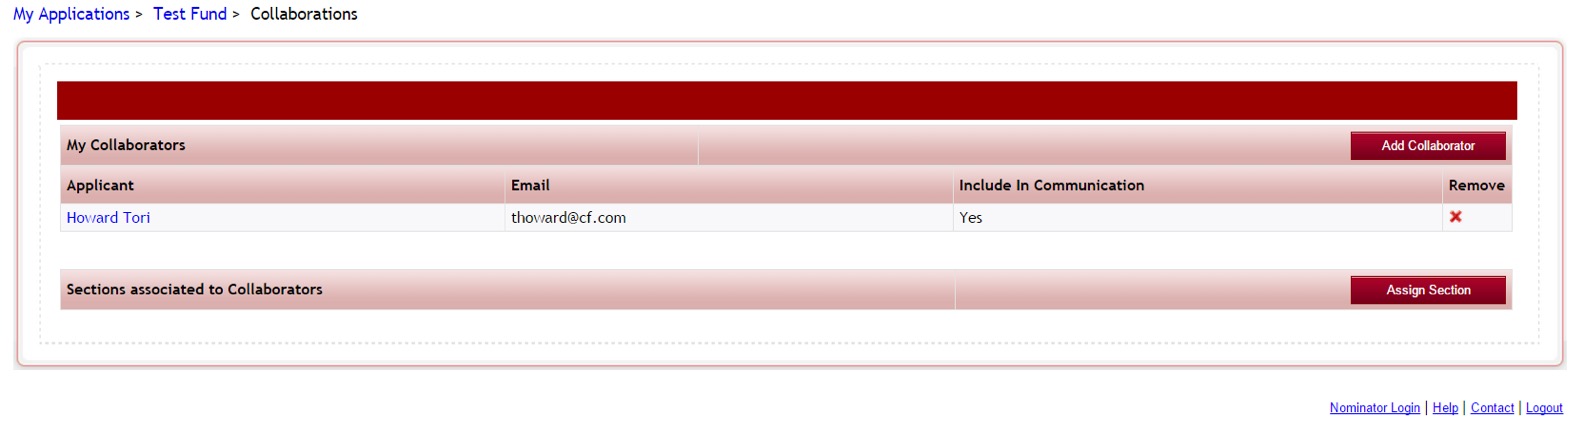
Step 10: Once they add the Collaborator, they will return to the “My Collaborators” screen and the new collaborator’s name will appear in the Applicant Column. They can add additonal collaborators if needed.
Clicking the Name of the Collaborator will allow the applicant to remove the “Include in Communications” if they decide not to have them included. They can click the red “X” to remove a collaborator.
Step 11: Once the Collaborators have been added, the applicant will then have to select the Sections in the application that they want to assign to them. Click the Assign Section button.
![]()
Step 12: The Assign Sections screen will appear. Select the section(s) you want to assign to the collaborator by putting a check mark in that section(s) box.
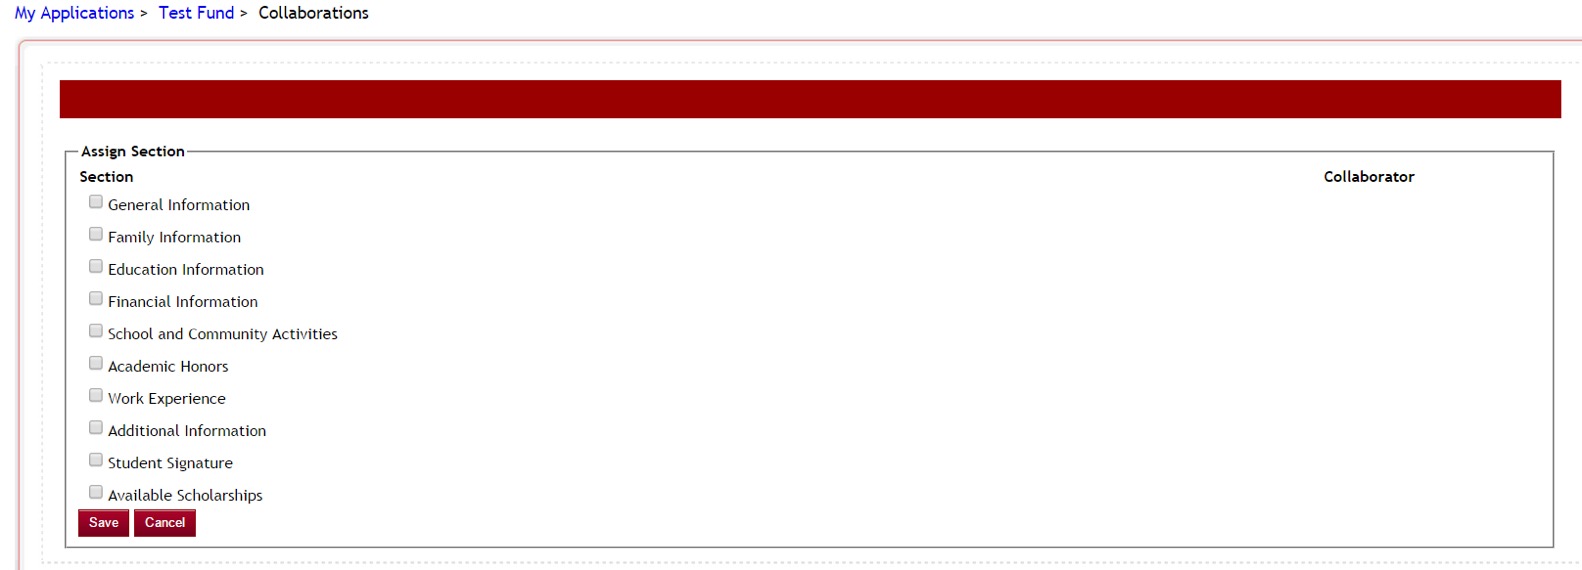
Step 13: Once you select the section, a select box will open to the right of that section under the Collaborator column. Click on the Dropdown arror in that box and select the name of the Colaborator you want to assign to that section:
Step 14: After you have assigned all the applicable sections. Click on Save to save the assignment
Step 15: Once the applicant returns to the “My Collaborators” screen the Section assignment will show at the bottom. They can click the red “X” to remove a section assignment.
Step 16: Once they are completed assigning all the sections they can click on the application name in the breadcrumb navigation at the top of their page.
Important: The applicant will not be able to submit their application until all sections are completed. The applicant will be responsible for communicating with the collaborator in regards to completing the section.
The applicant will still have access to the assigned section and be able to review those for completeness, as well as, answer any questions they would like to repy to within that same section. However,if they answer a question in that section, the collaborator can stil go in and change their replies.
4.3.2 How does the Collaborator access a Collaborated application
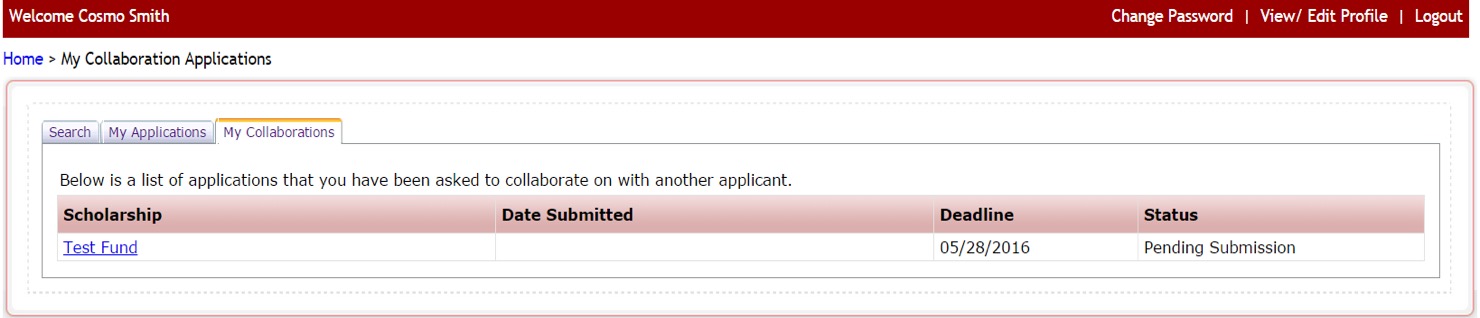
Step 1: When the collaborator logs into their account they will see the “My Collaborations” tab in the dashboard.
Step 2: When they click on that tab they will see the listing of applications they have been asked to collaborate on.
Step 3: They will click on the application name under the Scholarship Column and this will open the dashboard for that application showing the section icons for the sections they have been assigned in the collaboration.
Step 4: They can click on the icons and completed each section assigned.
Once they complete the required information the questions are automatically recorded on the applicant’s dashboard for them to review. (Note: the collaborator is actually in that section on the applicant’s dashboard, therefore any replies they enter and save on that section will automatically appear on the applicant’s dashboard).
Step 5: Once the collaborator has completed the section they will simple log out or go to their Home page in the breadcrumb navigation.
Important: Once the collaborator is completed with entering their information, they will need to communicate back to the applicant that they have completed. There is not an automatic notification notifying the applicant when they are completed. The only way the applicant will know is to log in and review the section that was assigned to see if it was completed.
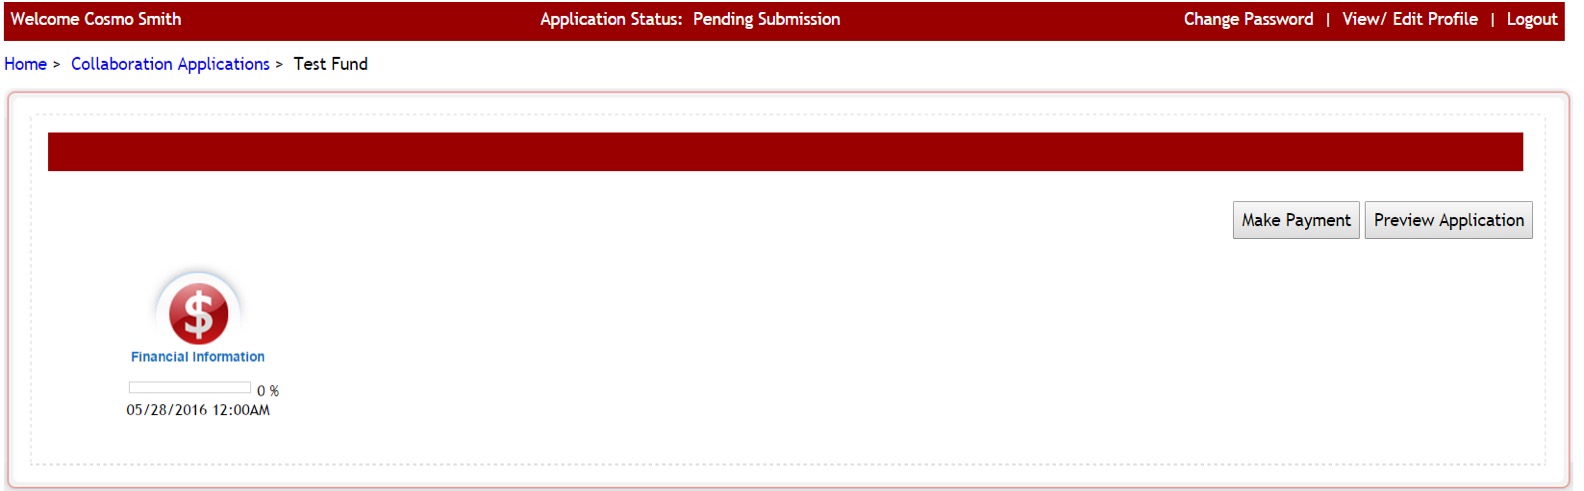
4.4 Application Payment Form
Application Payment Form allows you to accept a payment on an application if you have a fee requirement for filing of that application.
When using the Application Payment Form, the applicant will not be able to submit their application until the payment has been made.
Note: This feature requires integration with a third party payment software and will need to be set up by the CommunityForce Implementation team.
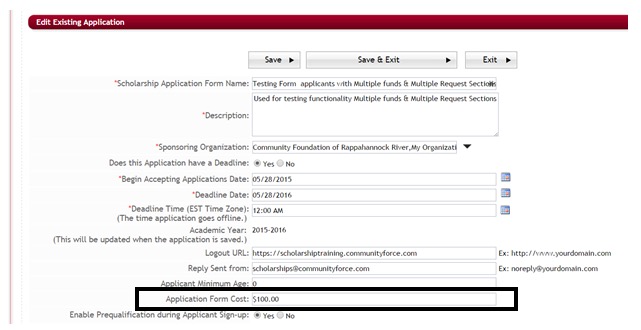
Step 1: Before using this feature the Global Admin will first have to Enable this feature in the Administration>Site Settings>General Settings, Enable Application Payments and select “yes” for this feature to be enable.
Step 2: Once it is turned on in the Site Settings, you will see in the General Information setup for your application the option Application Form Cost. Enter the amount required for the Application:
Step 3: You will need to create a question in your application, and use the Payment Gateway question type when creating that question.
Best Practice Tip: Create this question in a separate Payment and Signature section so the applicant views this on their dashboard and is aware it is a priority to complete their application process.
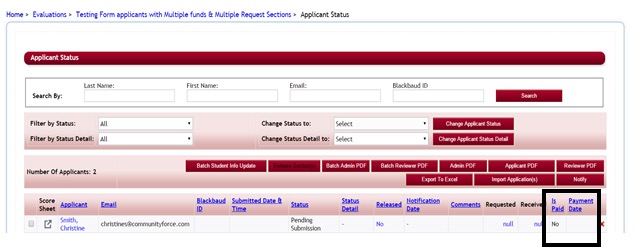
When if using this functionality, the Evaluation>Applicant Status report will show this payment information in two separate columns. Is Paid – Yes/No and the Payment Date.
4.4.1 How does the applicant make a payment
Step 1: A payment question with a button will appear to the applicant that they will click on to be directed to the payment gateway software that you are using.

Step 2: When the applicant clicks on the Make Payment button they will be directed to the following screen:
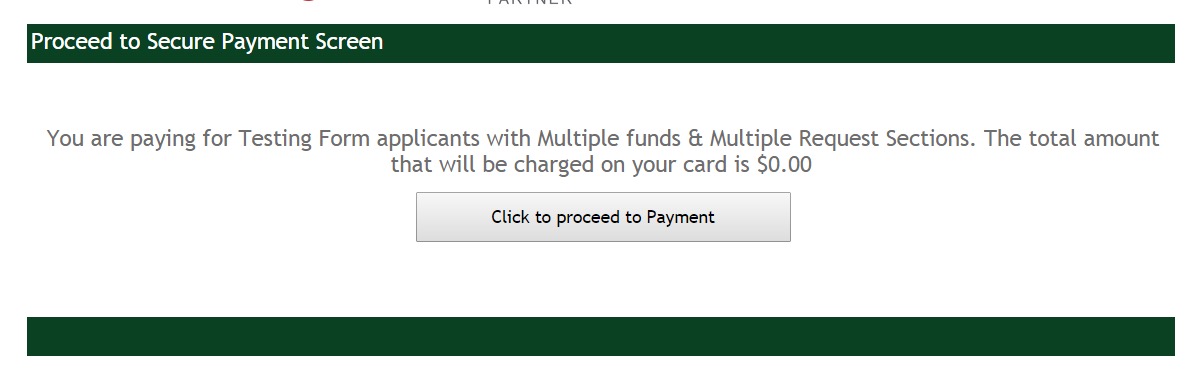
Step 3: Once they click to proceed, they will be directed to the payment software program to make the payment.
Step 4: After the applicant makes the payment, the payment software program will communicate back that the payment has been made and the button on the payment question will change on the applicant’s dashboard from Make Payment to Payment Made. The applicant can then proceed with submitting their application.
![]()
4.5 View Matching Scholarships
The View Matching Scholarships, is used in a one to one application process and allows you to have the ability for your applicant’s to be matched to additional applications that are similar based on the funding source’s eligibility criteria.
When the applicant applies to one funding source and completes that application, they will have a button on their dashboard that allows them to view matched applications for additional funding sources they may want to apply to.
The matching will require that the same criteria questions are present in all the additional funding applications.
As the applicant answers the criteria questions in one application, if that question(s) criteria’s reply is exactly the same as the reply needed to meet the criteria in another application, the applicant will be matched to that additional application.
4.5.1 Setting up the View Matching process
Exercise 1
Step 1: Create each individual application form, cloning from the Master template application or create your first application and clone all the remaining using that same application. You want all the questions needed to match criteria, the same in all your individual application forms, meaning they “must” have the same sectionxml and questionxml names to match.
In the General Information setup for each application select “yes” for the Enable View Matching Scholarship, and select “yes” for the Enable Opt In/Apply Options in View Matching Scholarship.
Step 2: For each application create your funding source in the Funding Source Setup and associate that funding source’s application to that fund setup.

Step 3: On each application form in the application’s setup dashboard, open the Manage Application Funds section and select all the other funding sources that you want to match to using this process.
Step 4: After you have set up the Manage Application Fund, you will need to set all the eligibility criteria filters for each of those addition funds only under the Manage Funds Criteria Information for that same application.

Step 5: Repeat steps 3 and 4 for every fund’s application setting all the eligibility criteria on every fund on every application.
Step 6: Once all the funds’ applications have had all the funds’ criteria set, then the applicants can begin applying and start seeing the matched applications.
4.5.2 How does the applicant apply using the View Matching Process
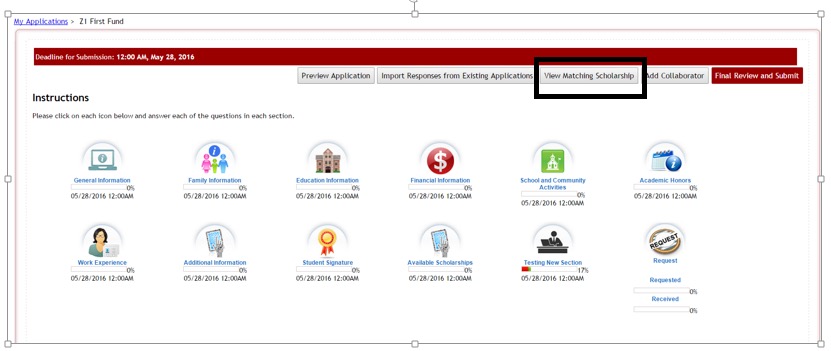
Step 1: Once an applicant selects an application and begins applying to that application, the application’s dashboard will have a “View Matching Scholarship” button.
Step 2: As the applicant completes the application and answers the common eligibility criteria questions that are present in all the applications, the system will start matching them to the other applications based on that criteria’s reply. When the applicant clicks on that View Matching Scholarship button, and a match if found a listing of those matched applications will appear:
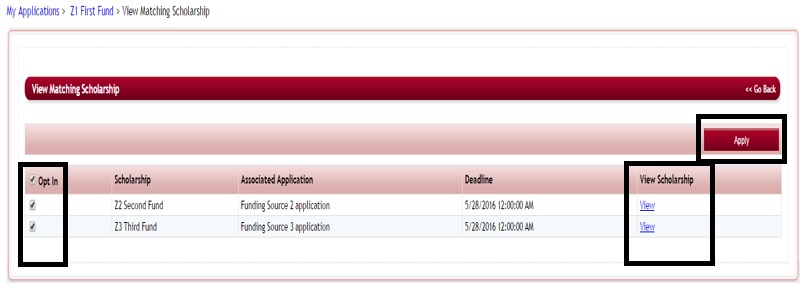
Step3: Each application that they matched to will have the “Opt In” column checked. The applicant can unselect any application they do not want to apply to. They can click on the “View” to view details about that applications funding.
Step 4: The applicant can then select the “Apply” button to apply to the selected applications.
Step 5: They will receive a message confirming they want to apply, and will need to click Continue with Apply.

Step 6: They will get the message that they have applied successfully, and can click OK.

Step 7: When the applicant clicks on their “My Applications” tab, those additional applications will now be listed. The applicant will need to click on each separate application to complete it and submit it, as well as complete and submit the originating application that they started.
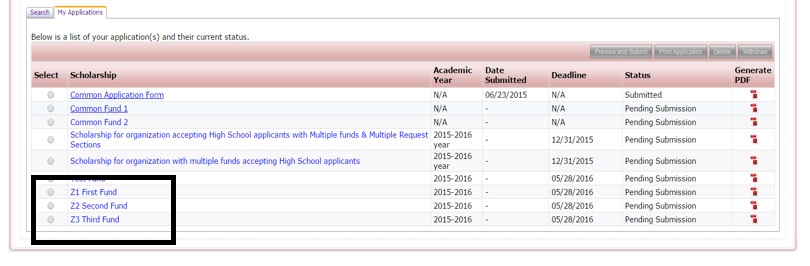
4.6 Common Application
The Common Application feature allows you to create one common application form that is used for the applicant to apply to multiple funding sources that have their own application process and require a separate application form for each of those funding sources.
Note: This is a very complex setup and recommend on an “as needed” basis only. It is recommended that you have the CommunityForce implementation assist with the setup of this feature.
When creating your Common Application you are creating “one” application and including all the sections and questions in that application that are applicable to all the funding sources and the applications that are for those funding sources.
Each funding source will required a separate application, “child” application, to be created containing only the Sections and Questions required for that funding source.
When an applicant completes the common application they hit the submit button. This will then show the applicant all the “child” fund applications that they are eligible to apply for.
Once the applicant selects all the applications they want to apply to, and clicks submit again, all the data contained in the Common application that is required for each funds separate application, is automatically pushed down to the funds “child” application.
Each separate application they selected will appear in the applicant’s “My Applications” tab. If there was no additional information and you do not require the applicant to go in on each individual application and submit, the individual applications will all show as submitted for that applicant.
However, if there is additional information for the applicant to complete in only the “child” application, then the applicant must click on that application, complete the additional items and then submit the “child” application.
4.6.1 Setting up the Common Application process
When using the Common Application process for your organization, it is required that you use a Master Template to build and clone the application forms from.
Important: Your Global admin will need to confirm that they have activated the Enable Import Responses from Existing Application by selecting “Yes” to that item in the Administration>Site Settings>General Settings. Items will not import to the additional applications unless this is selected.
Step 1: Create your Master Template application with all the required common sections and questions needed for all your organization’s applications.
If your child application has questions that only pertain to that child application, do not add those to the Master Template, as you do not want to have to remove them in every single cloned copy you make from the Master. You will create those questions in the child application only.
Make sure to include a section that contains the Matching Fund Eligibility Question. (See: Adding the Matching fund Eligibility Question).
(See: Using a Master Application Template for additional information on creating a Master Template)
Step 2: Clone your Master Template and create your Common Application form. (See Creating an Application Form – Cloning an Existing Application for additional information on how to clone an application)
The Common Application is the application the applicant’s will be looking for when applying. Be sure to name the Common Application a name that the applicant’s will understand.
Make adjustments to the General Information setup to apply to the Common Applications process, (i.e. deadline dates, instructions, etc.)
Step 3: Remove from the Common Application form, any sections and questions that do not pertain to this Common Application or the individual fund’s “child” application. Keep only those items that are necessary for all the “child” funds and the common application process.
Important: Do not add any additional items to the Common Application if they are needed in the Common application to be pushed down to the child applications. Do those additions in your Master Template first. Do not change any of the XML names on items that came from the Master Template or you will lose any import mapping (pushing) capabilities for those items.
Note: if the common application process is the only application process you use. And you only have that one common application each cycle, then create your Master Template for that process and you will not need to remove any items when it is cloned.
Step 4: After you have cleaned up the Common Application you will begin cloning the Common Application to create each one of your separate fund’s child applications.
Make sure when cloning that you adjust the General Information to apply to each separate fund’s application as those fund applications may have different deadline dates that are earlier then the Common Applications deadline.
Since the Common application has all the xml from the Master template and you did not change any of those names, when you clone the Common application, those XML names will clone with it keeping it intact with the Master Template.
Step 5: In each of the child applications remove any items that were cloned from the Common Application, that are not required for that fund’s application.
Step 6: At this point, in the child application, if you have additional items that pertain only to that child application, that the applicant will have to complete in the child application only, add those to the application now.
Step 7: In the Setup Scholarships (funding source), confirm that you have a fund setup for each separate fund that is part of the common application process. If the fund is not available you will need to set it up. Make sure that each fund is marked as “Published (Viewable to the Applicant – Yes)
Step 8: In the Associated Application for each separate fund, select the child application you created for that fund. Repeat for each fund.
Step 9: In the Setup Scholarships (funding source) create a posting fund for the actual Common application that the applicants will be applying to. For the Associated Application select the Common Application form. Make sure that this fund is marked as “Published” (Viewable to the Applicant – Yes)
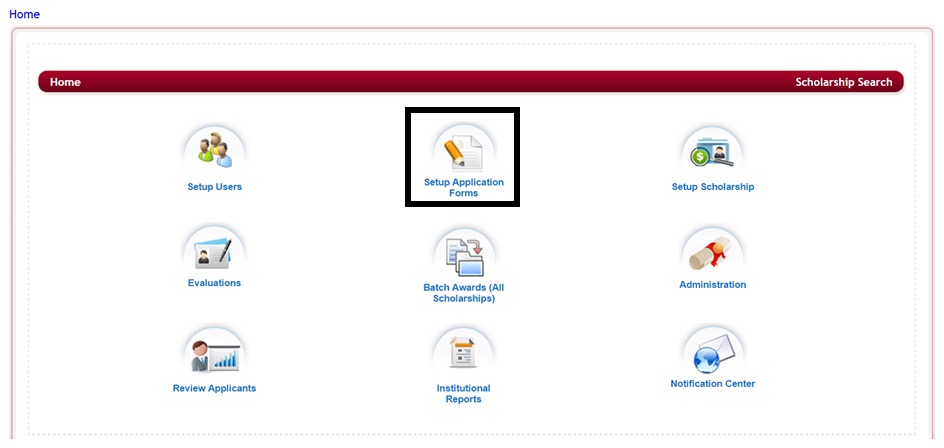
Step 10:Select from the Home Page – Setup Application Forms
Step 11: Select from the listing of applications the Common Application clicking on the name in the Application Form column.
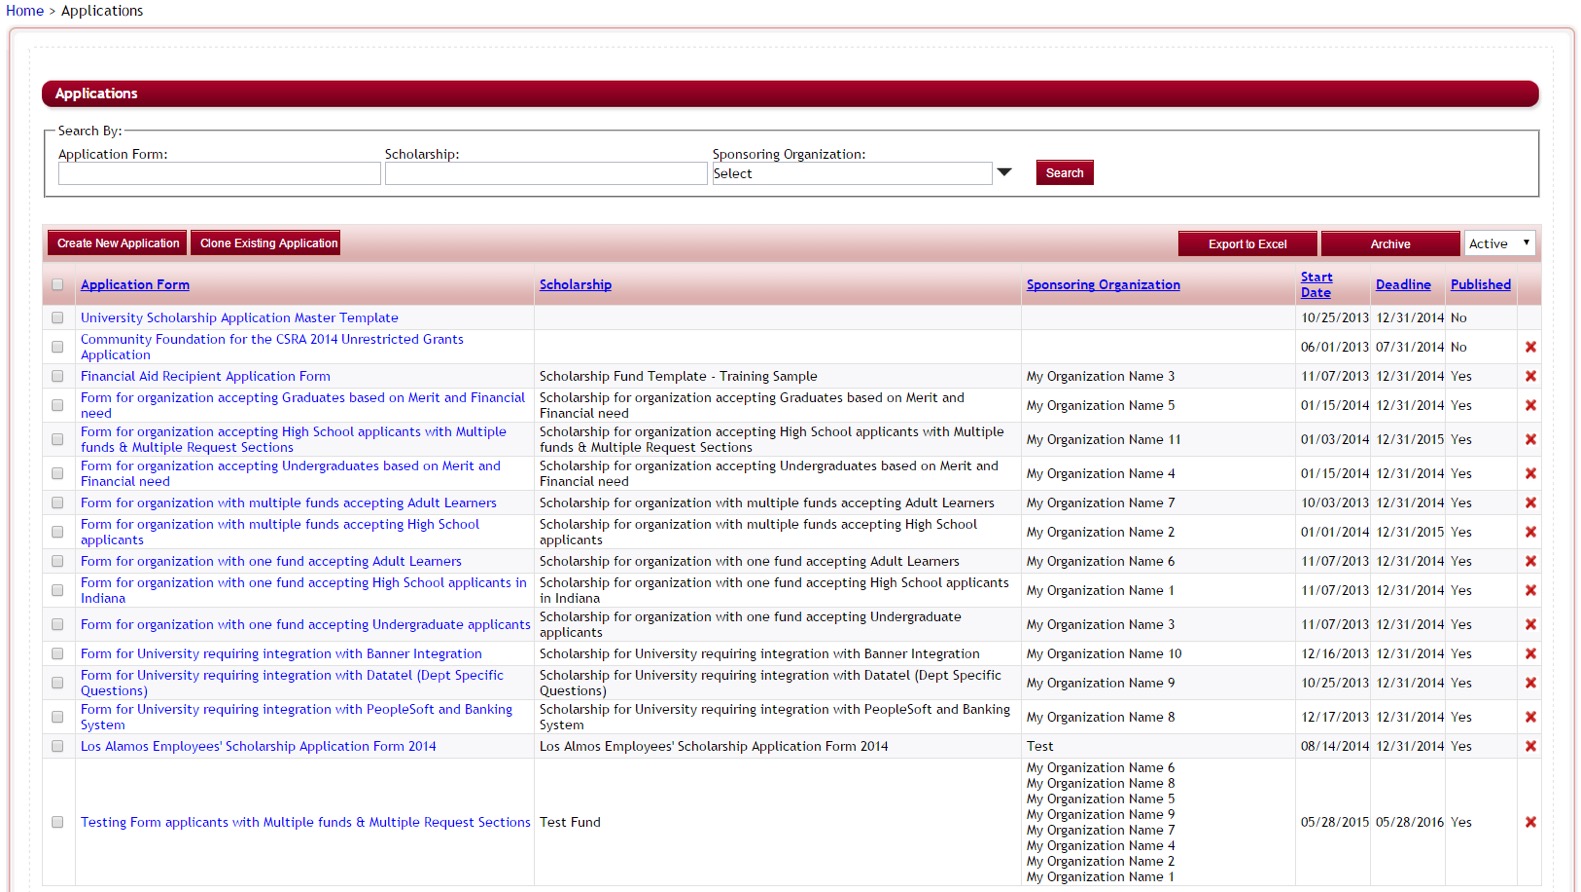
This will bring you to the Application’s Dashboard for the Common Application.
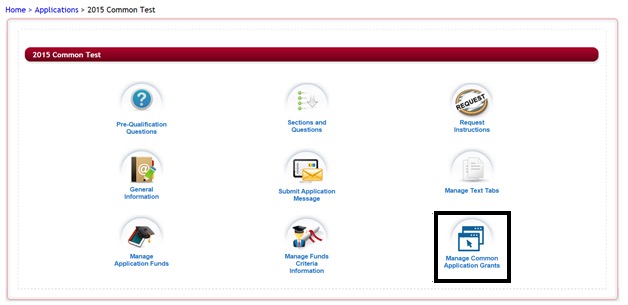
Step 12: Select the Manage Common Application Icon.
The Mange Common Applicatin Grants setup will open:

Step 13: The top two sections allow you to enter a message to the applicant so that they understand their instructions during the selection process. Enter your message using the editor box for each section.
Eligible Scholarship Information: This is the View Matching Scholarship Icon message to the applicant will see when they click on the “Scholarships Associated with this Common Application” icon on their dashboard. This message should give them instructions for that page.
Select Eligible Scholarship Instructions: This is the message that will appear on the screen the applicant sees after they submit the first Common Application:
Step 14: In the bottom section you will see two questions:
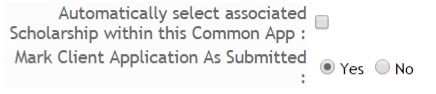
- Automatically select associated Scholarhip within this Common App: check this box if you want the system to automatically select the funds for the applicant, instead of allowing them to select.
- Mark Client As Submitted:
Yes - Select Yes if the child applications do not require any additional items to be completed on the child application level. The child application will then automatically be submitted and the applicant will not have to access the child application and submit.
No – Select No if the child applications contain additional items to be completed by the applicant. The applicant will then click on the child application in their “My Applications” tab, complete the child application, and click submit in the child application to submit that application.
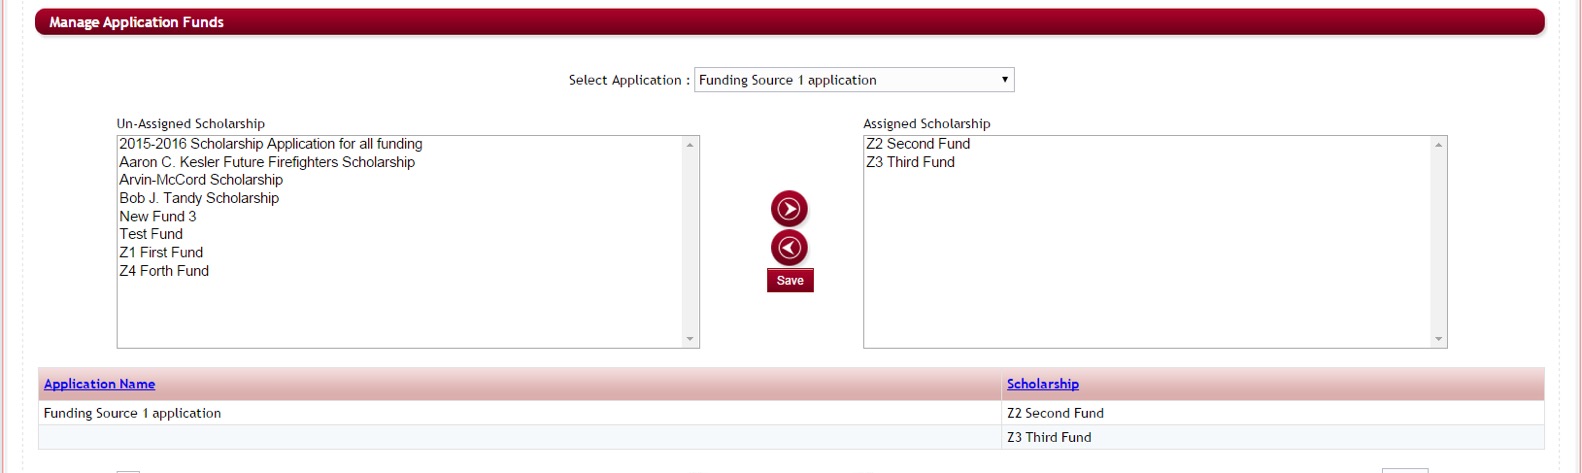
Step 15: At the Bottom will be two boxes, Un-Assigned Scholarships and Assigned Scholarships.
The Un-Assigned will be a listing of all your funds that are currently published that you can assign to your Common Application. Data from the Common application will not push to any funds application that has not been assigned to it.
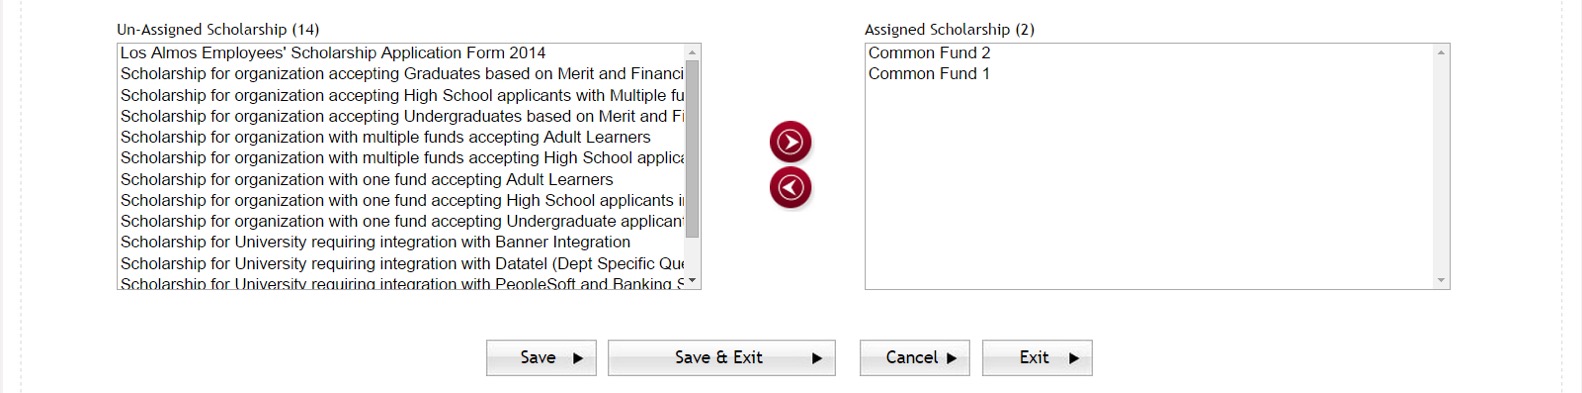
Step 16: In the Un-Assigned column, select all the Funds you have created applications for that are to be added to this common application and click on the right directional arrorw to add it to the Assigned Scholarship column. You can click the left directional arrow to move it back to the Un-Assigned.
If you do not see a fund then it was not marked as published. You will need to return to the fund setup mark it published and then assign it on this section.
Step 17: Once you have you funds assigned, click on the Save or Save and Exit to save the assignment and return to the Application’s Dashboard.
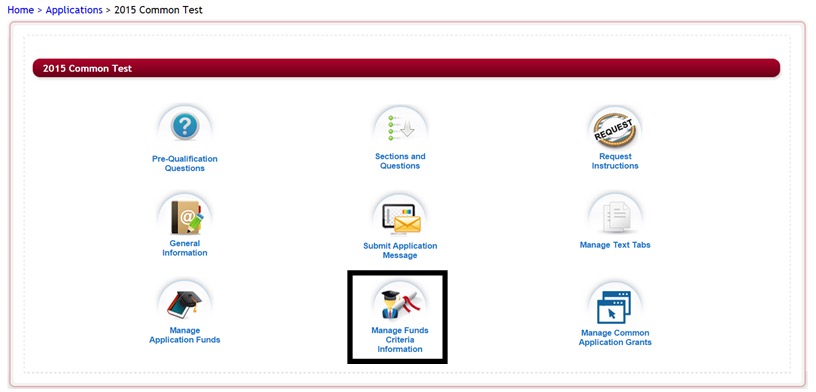
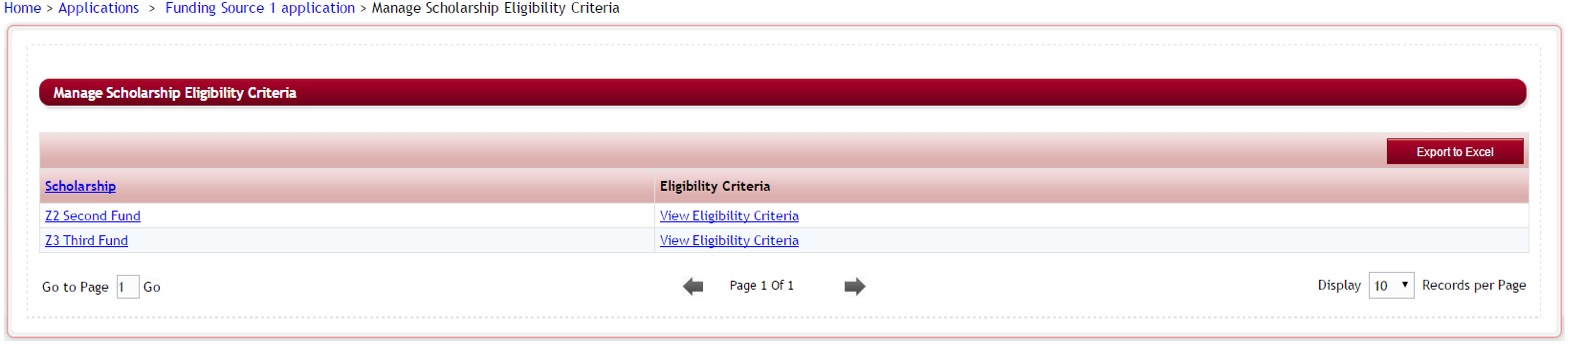
Step 18: Select the Manage Funds Criteria Information icon. The Mange Scholarship Eligibility Criteria listing the funds you just assigned will appear.
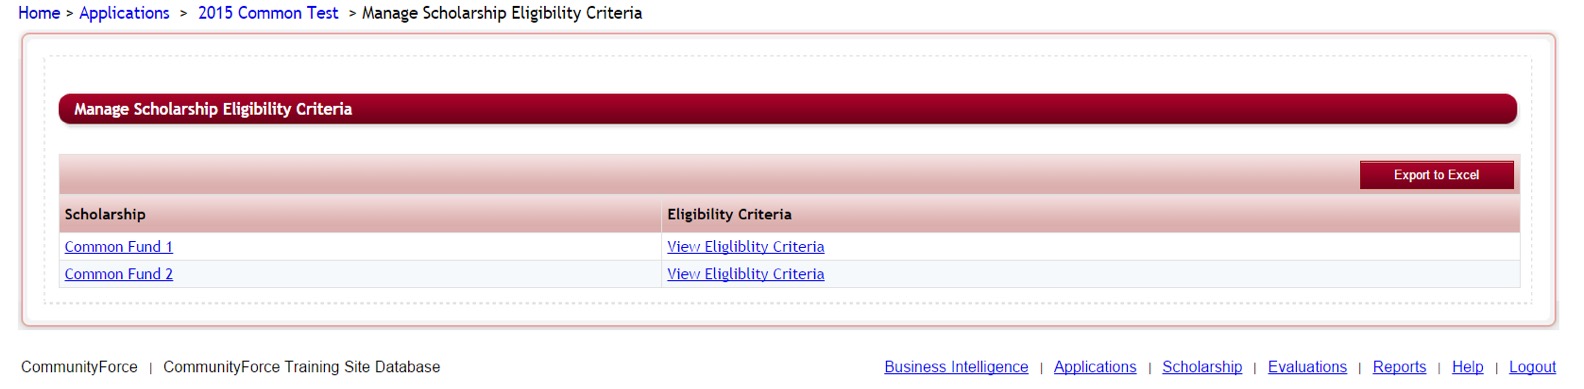
Step 19: Click on the View Eligibility Criteria for each of the funds and set the Filter conditions based on the eligibility questions contained in your Common Application.
Once the applicant answer the question according to the correct eligibility they will be matched to that specific fund and that fund will show in the selection results.
(See: Manage Funds Criteria setup for additional information on creating the criteria filters)
4.6.2 How does an applicant apply using the Common Application
Step 1: When the applicant searches for a fund that is linked to the Common Application form and clicks the “Apply” for that fund, they will directed to the Common Application form.
Step 2: The applicant would then click the “Apply” for that form and be directed to the Common Application’s dashboard to proceed with the application.
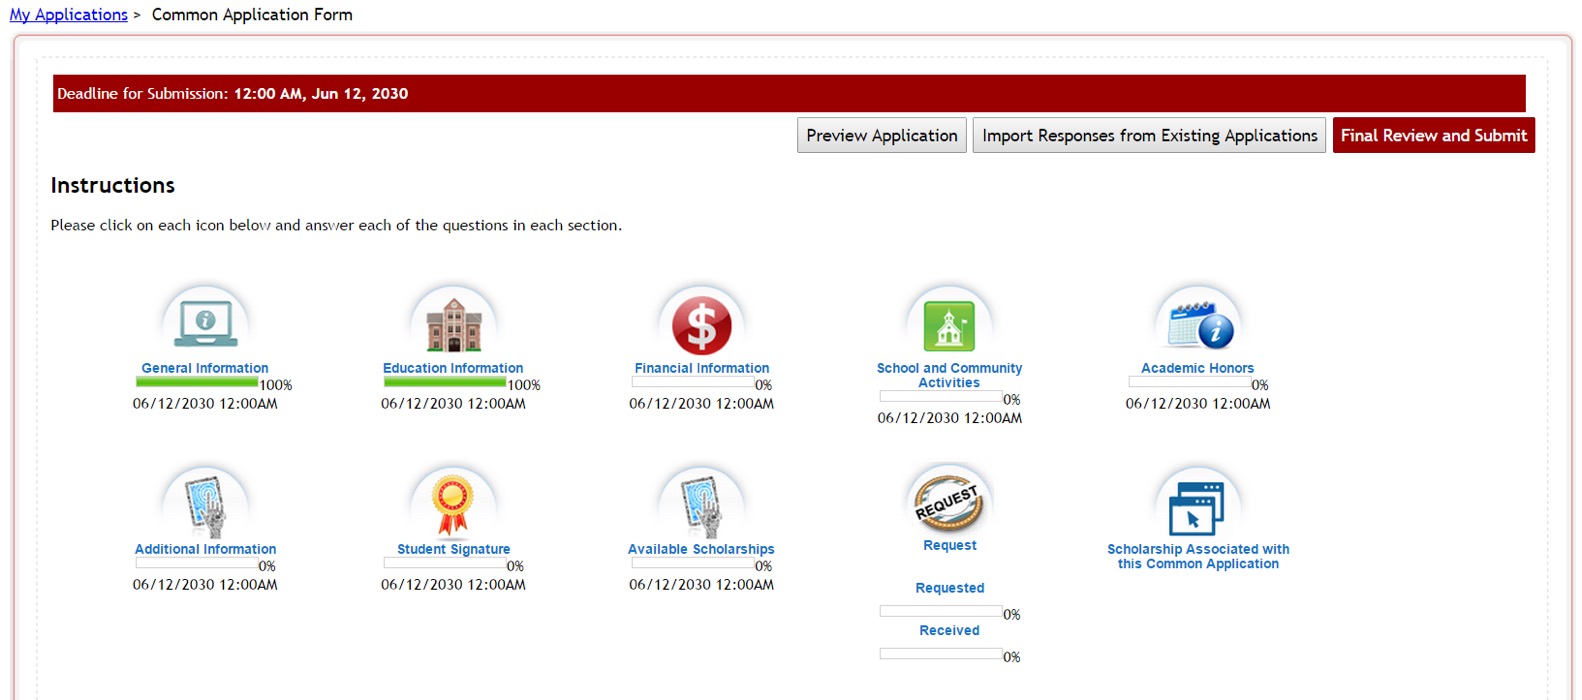
Step 3: There will be an icon on their dashboard “Scholarship Associated with this Common Application”.
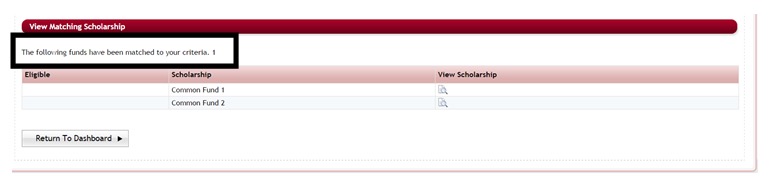
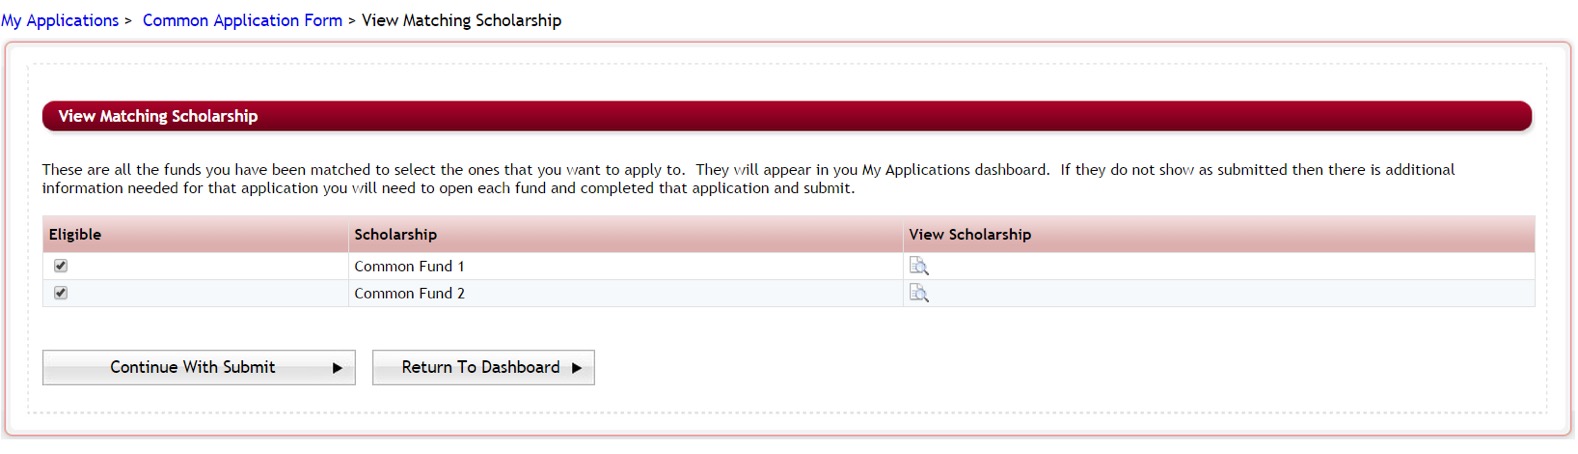
Step 4: When they click on that icon the View Matching Scholarship page will appear.

Step 5: This page is a view only page to show them what they are being matched to.
From this page they can view details about all the funds that are available by clicking on the View Scholarship icon next to the fund they want to view. This will open a new tab in their browser displaying the detail’s section for that fund that was set up in the Fund Setup.
Once an applicant completes all the questions that determine eligibility for a specific fund, if they are eligible for that fund, a check mark will appear next to the fund in this display. If they are not eligible the check mark will not appear.

Step 6: The applicant can click “Return to Dashboard” to continue completing the application. As they complete it and return to this section more funds will appear as the questions are answered.
Step 7: Once the applicant completes their application and clicks the Final Review And Submit on their dashboard
![]()
Step 8: They will receive the following System Alert message. They will need to click continue to proceed.

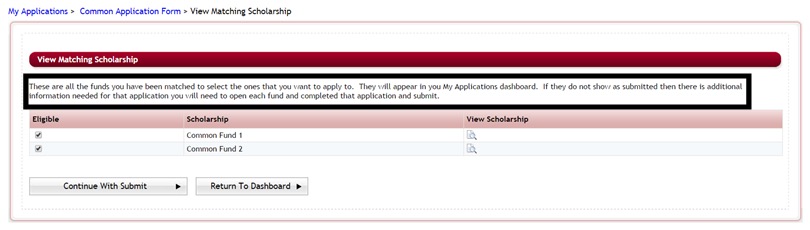
Step 9: After they click Continue, the following screen will appear:
Step 10: This screen will show the applicant the actual scholarships they will be applying for. The scholarships that are marked with a check in the box next to the name are the applications the applicant will be applying to.
Note: When setting up the Manage Common Application section of the application setup, if you selected the box on the Automatically select associated Scholarship within this Common App: the applicant will not be allowed to unselect the box for the scholarship they matched to. Once they submit those funds will automatically appear in their My Applications” tab.
If you did not select this box, then the applicant will be able to unselect the box next to any scholarship they do not want to apply to.
Step 11: Once the applicant selects (or is automatically selected), they will need to click the
Continue With Submit button to complete the submission, or
Return to Dashboard, to reconfirm replies they have made, if they feel a scholarship is not selected that should have been.

Step 12: Once the applicant clicks the Continue With Submit. They will directed to the preview of their application, where they can preview the application and check the box for the “Please Check the Check-box to confirm…” at the top of the page.

Step 13: Once they have previewed their application they can click the “Submit” to finalize the submission and receive the online submittal message. (The confirmation email will go out at this time as well.)

Step 14: When they click “Ok” on the message they will be directed to their “My Applications” tab. The separate scholarship applications will now appear in the applicant’s dashboard, with either a status of “submitted” if you selected to automatically submit when setting up the Manage Common Application section, or they will show with Pending Submission. If they are not submitted, the the applicant will need to go in on each separate application and completed it before it is considered submitted.