There can only be one application designated as the Master Application.
The Master Template can then be used for cloning new applications going forward. Any changes that are made to the Master Application template can then be pushed down to any active applications that have been cloned from it.
A Master Application should be used with all External System Integrations.
If you have multiple applications that are similar in most sections, (i.e. General Information, Family Information, Financial Information, Letters of Recommendation, etc.), but a few minor changes in others, it is best practice to create a master application that contains all the necessary sections for all those applications.
You would also want to use a Master Application if you have multiple applications that are similar and you want the applicant’s information to be able to be imported from one application to another.
If you have a Master Application Template and need to make an update to a section in your application that affects all your applications going forward, you can make that update to the Master Template and then push that change down to the appropriate applications. When you push changes to applications they must be unpublished, with a future deadline date in order to accept the change.
Exercise 1
Step 1: Build your Master Template Application adding all the required sections and questions needed for your cloned applications. In the General Setup select the No Deadline Option as this will not require a deadline date.
Note: When cloning your application all the email templates from the Master Template will clone as well as the evaluation process tasks. If all are similar for each application, you might find it beneficial to add those to the master template prior to cloning your applications to keep from having to re-create them again in the cloned applications. This is only beneficial for cloning the Applications, note though, that when pushing changes from the Master Application, the only changes that push are to the Application Form only, not other items can be updated.
Step 2: Once you build your Master template application you will need to have your Global Admin set that Application as the Master Template. (This is only a Global Admin functionality, no other role type can perform this functionality) (See: Setting the Master Template Application)
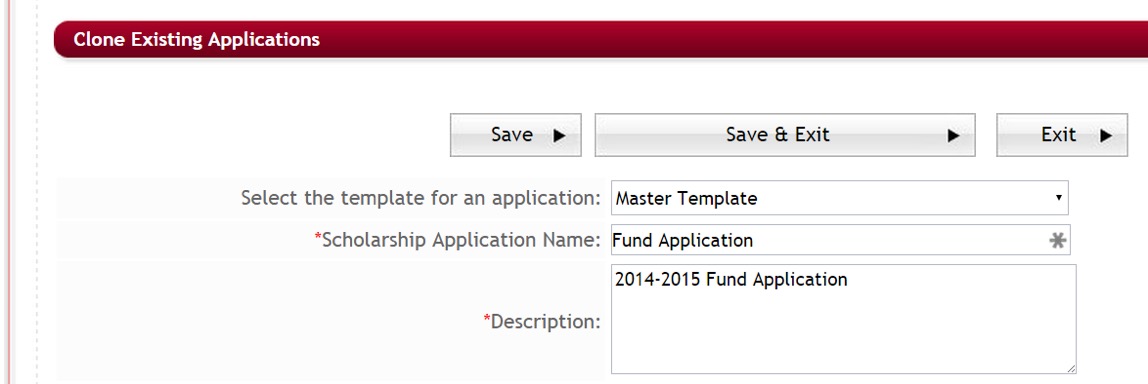
Step 3: Use the Master Template to clone your actual applications. When cloning select the Master Template in the “Select the Template for an Application”.
This will make an exact clone of the Master Template you have built, including all the sections and questions, email templates, messages, and evaluation setup that you have created in the Master Template. Note: Ad hoc reports and fund management will not clone.
Step 4: When cloning make sure to adjust the General Information setup to fit the new application (i.e. application name, deadline dates, Instructions, etc.).
Step 5: Make any needed adjustments to the Sections and Questions in your new application. You can add sections and questions, as well as delete sections and questions. You will also want to make the adjustments for this application in all the other setup items in the Application’s Dashboard and the Evaluation Setup that are not required for this application.
Important: Use extreme caution not to change xml names for items that you keep from the Master Template. (See: Importance of the XML name in the Master Template)
Step 6: Once you have cloned the applications and made all the required adjustments to them, if they are active and you need to make a universal change to a question or section that was cloned down from the Master Template, you will always make the change in the Master Template and then push the changes down to the appropriate applications (See: Pushing Changes from the Master Application) Remember though that only changes to the actual application form (Sections and Questions) will be pushed, all other items will have to be adjusted in each individual application.
3.1 Importance of the XML Name in the Master Template
Using the Master Template to clone other applications will keep all the XML Names consistent throughout all your sections and questions for all your cloned applications.
XML names are how the system maps one item to another.
When pushing changes from the master template, it will look for that same XML name in the cloned application. When if finds the match, it will make the appropriate change. Therefore, it is important to remember, if you change any XML name that originated from the Master Template, you have broken the link to the Master Template for that specific item and the Master Template will not be able to make any changes to that item, as it will not be able to map to it.
To help keep consistency in your XML names. When creating your Master Template it is a best practice to add the MT in front of every XML Section Name and Question Name. That way when you are in a cloned application you will know exactly what was cloned down from the Master Template and what was added to the application later and not part of the Master Template.
For Example:
Section Names: for the General Information Section, use the XML name MTGeneralInformation.
Question Names; for the First Name, enter the xml name as MTFirstName,
Remember, XML names are not the name the applicant views, they are only for internal purposes only.
3.2 Setting the Master Application (Must Have Global Admin Access to Perform)
The Set Master Application feature allows you to set an existing application as the Master Template. There can only be one application designated as the Master Application. The Master Template can then be used for cloning new applications going forward.
A Master Application should be used with all External System Integrations.
Setting up a Master Template is only available to Global Admins. The setting for this located in the Manage Site Setting under the Administration Dashboard.
Exercise 1
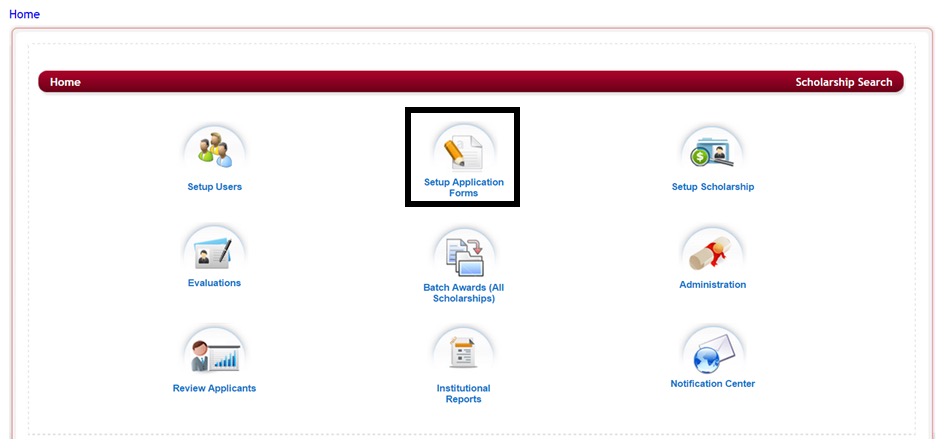
Step 1: Select from the Home Page – the Administration icon (If you do not see the Administration Icon on your dashboard you do not have authority to perform this function. Please see your Global Admin for assistance)
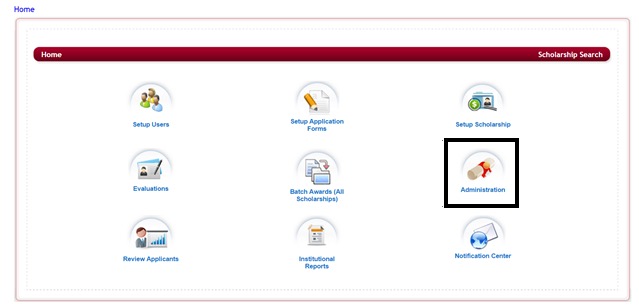
This will open the Administration Dashboard
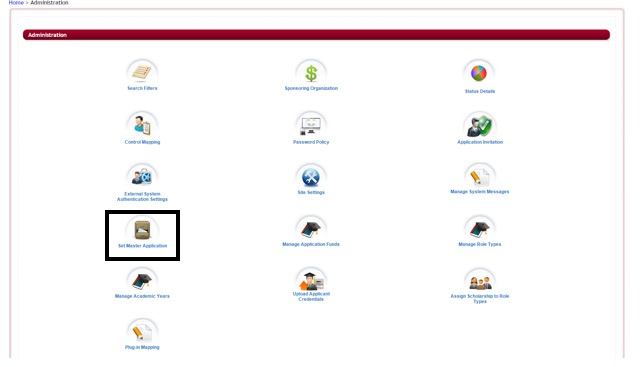
Step 2: Select the Set Master Application Icon
This will open the Set Master Application setup screen. The Current Master Application should be blank if you have not set a Master application already.
Note: If there is a current Master Application, already, then changing it will only push any new changes down to applications that are then cloned from the new Master Application. Any applications that were previously cloned from the prior Master Application, will no longer have any new changes pushed down that are created in the new Master application.
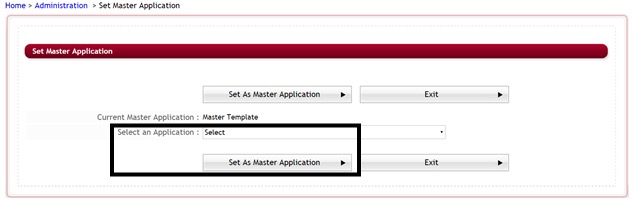
Step 3: Click the Drop down arrow in the “Select an Application” and select the Master Template that was created.
Step 4: Click the Set As Master Application button
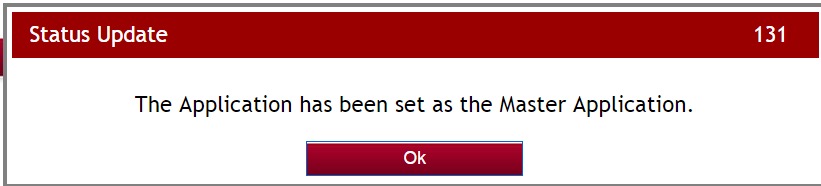
Step 5: Click OK on the Status update.
“The Current Master Application” should now show the name of your Master Template.
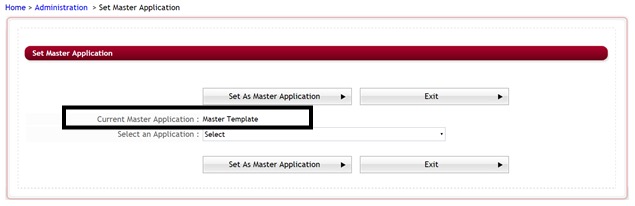
Step 6: Click exit to complete the setup and return to the Administration Dashboard.
3.3 Pushing Changes from the Master Application
When you are using a Master Template to clone your applications, anytime that you need to make a universal change to all your active applications, you will want to make the change in the Master Template first and then push those changes down to your applications.
Important: This willonly push to applications that were cloned from the Master Template and in the following status: (in both scenarios the published column would need to show as NO for the application form.)
- All Active Applications who don’t have a fund associated and have an End Date and time greater than the current date and time (The published column in the application listing would show as No as no fund has been associated)
- All Active applications who have unpublished funds Associated and have an End Date and time greater than the current date and time. (The published column in the application listing would show as No as the fund associated has not yet been marked as published)
It is recommended that once you start your application process that no additional questions be added to the application, therefore it is best to do this push prior to releasing your applications to the applicants.
When pushing changes from the Master Application you can choose to push all the originating items from the Master Application down to the cloned applications, or just specific sections and/or questions.
Exercise 1
Step 1: Select from the Home Page – Setup Application Forms
Step 2: Select your Master Template application in the listing of applications by clicking on the name in the Application Form column.
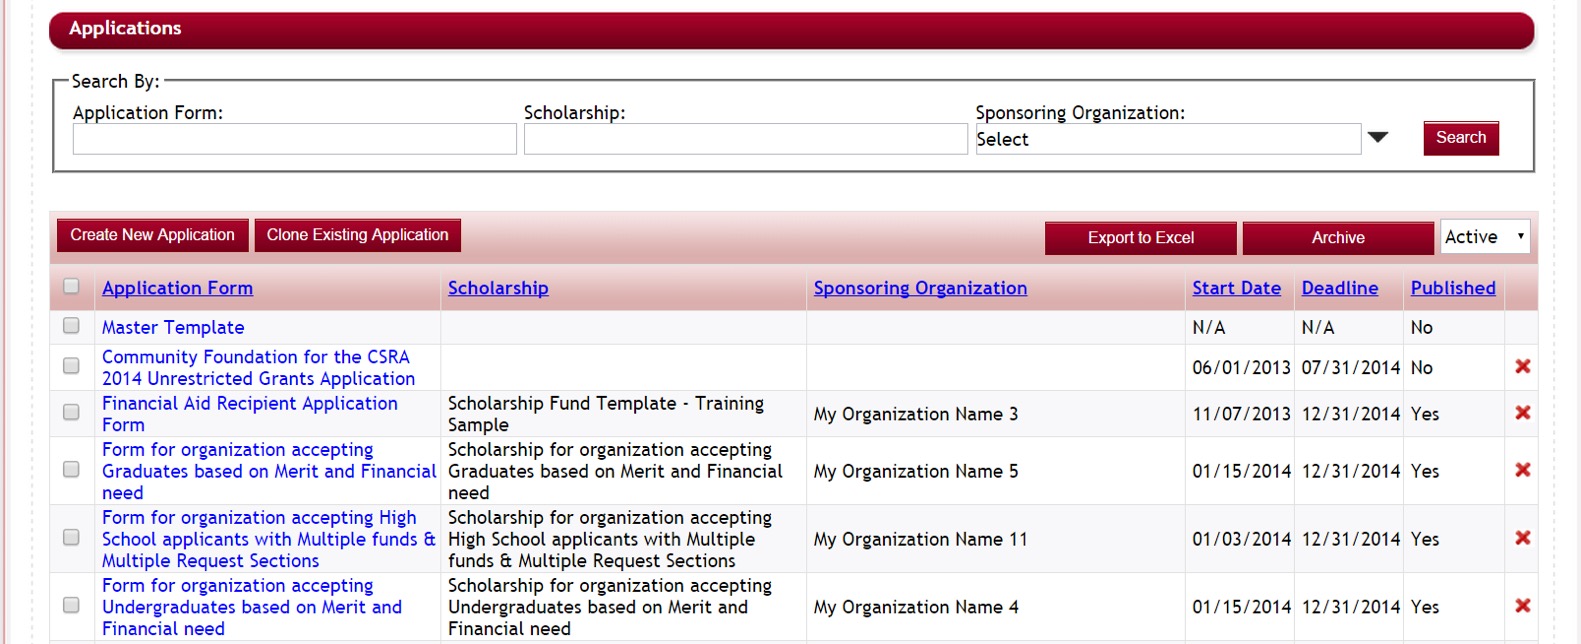
This will bring you to the Applications Dashboard.
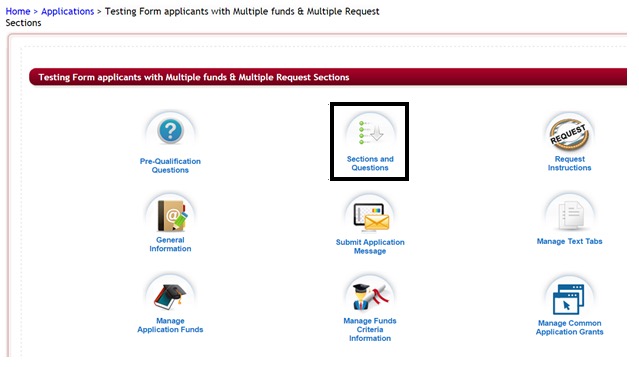
Step 3: Select the Sections and Questions Icon.
This will open the Sections page, listing all the available sections in your Master Template application.
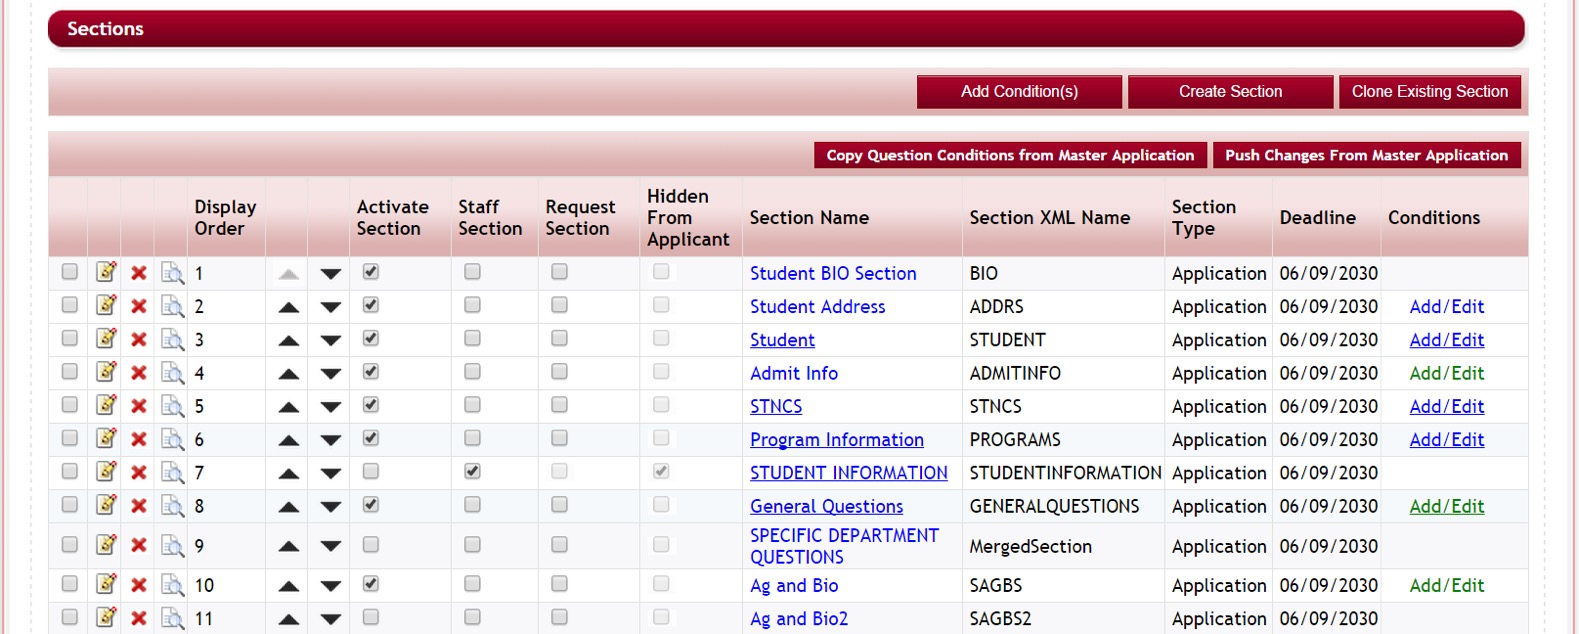
Step 4: Make all your necessary changes to the Sections as well as to any Questions within your sections that need updated.
Step 5: Once all your changes have been completed return to the Section listing page to begin the Push Changes process.
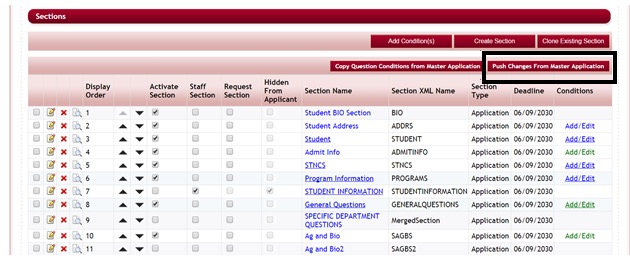
Step 6: Click the Push Changes From Master Application button
![]()
This will open the Push Changes From Master Application selection page:
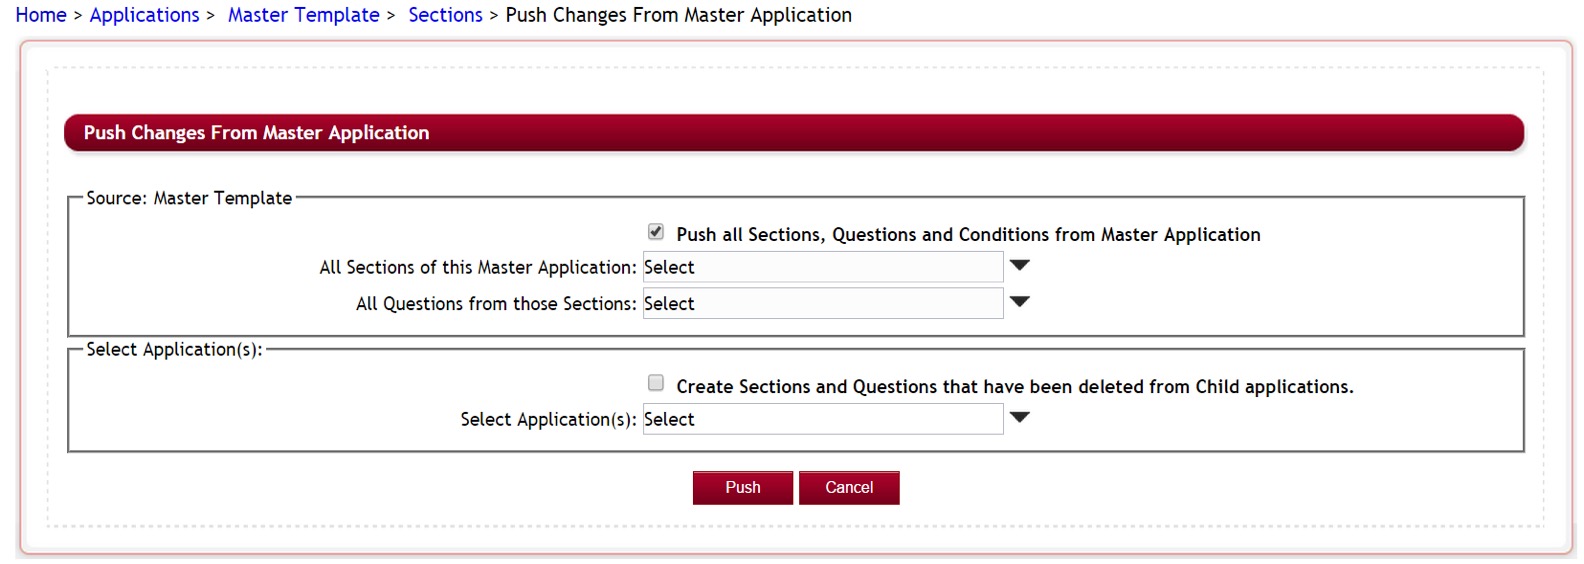
Step 7a: Source: Master Template: If you want everything that has been updated in the Master Template, from the beginning of its creation, not just the changes you made, to be pushed put a checkmark in the Push All Sections, Questions and Conditions from Master Template.

This will push all the changes to all the applications that have been cloned. (This is selected by default, you will need to uncheck it if you are only selecting specific changes be pushed.) The following scenarios will happen if you select the “Push all” feature:
- All Active Sections along with their questions from the master application will be pushed to the child applications. By push we mean that if the sections and questions are present, then they will be updated, or else they will be created in the target application.
- Sections and questions pushed from master application will appear in the same order in target applications as that of master application. The individual sections and questions belonging to target applications only (meaning after the application was cloned and you added additional sections) will appear after the sections and questions pushed from master application.
- Sections conditions and question conditions will be copied over to target applications. Only those conditions will be copied over to target applications that have the related sections and questions present in the target application. By related sections and questions we mean condition referring to section and question in master application has to be present in target application with the same sectionxmlname and questionxmlname.
- Existing conditions will remain there and the conditions from master application will be added at the end with new grouping than that of the conditions already present in child applications.
- Linked questions, DependentDropDown Condition, Calculation Question will be copied over to the target application, but their dependencies should relate section and questions present in target application same as conditions.
Step 7 b: However, you may not want to push all of your changes. If that is the case uncheck the box and proceed with selecting the specific Sections and Questions that you want to push.
Step 8: If not pushing all, click on the dropdown arrow in the All Sections of this Master Application and select all the Sections that contain the changes you are making. Selecting just the selected sections pushes using the following scenarios:
- All Selected Sections along with their questions from the master application will be pushed to the child applications. By push we mean that if the sections and questions are present, then they will be updated else they will be created in the target application.
- All Sections and questions relating to master application will appear in the same order in target applications as that of master application. The individual sections and questions belonging to target applications will appear after the sections and questions pushed from master application.
- Sections conditions and question conditions will be copied over to target applications. Only those conditions will be copied over to target applications that have the related sections and questions present in the target application. By related sections and questions we mean condition referring to section and question in master application has to be present in target application by same sectionxmlname and questionxmlname.
- Existing conditions will remain there and the conditions from master application will be added at the end with new grouping than that of the conditions already present in child applications.
- Linked questions, DependentDropDown Condition, Calculation Question will be copied over to the target application, but their dependencies should relate section and questions present in target application same as conditions.
Step 9: Click on the dropdown arrow in the All Questions from those Sections and select all the Questions that have the changes you are making for the sections you chose above. Selecting just the selected sections pushes using the following scenarios:
- User will be able to select individual questions only if he selects a single section in the section drop down
- Questions will be pushed to target applications only if their section exists in target applications.
- Question conditions will be copied over to target applications. Only those conditions will be copied over to target applications that have the related sections and questions present in the target application. By related sections and questions we mean condition referring to section and question in master application has to be present in target application by same sectionxmlname and questionxmlname.
- Existing conditions will remain there and the conditions from master application will be added at the end with new grouping than that of the conditions already present in child applications.
- Linked questions, DependentDropDown Condition, Calculation Question will be copied over to the target application, but their dependencies should relate section and questions present in target application same as conditions.
Step 10: Select Applications: If you want to recreate all the sections and questions that were originally removed from your cloned applications and have those added back into the cloned applications, then check the Create Sections and Questions that have been deleted from Child Applications.
Otherwise do not check it. If it is not checked, then sections and questions deleted from the child applications, after they were cloned, will not be recreated in the child applications.

If this is not checked, only the newly created sections/questions in the Master template and existing sections/questions with the same xml in the child applications will be pushed down.
Step 11: Click on the dropdown arrow in the Select Application(s) and select all the applications you want to push your changes to.
Only the unpublished, active applications will appear.
Step 12: Confirm that you have selected everything you want updated correctly as this cannot be undone.
Step 13: Click the Push Button to push your changes.
3.4 Copying Question Conditions from Master Application to Child Application
When pushing data from the Master Application you also can choose to copy all the logic conditions that are set on questions in a specific section in the Master Template to it’s child applications.
This is useful if you cloned just a single section from the Master template, when you initially clone just the single section the conditions will not clone, therefore if cloned from the master template, you can then go in and click the “Copy Question Conditions from Master Application” choose that section and then have all the conditions added to the section in your new application, as well.
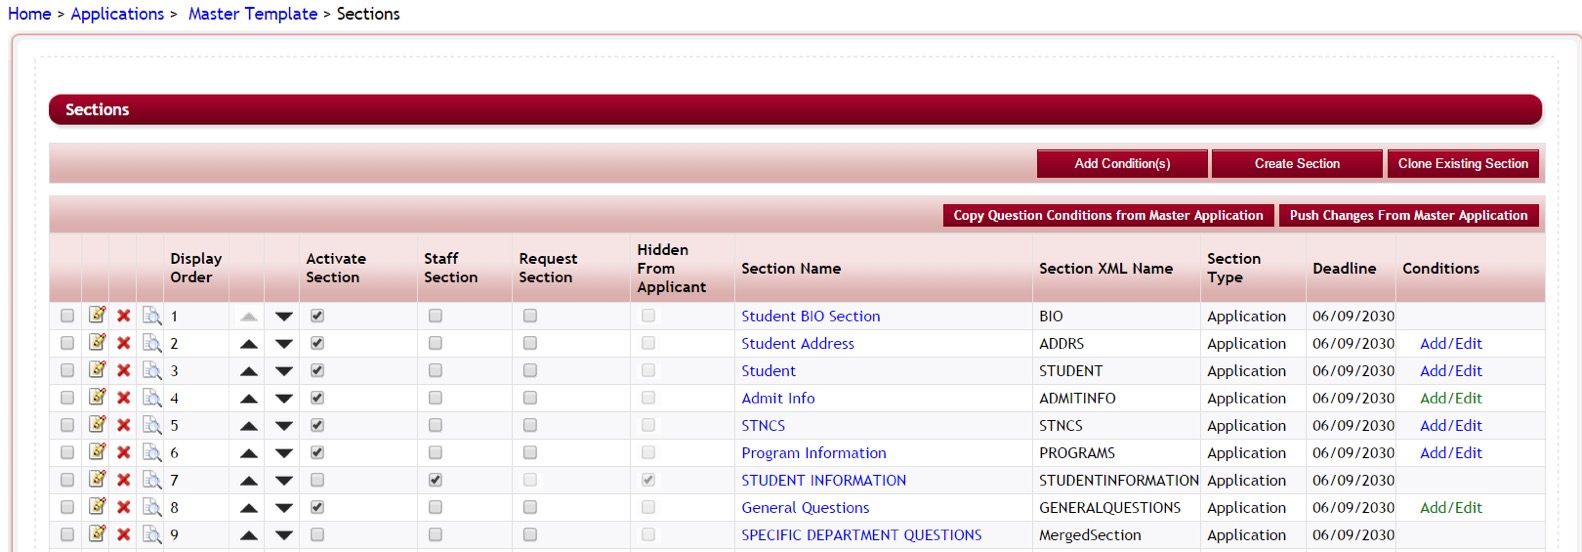
Step 1: While in the Section listing page for the Master Template Click on the “Copy Question Conditions from Master Application” button
![]()
Step 2: This will open the Copy Question Conditions from Master Application to Child application selection page:
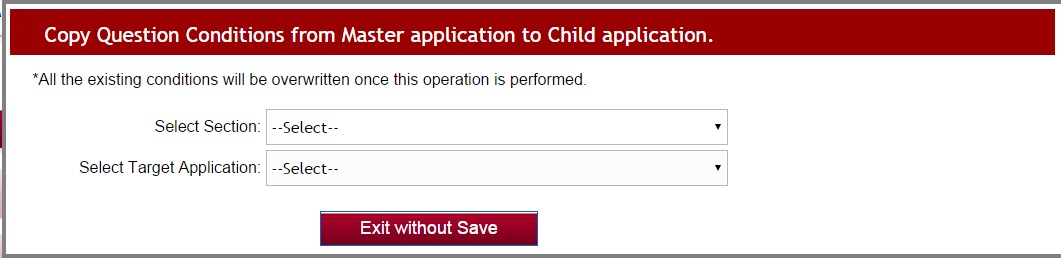
Step 3: Select the Section that you want to copy the conditions on.
Step 4: Select the Target Application you want the conditions to be copied to.
Step 5: A message will appear stating all the existing conditions from the Master template will be overwritten to that section. Click continue to proceed.

All the conditions will then be pushed to the section in the Target Application.